Quantcast
Channel: cyotek.com Blog Summary Feed
Viewing all 559 articles
Browse latest View live

Getting the hWnd of the edit component within a ComboBox control

$
0
0

I'm currently in the process of dusting off the bugs from a tool written back in 2011. One of the bugs involves an editable ComboBox control paired with a separate Button control. When the button is clicked a popup menu is shown, and when an item in this menu is clicked, the text of the ComboBox is updated.

The problem with this scenario is by default, as soon as the ComboBox loses focus, the SelectionStart, SelectionLength and SelectedText properties are reset, thus preventing my little menu from replacing the selected text. While this article doesn't solve this problem (I'll save that for the next article!), it does describe how you can get the hWnd, or window handle (in .NET terms the Handle) of the edit component, thus opening the door for a little Win32 API fun.

There are various approaches to doing this - you could use FindWindow and search for a child window with a class of edit, or use SendMessage with the CB_GETCOMBOBOXINFO message. Or, easiest of all, we can use the GetComboBoxInfo function.

A simple demonstration application

Interop Declarations

Using this API is very simple, as there's one method and two simple structs.

[DllImport("user32.dll")]
public static extern bool GetComboBoxInfo(IntPtr hWnd, ref COMBOBOXINFO pcbi);

[StructLayout(LayoutKind.Sequential)]
public struct COMBOBOXINFO
{
  public int cbSize;
  public RECT rcItem;
  public RECT rcButton;
  public int stateButton;
  public IntPtr hwndCombo;
  public IntPtr hwndEdit;
  public IntPtr hwndList;
}

[StructLayout(LayoutKind.Sequential)]
public struct RECT
{
  public int left;
  public int top;
  public int right;
  public int bottom;
}

Calling the API

There is one (well, many, but lets start simple!) caveat which you may fall foul of if you are new to Win32 API programming - often the contents of structs need to be initialized with their size first. But how to you know how big a structure is? Lucky for you, you don't need to calculate it manually - the Marshal.SizeOf function will handle this for you.

If you forget to set the size, then the structure simply won't be populated.

NativeMethods.COMBOBOXINFO info;

info = new NativeMethods.COMBOBOXINFO();
info.cbSize = Marshal.SizeOf(info);

if (NativeMethods.GetComboBoxInfo(control.Handle, ref info))
{
  // the info structure is now populated, go wild!
}

Getting the edit control handle

With the above in place, then getting the handle of the edit component is very straightforward.

private IntPtr GetEditHandle(ComboBox control)
{
  NativeMethods.COMBOBOXINFO info;

  info = new NativeMethods.COMBOBOXINFO();
  info.cbSize = Marshal.SizeOf(info);

  return NativeMethods.GetComboBoxInfo(control.Handle, ref info) ? info.hwndEdit : IntPtr.Zero;
}

Bear in mind that the edit control is a Win32 control - not a managed .NET control. In order to do anything with this therefore, you need to use additional Win32 API methods, or perhaps bind it to a NativeWindow class for easy subclassing. I'll briefly cover some of this in a future article.

Other goodies

The COMBOBOXINFO structure has other information, such as the handle of the list control, which you see if you set the DropDownStyle property of the ComboBox to Simple and the state of the dropdown button. You can view the MSDN Documentation to learn more about the structure.

Downloads

All content Copyright (c) by Cyotek Ltd or its respective writers. Permission to reproduce news and web log entries and other RSS feed content in unmodified form without notice is granted provided they are not used to endorse or promote any products or opinions (other than what was expressed by the author) and without taking them out of context. Written permission from the copyright owner must be obtained for everything else.
Original URL of this content is https://www.cyotek.com/blog/getting-the-hwnd-of-the-edit-component-within-a-combobox-control?source=rss.


Visual Studio Extension for adding multiple projects to a solution

$
0
0

Background

My solutions have lots of references to other projects, either common libraries or unit testing libraries. Neither of these scenarios lend well to manual binary references or NuGet packages, so I have lots of source code projects loaded for each solution.

When creating a new solution (or retro fitting an existing solution to use new libraries), I end up using File | Add | Existing projecta lot. As I was curious about how extensions in Visual Studio worked, I decided to write a very simple one to ease the grunt work of adding multiple common projects.

The last time I wrote an extension (or addin as they were called back then :)) for an IDE was vbCodeShield for Visual Basic 6 and that was years ago. I was incredibly surprised to find that writing an extension for Visual Studio is pretty much the same as it was (if not worse) - a horrible mass of unintuitive COM interfaces and clunky code. Whatever happened to the managed dream?

On the plus side, they are much easier to debug than I remember VB6 addins being. Or at least, they would be if Resharper didn't raise continuous exceptions while running in Visual Studio's Experimental Instance.

Almost Ranting

Still, I created the extension without too much pain, although I have to say it's some of the code I'm least proud of, and I'm certainly not going to walk through the code on this blog.

I gather you're supposed to use WPF to write extensions, but well... I wasn't going to learn WPF and the DTE at the same time. I actually tried (the aborted attempt is still in the source tree) to use a WPF dialog as recommended by the MSDN docs, but after finding simple things like checked list boxes (or even just list views with checkboxes) seemed to have a learning curve equal to the Moon landing, I went back to Windows Forms and had it knocked up in no time.

The code is messy, isn't using WPF, doesn't have a great deal of exception handling, and is full of artefacts from the wizard generation. But, it does seem to work.

Using the extension

Accessing the extension

To use the extension, open the Tools menu and choose Add Projects. This will open a lovely unthemed Windows Forms dialog containing an empty list of projects.

Adding a single project to the MRU

To add a single project to the list, click the Add File button then select the project you want to include.

Adding multiple projects to the MRU

To add multiple projects to the list, click the Add Folder button, then select a folder. After you've selected a folder, all projects in this folder and its subfolders will be added to the list.

Removing projects from the MRU

You can remove projects from the list, just select them and press the Delete key or the Remove button.

Adding projects to your solution

Using the extension

Just place tick each project you want to add to your solution, then click the OK button. It will then try and add each selected project to your solution, skipping any that are already present.

Configuration Settings

The settings for the extension are saved into an XML file located at %AppData%\Cyotek\VisualStudioExtensions\AddProjects\config.xml.

<?xml version="1.0"?><ExtensionSettings xmlns:xsi="http://www.w3.org/2001/XMLSchema-instance" xmlns:xsd="http://www.w3.org/2001/XMLSchema"><Filter>C# Projects (*.csproj)|*.csproj|All Files (*.*)|*.*</Filter><Projects><string>C:\Checkout\cyotek\source\Libraries\Cyotek.ApplicationServices\Cyotek.ApplicationServices.csproj</string><string>C:\Checkout\cyotek\source\Libraries\Cyotek.ApplicationServices.Commands\Cyotek.ApplicationServices.Commands.csproj</string><!-- SNIP --><string>C:\Checkout\cyotek\source\Libraries\Cyotek.Windows.Runtime.Support\Cyotek.Windows.Runtime.Support.csproj</string><string>C:\Checkout\cyotek\source\Libraries\Cyotek.Windows.Runtime.Testing\Cyotek.Windows.Runtime.Testing.csproj</string></Projects></ExtensionSettings>

The Filter element lets you specify the filter for the Add File dialog, and is also used by Add Folder to search for appropriate files - if you write in Visual Basic rather than C# you'll probably want to change the filter to be vbproj rather than csproj!

The Projects element stores the MRU list of projects.

Closing

That's pretty much it - it's a very simple extension, but potentially a starting point for something more interesting.

Downloading

The best place to get the extension is from the extension page on the Microsoft Visual Studio Gallery. This also ensures you get notifications when the extension is updated. (Don't forget to post a review!)

You can also grab the source directly from our GitHub page.

Legacy links available below are no longer maintained.

History

  • 12Oct2013 First published
  • 14Oct2014 Updated to include Visual Studio Gallery and GitHub links

Downloads

All content Copyright (c) by Cyotek Ltd or its respective writers. Permission to reproduce news and web log entries and other RSS feed content in unmodified form without notice is granted provided they are not used to endorse or promote any products or opinions (other than what was expressed by the author) and without taking them out of context. Written permission from the copyright owner must be obtained for everything else.
Original URL of this content is https://www.cyotek.com/blog/visual-studio-extension-for-adding-multiple-projects-to-a-solution?source=rss.

Cyotek Add Projects Extension updated for Visual Studio 2013 RTM

$
0
0

In my last post I introduced Cyotek Add Projects, a simple extension for Visual Studio that allowed you to add multiple projects to a solution.

However, I'd left the VSIX manifest version at 11.0, meaning it would only install on Visual Studio 2012. I've updated this so that it should install on Visual Studio 2012 or higher - certainly it's now installed on my fresh install of Visual Studio 2013.

I've made no other code changes so I haven't updated the source archive (I'll save that for the WPF overhaul!), but just updated the VSIX file, which you can download below.

Downloading

The best place to get the extension is from the extension page on the Microsoft Visual Studio Gallery. This also ensures you get notifications when the extension is updated. (Don't forget to post a review!)

You can also grab the source directly from our GitHub page.

Legacy links available below are no longer maintained.

History

  • 18Oct2013 First published
  • 14Oct2014 Updated to include Visual Studio Gallery and GitHub links

Downloads

All content Copyright (c) by Cyotek Ltd or its respective writers. Permission to reproduce news and web log entries and other RSS feed content in unmodified form without notice is granted provided they are not used to endorse or promote any products or opinions (other than what was expressed by the author) and without taking them out of context. Written permission from the copyright owner must be obtained for everything else.
Original URL of this content is https://www.cyotek.com/blog/cyotek-add-projects-extension-updated-for-visual-studio-2013-rtm?source=rss.

Specifying custom text when using the LabelEdit functionality of a TreeView

$
0
0

Recently I was updating a support tool that displays documents in raw form and allows editing of them. This tool is centred around a TreeView, and the Text property of each TreeNode is a concatenation of a name and one or more values.

The problem with this approach is if you wish to allow the nodes to be edited using the built in functionality you're in trouble as by default you can't actually influence the text that appears in the in-line editor. In other applications of a similar nature I used owner-drawn trees as I was using different styles for the name and the value. In this case, I just wanted the standard look.

An example project showing the different techniques described in this article.

How you would expect it to work

Ideally, you'd expect that by hooking into the BeforeLabelEdit event (or overriding OnBeforeLabelEdit) then you could manipulate the NodeLabelEditEventArgs.Label property. Except this property is read only.

Scratch that then. What about setting the TreeNode.Text property to something else in this event, then resetting it afterwards? Nope, doesn't work either.

Therefore, using just the managed code of the TreeView it's not possible to do what we want. Lets get slightly outside the black box with a little Win32 API. We'll get the handle of the edit control the TreeView is using and directly set it's text.

Getting the handle to the EDIT control

In order to manipulate the edit control, we first need to get a handle to it. We can do this succinctly by overriding OnBeforeLabelEdit (or hooking the BeforeLabelEdit event although the former is preferable) and using the TVM_GETEDITCONTROL message.

[DllImport("USER32", EntryPoint = "SendMessage", CharSet = CharSet.Auto, SetLastError = true)]
public static extern IntPtr SendMessage(IntPtr hWnd, int msg, IntPtr wParam, IntPtr lParam);

public const int TVM_GETEDITCONTROL = 0x110F;

protected override void OnBeforeLabelEdit(NodeLabelEditEventArgs e)
{
  IntPtr editHandle;

  editHandle = SendMessage(this.Handle, TVM_GETEDITCONTROL, IntPtr.Zero, IntPtr.Zero);
  if (editHandle != IntPtr.Zero)
  {
    // we have a handle, lets use it!
  }

  base.OnBeforeLabelEdit(e);
}

Setting the text of the EDIT control

Now that we have a handle, we can painlessly use WM_SETTEXT to change the text of the edit control

[DllImport("USER32", EntryPoint = "SendMessage", CharSet = CharSet.Auto, SetLastError = true)]
public static extern IntPtr SendMessage(IntPtr hWnd, int msg, IntPtr wParam, string lParam);

public const int WM_SETTEXT = 0xC;

protected override void OnBeforeLabelEdit(NodeLabelEditEventArgs e)
{
  // -- snip --

  if (editHandle != IntPtr.Zero)
    SendMessage(editHandle, WM_SETTEXT, IntPtr.Zero, "Magic String");

  // -- snip --
}

OK, but what about specifying the real text?

If you were hooking into the BeforeLabelEdit event, then you can just have your own logic in that event to determine the text to apply. If however you're overriding OnBeforeEdit in order to make a nice reusable component, you need another way of allowing implementers to specify the value. For this, I added a new event to the control.

[Category("Behavior")]
public event EventHandler<NodeRequestTextEventArgs> RequestEditText;

protected virtual void OnRequestEditText(NodeRequestTextEventArgs e)
{
  EventHandler<NodeRequestTextEventArgs> handler;

  handler = this.RequestEditText;

  if (handler != null)
    handler(this, e);
}

The NodeRequestTextEventArgs class is essentially a clone of NodeLabelEditEventArgs except with a writeable Label property. I also decided to allow you to cancel the node edit from this event, so that implementers don't have to hook both events unless necessary.

public class NodeRequestTextEventArgs : CancelEventArgs
{
  public NodeRequestTextEventArgs(TreeNode node, string label)
    : this()
  {
    this.Node = node;
    this.Label = label;
  }

  protected NodeRequestTextEventArgs()
  { }

  public TreeNode Node { get; protected set; }

  public string Label { get; set; }
}

Our final version now looks like this:

protected override void OnBeforeLabelEdit(NodeLabelEditEventArgs e)
{
  NodeRequestEditTextEventArgs editTextArgs;

  // get the text to apply to the label
  editTextArgs = new NodeRequestTextEventArgs(e.Node, e.Node.Text);
  this.OnRequestEditText(editTextArgs);

  // cancel the edit if required
  if (editTextArgs.Cancel)
    e.CancelEdit = true;

  // apply the text to the EDIT control
  if (!e.CancelEdit)
  {
    IntPtr editHandle;

    editHandle = SendMessage(this.Handle, TVM_GETEDITCONTROL, IntPtr.Zero, IntPtr.Zero); // Get the handle of the EDIT control
    if (editHandle != IntPtr.Zero)
      SendMessage(editHandle, WM_SETTEXT, IntPtr.Zero, editTextArgs.Label); // And apply the text. Simples.
  }

  base.OnBeforeLabelEdit(e);
}

And an sample usage scenario from the demo application:

private void subclassedTreeView_RequestEditText(object sender, NodeRequestEditTextEventArgs e)
{
  e.Label = e.Node.Name;
}

In this example, we are setting the edit text to be the value of the TreeNode's Name property, regardless of whatever its Text is.

Updating the text post-edit

After the conclusion of the label editing, the node's text will be set to the new label, and therefore we need to tinker that logic to allow the implementer to specify the new value text.

You could just hook the AfterLabelEdit event and have your custom logic in there (remembering to cancel the default edit), as shown here:

private void notifyTreeView_AfterLabelEdit(object sender, NodeLabelEditEventArgs e)
{
  if (e.Label != null)
  {
    e.CancelEdit = true;

    e.Node.Name = e.Label;
    e.Node.Text = string.Format("{0}: {1}", e.Label, e.Node.Tag);
  }
}

However, I didn't want to be having to do this type of code each time I implemented this sort of behaviour in an application. Rather than get fancy with subclassed TreeNode classes, I choose to add a sister event for RequestEditText, named RequestDisplayText and then handle this automatically. This is the only aspect of this article that feels "smelly" to me - ideally it would be nice if the control could handle this for you without having to ask for more information. But, this should do for the time being.

protected override void OnAfterLabelEdit(NodeLabelEditEventArgs e)
{
  if (e.Label != null) // if the user cancelled the edit this event is still raised, just with a null label
  {
    NodeRequestTextEventArgs displayTextArgs;

    displayTextArgs = new NodeRequestTextEventArgs(e.Node, e.Label);
    this.OnRequestDisplayText(displayTextArgs);

    e.CancelEdit = true; // cancel the built in operation so we can substitute our own

    if (!displayTextArgs.Cancel)
      e.Node.Text = displayTextArgs.Label;
  }

  base.OnAfterLabelEdit(e);
}

And an example of use:

private void subclassedTreeView_RequestDisplayText(object sender, NodeRequestTextEventArgs e)
{
  e.Label = string.Format("{0}: {1}", e.Label, e.Node.Tag);
}

The demonstration shows both of these approaches - the TreeViewEx control favours the RequestDisplayText event, and the TreeViewExNotify control leaves it entirely to the implementer to deal with.

Closing notes

And that's it. I've seen some implementations of this sort of functionality in various places across the internet, and some of them are pretty awful, having to override all sorts of methods, store and restore various states. The above solution is pretty simple and works regardless of if you are calling TreeNode.BeginEdit or using the "click and hover" approach on a node.

In addition, it's trivially easy to expand this to support validation as well, I'll cover that in the next article.

Bonus Chatter

I originally tried two different approaches to modifying the value, both of these involved capturing the TVN_BEGINLABELEDIT notification. The first approach used a NativeWindow bound to the TreeView control's parent watching for the WM_NOTIFY message. The second approach did the same thing, but used MFC's Message Reflection via WM_REFLECT to intercept the notification message on the tree view itself. Both of these solutions worked, and yet were still overkill as overriding OnBeforeLabelEdit is sufficient.

Although I'm not going to describe that approach here as it'll just clutter the article, I did include an implementation of the WM_REFLECT solution in the demonstration project as I think it is a neat technique and potentially useful for other notifications.

Downloads

All content Copyright (c) by Cyotek Ltd or its respective writers. Permission to reproduce news and web log entries and other RSS feed content in unmodified form without notice is granted provided they are not used to endorse or promote any products or opinions (other than what was expressed by the author) and without taking them out of context. Written permission from the copyright owner must be obtained for everything else.
Original URL of this content is https://www.cyotek.com/blog/specifying-custom-text-when-using-the-labeledit-functionality-of-a-treeview?source=rss.

Extending the LabelEdit functionality of a TreeView to include validation

$
0
0

In my last post I described how to extend the default label edit funcionality of a TreeView control to be somewhat more flexible, by allowing you to specify custom text other than blindly using the text of the TreeNode being edited.

This post will extend the original code to include custom validation. For example, you may wish to restrict the available characters, or check to see if the value entered doesn't match an existing value.

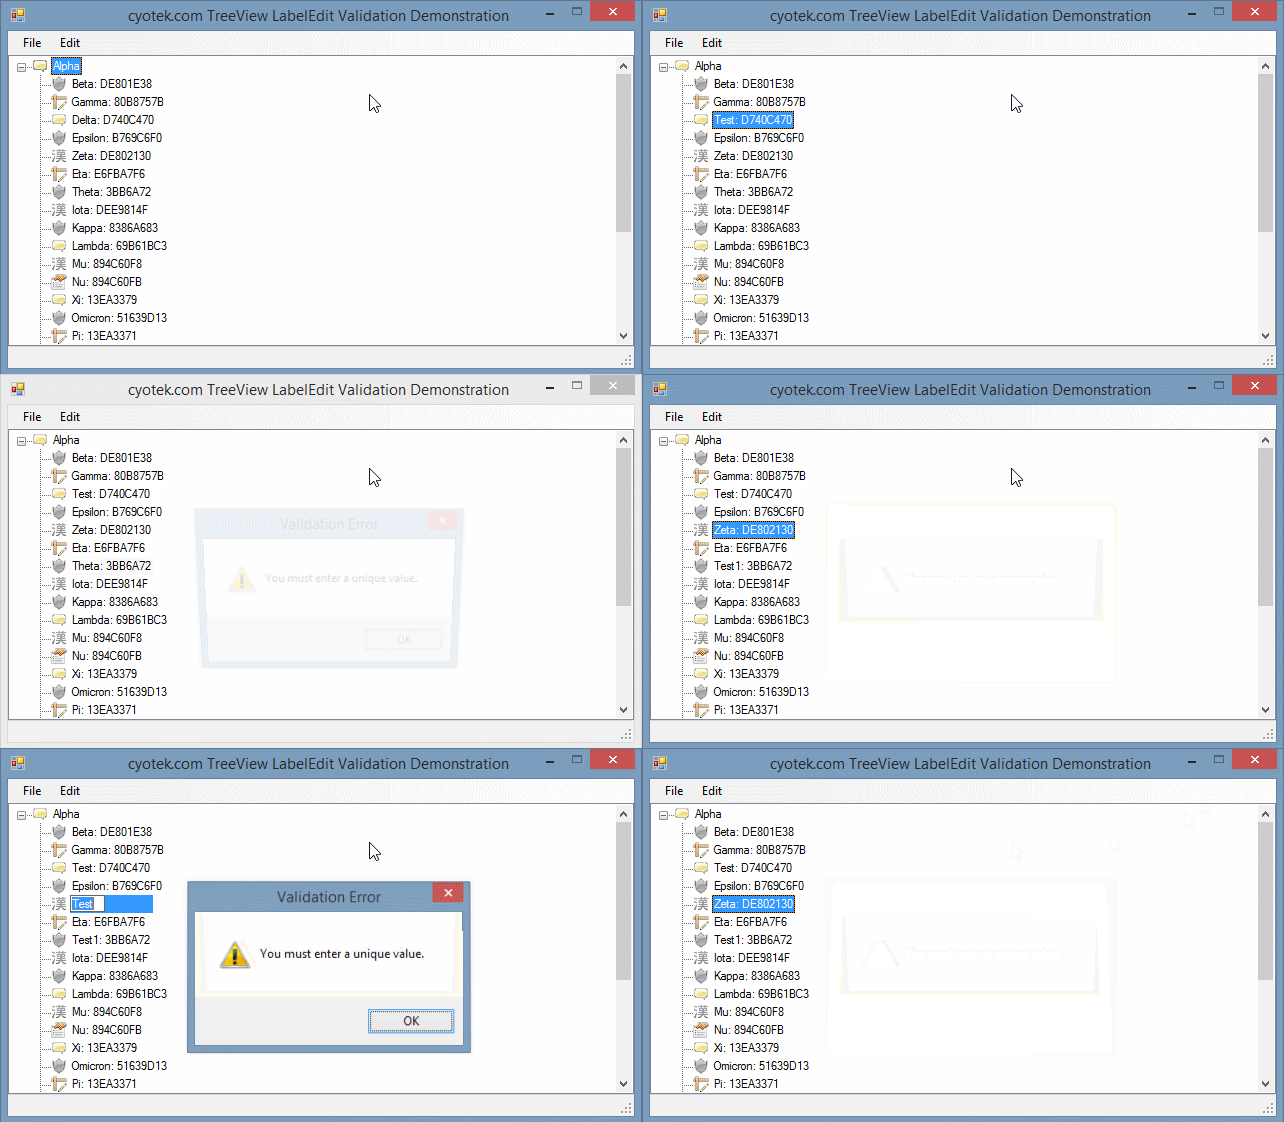
An example project showing the use of validation in node editing, and preserving the entered text between errors.

Getting started

The code in this article assumes you have a base class that includes the enhancements from the previous post, or you can download the complete example from the link at the end of the article.

Firstly we need to add a new event that will present the proposed change and allow the implementer to validate it. As this is event won't allow the label to be modified, we can use the original NodeLabelEditEventArgs class rather than the custom class we created in the previous post.

[Category("Behavior")]
public event EventHandler<NodeLabelEditEventArgs> ValidateLabelEdit;

protected virtual void OnValidateLabelEdit(NodeLabelEditEventArgs e)
{
  EventHandler<NodeLabelEditEventArgs> handler;

  handler = this.ValidateLabelEdit;

  if (handler != null)
    handler(this, e);
}

We also need a backing variable to store the current text string in the event of a validation error in order to correctly re-initialize the edit field.

private string _postEditText;

Raising the validation event

In our extended TreeView component, we had overridden OnAfterLabelEdit in order to obtain the new display text after a successful edit. We're going to modify this override slightly in order to handle validation.

protected override void OnAfterLabelEdit(NodeLabelEditEventArgs e)
{
  if (e.Label != null) // if the user cancelled the edit this event is still raised, just with a null label
  {
    NodeLabelEditEventArgs validateEventArgs;

    e.CancelEdit = true; // cancel the built in operation so we can substitute our own

    validateEventArgs = new NodeLabelEditEventArgs(e.Node, e.Label);

    this.OnValidateLabelEdit(validateEventArgs); // validate the users input

    if (validateEventArgs.CancelEdit)
    {
      // if the users input was invalid, enter edit mode again using the previously entered text to give them the chance to correct it
      _postEditText = e.Label;
      e.Node.BeginEdit();
    }
    else
    {
      // -- snip --
    }
  }

  base.OnAfterLabelEdit(e);
}

Here, we automatically cancel the default handling of the label edit, as regardless of whether validation passes or not, we'll be updating node text manually.

First we raise our ValidateLabelEdit event, passing in the TreeNode to be edited, and the proposed label text. If the CancelEdit property of the passed NodeLabelEditEventArgs is set to true, then validation has failed.

If validation does fail, we update the _postEditText variable we defined earlier with the current label text, then automatically switch the control back into label editing mode.

Changing how label edits are initialized

There's just one thing left to change. As with OnAfterLabelEdit, we had also overridden OnBeforeLabelEdit in order to modify the text displayed in the edit field. We'll need to modify this to provide the current label value if a validation error occurs, otherwise the text will reset to whatever the original value was before editing started. Of course, in the event of a validation error you want he user to be able to retry with the modified value to allow correction of the error. To do this, we'll modify the block of code that obtained the text to display to use the new _postEditText variable and to skip raising the RequestEditText event if its set. We'll also reset the _postEditText to null so that the next time an edit is started, it reverts to the original behaviour. Unless it's another validation error for the current edit operation of course!

protected override void OnBeforeLabelEdit(NodeLabelEditEventArgs e)
{
  NodeRequestTextEventArgs editTextArgs;

  // get the text to apply to the label
  editTextArgs = new NodeRequestTextEventArgs(e.Node, _postEditText ?? e.Node.Text);
  if (_postEditText == null)
    this.OnRequestEditText(editTextArgs);
  _postEditText = null;

  // -- snip --

  base.OnBeforeLabelEdit(e);
}

And that is it. Extremely simple, but very useful if you need to validate this sort of input!

Sample application

The sample project available with this article demonstrates validation, as shown in the following snippet.

private void subclassedTreeView_ValidateLabelEdit(object sender, NodeLabelEditEventArgs e)
{
  TreeNode[] matchingNodes;

  // Check to make sure the value the user enters isn't used by any other node than the current.
  // This code assumes that all names in the tree are unique, regardless of level
  matchingNodes = subclassedTreeView.Nodes.Find(e.Label, true);
  if (matchingNodes.Length != 0 && matchingNodes[0] != e.Node)
  {
    MessageBox.Show("You must enter a unique value.", "Validation Error", MessageBoxButtons.OK, MessageBoxIcon.Exclamation);
    e.CancelEdit = true;
  }
}

Further Improvements

As can be seen from the simple animation at the start of the article, the edit field is hidden and the original node text displayed, validation occurs, then editing restarts in the event of an error. This means, if you display a message box for example, the original tree state is displayed. It also means that the cursor and selection state of the edit field is lost. Ideally, it would be preferable to do validation without causing the edit field to vanish first, but that would require some more pinvoke, and probably isn't necessary for most cases - this method keeps the users entered text which is the important bit.

Downloads

All content Copyright (c) by Cyotek Ltd or its respective writers. Permission to reproduce news and web log entries and other RSS feed content in unmodified form without notice is granted provided they are not used to endorse or promote any products or opinions (other than what was expressed by the author) and without taking them out of context. Written permission from the copyright owner must be obtained for everything else.
Original URL of this content is https://www.cyotek.com/blog/extending-the-labeledit-functionality-of-a-treeview-to-include-validation?source=rss.

How to be notified when your application is activated and deactivated

$
0
0

I recently had a requirement where a user was able to perform an action externally to my application, and my application then had to detect this for processing.

I could of course just had a poller running away in the background to check, but as the requirement also needed user input, why not just wait until the user switched back to my application, then check and deal with accordingly?

A simple demonstration of application activation and deactivation.

The Activated and Deactivate events

Your standard Form object has an Activated event and a Deactivate event that (very logically!) are fired when your form is activated and deactivated.

Brilliant! Well, it would be - if your application is a single form application that doesn't show any window ever. Including message boxes. Still, you could do it that way, if your processing was absolute and always done there and then. In my case, I had to give the user a choice - if they said no, then I would simply ask them again later (ie the next time the application was activated). But if I stuck with the Activated event it would mean they would get prompted after displaying another dialog in my application... probably not the sort of behaviour you want to exhibit.

The WM_ACTIVATEAPP message

So how does Windows do it? It does it via the use of the WM_ACTIVATEAPP (MSDN reference). Windows sends this message when a window belonging to a different application than the active window is about to be activated. It's also good enough enough to send it to the window about to be deactivated too, so this one message can cover both activation and deactivation.

Overriding WndProc

Even after all these years of being a C# developer, I still marvel at just how easy this stuff is. In my VB6 days, I could (and did) do exactly the same thing, but it was difficult to implement and fun to debug.

To handle Windows Messages in C# we just need to override the WndProc method on your Form. Then we can check for the WM_ACTIVATEAPP message arriving and handle it accordingly.

const int WM_ACTIVATEAPP = 0x1C;

protected override void WndProc(ref Message m)
{
  if (m.Msg == WM_ACTIVATEAPP)
  {
    if (m.WParam != IntPtr.Zero)
    {
      // the application is getting activated
    }
    else
    {
      // the application is getting deactivated
    }
  }

  base.WndProc(ref m);
}

According to the MSDN docs, lParam contains the thread identifier, however we can safely ignore this. wParam (the WParam property on the Message struct) is the important bit. It's a simple true or false value (true for activation, false otherwise) and so we just need to check it isn't zero and we're good to go.

Add some events

You could just stick that override in your applications form and use it like that, but as always we should think a little bit about the future and promote some code re-use! In this case, I'm going to create a pair of events and add them (along with the override) to a base class, so next time I want this functionality the events are sitting there waiting.

public class BaseApplicationForm : Form
{
  public event EventHandler ApplicationActivated;

  public event EventHandler ApplicationDeactivated;

  protected virtual void OnApplicationActivated(EventArgs e)
  {
    EventHandler handler;

    handler = this.ApplicationActivated;

    if (handler != null)
      handler(this, e);
  }

  protected virtual void OnApplicationDeactivated(EventArgs e)
  {
    EventHandler handler;

    handler = this.ApplicationDeactivated;

    if (handler != null)
      handler(this, e);
  }

  protected override void WndProc(ref Message m)
  {
    if (m.Msg == NativeMethods.WM_ACTIVATEAPP)
    {
      if (m.WParam != IntPtr.Zero)
        this.OnApplicationActivated(EventArgs.Empty);
      else
        this.OnApplicationDeactivated(EventArgs.Empty);
    }

    base.WndProc(ref m);
  }
}

A simple demonstration

You can download the demonstration code from the end of this post, but here's a simple example of the code in use:

public partial class MainForm : BaseApplicationForm
{
  protected override void OnActivated(EventArgs e)
  {
    base.OnActivated(e);

    this.LogEvent("Activated");
  }

  protected override void OnDeactivate(EventArgs e)
  {
    base.OnDeactivate(e);

    this.LogEvent("Deactivate");
  }

  protected override void OnApplicationActivated(EventArgs e)
  {
    base.OnApplicationActivated(e);

    this.LogEvent("ApplicationActivated");
  }

  protected override void OnApplicationDeactivated(EventArgs e)
  {
    base.OnApplicationDeactivated(e);

    this.LogEvent("ApplicationDeactivated");
  }

  private void LogEvent(string text)
  {
    logTextBox.AppendText(string.Format("{0}\t{1}\n\n", DateTime.UtcNow.ToString("hh:mm:ss"), text));
  }
}

The Activated, Deactivate, ApplicationActivated and ApplicationDeactivated events are all being used (well, their overrides are) to log information. If you run the example, you will see that Activated and Deactivate are called whenever the form itself is processed, ie from opening a dialog or displaying a message box, whilst the ApplicationActivated and ApplicationDeactivated events are only called when I switch to another application.

Closing Thoughts

In the above example, the ApplicationActivated and ApplicationDeactivated events are raised as expected - including if you already have a modal dialog open in your application. Just something to keep in mind if you use this sort of functionality to prompt the user for an action. If your events are showing their own modal dialog, that's fine, but if they are trying to do something else, such as set focus to a control, or open a floating window - then you're likely to run into problems.

Downloads

All content Copyright (c) by Cyotek Ltd or its respective writers. Permission to reproduce news and web log entries and other RSS feed content in unmodified form without notice is granted provided they are not used to endorse or promote any products or opinions (other than what was expressed by the author) and without taking them out of context. Written permission from the copyright owner must be obtained for everything else.
Original URL of this content is https://www.cyotek.com/blog/how-to-be-notified-when-your-application-is-activated-and-deactivated?source=rss.

Tools we use - 2013 edition

$
0
0

As another year enters its final stages, I decided I would log the primary tools I use for my developer role, should be an interesting experiment to compare with each year, if I don't get distracted by something shiny.

I actually wrote this post in October last year (2012 that is) but in the end forgot to post it. That sounds marginally better than "I lost the post until search was added to cyotek.com's admin system"! Surprisingly little is different in the 15 months since it was first written. Either nothing has changed or I'm stuck in my ways with my head in the sand. I'm sure it's the latter!

Operating Systems

  • Windows Home Server 2011 - file server, SVN repository, backup host. It's a shame it has been discontinued
  • Windows 8.1 Professional - development machine. Interesting, I was still using Windows 7 when I first wrote this post... thought I'd been using WIndows 8 for longer than that.
  • Windows XP (virtualized) - testing
  • Windows Vista (virtualized) - testing
  • Windows 3.1 (virtualized) - no reason other than because I can?

Development Tools

  • Visual Studio 2013 Premium - an improvement upon 2010 in so many ways, and the second change in this update post as I was using 2012 last year
  • BugAidOzCocde (the old name was better!) - this is one of the tools you wonder why isn't in Visual Studio by default
  • .NET Demon - yet another wonderful tool that helps speed up your development, this time by not slowing you down waiting for compiles. I was just recently reminded of this when I was working on a machine without the Demon and I was shocked at how long I was waiting around for solution builds to complete
  • NCrunch for Visual Studio - (version 2!) automated parallel continuous testing tool. Works with NUnit, MSTest and a variety of other test systems. Great for TDD and picking up how a simple change you made to one part of your project completely destroys another part. We've all been there!
  • .NET Reflector - controversy over free vs paid aside, this is still worth the modest cost for digging behind the scenes when you want to know how the BCL works.
  • Cyotek Add Projects - a simple extension I recently created that I use pretty much any time I create a new solution to add references to my standard source code libraries. Saves me time and key presses, which is good enough for me!
  • Resharper - originally as a replacement for Regionerate, this swiftly became a firm favourite every time it told me I was doing something stupid.
  • Other extensions are VSCommands 2013, Web Essentials 2013 and Indent Guides

Analytics

  • Innovasys Lumitix - we've been using this for over 18 months now in an effort to gain some understanding in how our products are used by end users. I keep meaning to write a blog post on this, maybe I'll get around to that in 2014!

Profiling

  • ANTS Performance Profiler - the best profiler I've ever used. The bottlenecks and performance issues this has helped resolve with utter ease is insane. It. Just. Works.

Documentation Tools

  • Innovasys Document! X - Currently we use this to produce the user manuals for our applications.
  • SubMain GhostDoc Pro - Does a slightly better job of auto generating XML comment documentation thatn doing it fully from scratch. Actually, I use this less and less now, the way it litters my code folders with XML files when I don't use any functionality bar auto-document is starting to more than annoy me.
  • MarkdownPad Pro - fairly decent Markdown editor that is currently better than our own so I use it instead!
  • Notepad++ - because Notepad hasn't changed in 20 years (moving menu items around doesn't count!)

Graphics Tools

  • Paint.NET - brilliant bitmap editor with extensive plugins
  • Axialis IconWorkshop - very nice icon editor, been using this for untold years now since Microangelo decided to become the Windows Paint of icon editing (but without the awesome)
  • Cyotek Spriter - sprite / image map generation software
  • Cyotek Gif Animator - gif animation creator that is shaping up nicely, although I'm obviously biased.

Virtualization

  • Oracle VM VirtualBox - for creating guest OS's for testing purposes. Cyotek software is informally smoke tested mainly on Windows XP, but occasionally Windows Vista. Visual Studio 2013 installed Hyper-V, but given as the VirtualBox VM's have been running for years with no problems, this is disabled.

Version Control

File/directory comparison

  • WinMerge - not much to say, it works and works well

Backups

  • Cyotek CopyTools - we use this for offline backups of source code, assets and resources, documents, actually pretty much anything we generate; including backing up the backups!
  • CarboniteCrashPlan - another change for this year was to put aside the apathy and do away with Carbonites dreadful software onto something better. CrashPlan creates an online backup of the different offline backups that CopyTools does. If you've ever lost a harddisk before with critical data on it that's nowhere else, you'll have backups squirrelled away everywhere too!

Technologies

[Not a tool but sticking it here anyway so I can see if this changes between years]

  • For web work, mostly MVC, although I still have legacy WebForms applications to support. For desktop development, still Windows Forms. I never took to WPF and I'm not really interested in cutting 90% of our users off by switching to Metro apps. Hmmpf. Not much to say really, I don't get to use as much cutting edge stuff as I'd like to. Been working with Azure's PaaS recently, that's pretty cool.

Slightly larger list than I was expected, but even when I wrote this I was surprised at how little was in it... a lot of tools have faded by the wayside it seems. And I haven't mentioned tools I use but rarely, that seems a bit daft.

I wonder what I'll be using next year?

All content Copyright (c) by Cyotek Ltd or its respective writers. Permission to reproduce news and web log entries and other RSS feed content in unmodified form without notice is granted provided they are not used to endorse or promote any products or opinions (other than what was expressed by the author) and without taking them out of context. Written permission from the copyright owner must be obtained for everything else.
Original URL of this content is https://www.cyotek.com/blog/tools-we-use-2013-edition?source=rss.

Loading the color palette from a BBM/LBM image file using C#

$
0
0

I took a break from arguing with our GIF decoder to take a quick look at the BBM format as I have a few files in that format containing colour palettes I wished to extract. When I looked into this, I found a BBM file is essentially an LBM file without any image data, so I set to work at writing a new palette serializer for reading and writing the palette files. This article describes how to read the palettes from BBM and LBM files.

Note: I only cover loading of color palette data in this article. The image data I don't even look at - this article does not represent a full LBM decoder.

A sample application showing loading of palettes from BBM/LBM files

Caveat Emptor

The sample code presented in this article took all of an hour to write and has been tested on a pretty small selection of images. It only handles 8bit LBM files (possibly lower depths too, but I have not tested this). And, who knows, I might be misinterpreting the specification or missing a chunk of vital information.

Overview of BBM/LBM Files

Information is sketchy so I may well be wrong in particulars, but a BBM file essentially seems to be a LBM without a full image - in the files I've experimented with, there are header chunks describing a bitmap, but no real data. A LBM file is of course a full graphic, most popular (I think) by DeluxePaint on both the Amiga and MS DOS. As I said though, this information is my understanding and might be totally wrong. Luckily enough, or our purposes it doesn't matter. However, to keep things simple, for the rest of this article I'm going to refer to LBM, but you can consider this interchangeable with BBM.

The LBM format is more formally known as ILBM - IFF Interleaved Bitmap. It is built upon "EA IFF 85" Standard for Interchange Format Files. Both formats were devised by Electronic Arts as a standard means of sharing data between systems, their example of writing a theme song with a Macintosh score editor and incorporating it into an Amiga game summing it up neatly.

More information on these formats can be found in specification documents here and here.

Reading an LBM file

An IFF file is comprised of chunks of data. Each chunk is prefixed with a four character ID, the size of the data in the chunk, and then the chunk data itself.

There is one oddity in that if the size of the chunk is odd, an extra padding byte is added to the chunk data to make it even. This padding byte is not included in the size field, so if it's odd you must make sure you read (and discard) the padding byte.

Oh yes, and there's one other important detail. I don't know if this is specific to all IFF format files, or just LBM, but integers and longs are in big-endian format, so we need to convert these when we read them.

The CMAP chunk

The only section of the LBM file we are interested in is the CMAP chunk, which describes an 8bit colour palette. According to the specification however, it's optional so it's entirely possible that not all LBM files contain a CMAP. Also, only 8bit (or lower?) LBM files will contain a CMAP, as they only support RGB channels. 24bit or 32bit images won't have one as there's no scope for storing alpha channels.

The data section of a CMAP chunk is as simple as it gets - one set of 3 bytes for each colour describing the red, green and blue channels. The size attribute is the number of colours * 3.

Other Chunks

Although I'm not reading other chunks, I still have to pay attention to some of them.

Firstly, the FORM chunk describes an IFF document. So, if the file we read doesn't start with this, it's not a valid IFF file and we shouldn't continue reading.

The second chunk we at least want to identify is the chunk that states if this is an actual image. The specification states that this should be ILBM, but the sample images I've worked with use a different header which is PBM for Planar BitMap. Note there's a trailing space on this ID as the specification states ID's are four ASCII characters long. As in both cases the CMAP section is the same, I look for either of these.

Anything else will be discarded.

Reading the file

After opening the file, the first thing we do is read the first four bytes and convert these to an ASCII string. If the string reads FORM, we know we have an IFF document and continue reading. Otherwise, we throw an InvalidDataException exception.

using (FileStream stream = File.OpenRead(fileName))
{
  byte[] buffer;
  string header;

  // read the FORM header that identifies the document as an IFF file
  buffer = new byte[4];
  stream.Read(buffer, 0, buffer.Length);
  if (Encoding.ASCII.GetString(buffer) != "FORM")
    throw new InvalidDataException("Form header not found.");

Next we read the size of the data contained within the FORM chunk. As we aren't checking for nested chunks nor reading all the data, we can safely ignore this.

  // the next value is the size of all the data in the FORM chunk
  // We don't actually need this value, but we have to read it
  // regardless to advance the stream
  this.ReadInt(stream);

Time for another sanity check, this time to verify we are reading an image, be it Planar (PBM) or Interleaved (ILBM).

For some reason this chunk doesn't include a size, so we don't attempt to read any more bytes as the next byte is the start of a new chunk.

  // read either the PBM or ILBM header that identifies this document as an image file
  stream.Read(buffer, 0, buffer.Length);
  header = Encoding.ASCII.GetString(buffer);
  if (header != "PBM " && header != "ILBM")
    throw new InvalidDataException("Bitmap header not found.");

The reset of the routine is going to load one chunk of data from the file at a time, and either discard it or process it.

First, we read 4 bytes that will be the ID of the chunk. We also need the size of the chunk, regardless of whether we use it or not, so we'll read that too.

  while (stream.Read(buffer, 0, buffer.Length) == buffer.Length)
  {
      int chunkLength;

      chunkLength = this.ReadInt(stream);

As we are only interested in CMAP chunks, if the pending chunk has any other type of ID, we skip the remainder of the chunk, as identified by chunkLength read earlier. If we can, we just move the current position in the stream ahead, but if we can't (can't think why not!) then we just read and discard bytes until done.

      if (Encoding.ASCII.GetString(buffer) != "CMAP")
      {
        // some other LBM chunk, skip it
        if (stream.CanSeek)
          stream.Seek(chunkLength, SeekOrigin.Current);
        else
        {
          for (int i = 0; i < chunkLength; i++)
            stream.ReadByte();
        }
      }

Aha! We finally found the CMAP chunk. Now it's just a straightforward reading of colours. chunkLength is the number of colours / 3 (as each colour is represented by 3 bytes), so a simple loop to read each triplet and add them to our results collection is all we need.

Then, we exit out of the while loop - no pointing reading the entire file now that we have what we wanted.

      else
      {
        // color map chunk!
        for (int i = 0; i < chunkLength / 3; i++)
        {
          int r;
          int g;
          int b;

          r = stream.ReadByte();
          g = stream.ReadByte();
          b = stream.ReadByte();

          colorPalette.Add(Color.FromArgb(r, g, b));
        }

        // all done so stop reading the rest of the file
        break;
      }

If we are still in the loop however, then we need to check our chunkLength value. If it's odd, we read and discard the padding byte - otherwise you'll be out of alignment and won't hit any more chunk headers, except by accident.

      // chunks always contain an even number of bytes even if the recorded length is odd
      // if the length is odd, then there's a padding byte in the file - just read and discard
      if (chunkLength % 2 != 0)
        stream.ReadByte();
    }
  }

  return colorPalette;
}

Converting big-endian to little-endian

At the start of the article I mentioned that the numeric data types in an LBM image are stored as big-endian. On the Windows platform, we use little-endian. So when we try to read the chunk length from the file... well, it's just not going to work.

As bit shifting still jellies my brain, I took to Stackoverflow which provided me with a function for converting four bytes of big-endian data into a little-endian integer.

private int ReadInt(Stream stream)
{
  byte[] buffer;

  // big endian conversion: http://stackoverflow.com/a/14401341/148962

  buffer = new byte[4];
  stream.Read(buffer, 0, buffer.Length);

  return (buffer[0] << 24) | (buffer[1] << 16) | (buffer[2] << 8) | buffer[3];
}

So in our sample, we read our 4 bytes, shift their bits around and return the result.

That was easy

That was fairly straightforward! Well, if I ignore the endian conversion. And I'm sure if I decided to read the BODY chunk and actually start decoding the image itself I'd be tearing out my hair, but the bit I actually wanted could hardly have been easier.

As usual, a fully working sample is attached to this post.

Further Thoughts

As I wrap up this post it occurred to me I forgot to add anything in for if it's a valid LBM image, but doesn't contain a CMAP section. Although the clue would be in the empty list that's returned.

I also didn't even begin to look at writing a BBM file... this will probably be the next thing I take a look at. Unless I get distracted by Microsoft's (old?) palette format which I discovered is also a variant of IFF and should be just as easy to read.

Downloads

All content Copyright (c) by Cyotek Ltd or its respective writers. Permission to reproduce news and web log entries and other RSS feed content in unmodified form without notice is granted provided they are not used to endorse or promote any products or opinions (other than what was expressed by the author) and without taking them out of context. Written permission from the copyright owner must be obtained for everything else.
Original URL of this content is https://www.cyotek.com/blog/loading-the-color-palette-from-a-bbm-lbm-image-file-using-csharp?source=rss.


Reading Photoshop Color Swatch (aco) files using C#

$
0
0

In a previous article I described how to read the colour map from a DeluxePaint LBM/BBM file. In the next pair of articles, I'm going to describe how to load and save colour swatch files used by Photoshop (those with the .aco extension).

A sample application showing loading of colour swatches from Photoshop colour swatch files

Caveat Emptor

As usual, I'll start with a warning. I have a very limited set of sample files to test with, so it may be that there's an error in this code which means it can't handle all files. Certainly it can't handle all colour spaces (more on that later). However, I've tested it on a number of files download from the internet without problems.

Structure of a Photoshop colour swatch file

The structure of the aco file is straightforward, helped by Adobe themselves publishing the specification which is something to appreciate. This article was created using the October 2013 edition of this specification.

According to the specification, there's two versions of the format both of which are are fairly similar. The specification also implies that applications which support version 2 should write a version 1 palette first, which would admirably solve backwards compatibility problems. In practice this doesn't seem to be the case, as some of the files I tested only had version 2 palettes in them.

The structure is simple. There's a 2-byte version code, followed by 2-bytes describing the number of colours. Then, for each colour, there are 10 further bytes, 2 each describing the colour space and then four values to describe the colour. Version two palettes also then follow this with a four byte integer describing the length of the name, then the bytes which make up said name.

LengthDescription
2Version
2Number of colours
count * 10 (+ 4 + variable (version 2 only))

Colour data

LengthDescription
2Colour space
2Colour data value 1
2Colour data value 2
2Colour data value 3
2Colour data value 4

Version 2 only

LengthDescription
4Length of name string in characters
length * 2Unicode code characters, two bytes per character

All the data in an aco file is stored in big-endian format and therefore needs to be reversed on Windows systems.

Most colour spaces only use three of the four available values, but regardless of how many are actually used, all must be specified.

Colour Spaces

I mentioned above that each colour has a description of what colour space it belongs to. The specification defines the following colour spaces:

IdDescription
0RGB. The first three values in the colour data are red, green, and blue. They are full unsigned 16-bit values as in Apple's RGBColordata structure. Pure red = 65535, 0, 0.
1HSB. The first three values in the colour data are hue, saturation, and brightness. They are full unsigned 16-bit values as in Apple's HSVColordata structure. Pure red = 0,65535, 65535.
2CMYK. The four values in the colour data are cyan, magenta, yellow, and black. They are full unsigned 16-bit values. For example, pure cyan = 0,65535,65535,65535.
7Lab. The first three values in the colour data are lightness, a chrominance, and b chrominance. Lightness is a 16-bit value from 0...10000. Chrominance components are each 16-bit values from -12800...12700. Gray values are represented by chrominance components of 0. Pure white = 10000,0,0.
8Grayscale. The first value in the colour data is the gray value, from 0...10000.

To avoid complicating matters, this article will concentrate on RGB and Grayscale colour spaces, although I'll include the basics of HSV too for if you have a conversion class kicking around.

Reading short/int data types from bytes

As I mentioned above, the values in this file format are all big-endian. As Windows uses little-endian, we need to do some bit shifting when we read each byte comprising either a short (Int16) or an int (Int32), using the following helpers:

/// <summary>
/// Reads a 16bit unsigned integer in big-endian format.
/// </summary>
/// <param name="stream">The stream to read the data from.</param>
/// <returns>The unsigned 16bit integer cast to an <c>Int32</c>.</returns>
private int ReadInt16(Stream stream)
{
  return (stream.ReadByte() << 8) | (stream.ReadByte() << 0);
}

/// <summary>
/// Reads a 32bit unsigned integer in big-endian format.
/// </summary>
/// <param name="stream">The stream to read the data from.</param>
/// <returns>The unsigned 32bit integer cast to an <c>Int32</c>.</returns>
private int ReadInt32(Stream stream)
{
  return ((byte)stream.ReadByte() << 24) | ((byte)stream.ReadByte() << 16) | ((byte)stream.ReadByte() << 8) | ((byte)stream.ReadByte() << 0);
}

The << 0 bit-shift in the above methods is technically unnecessary and can be removed. However, I find it makes the intent of the code clearer.

Reading strings

For version 2 files, we need to read a string, which is comprised of two bytes per character. Fortunately for us, the .NET Framework includes a BigEndianUnicode (MSDN) class that we can use to convert a byte array to a string. As this class does the endian conversion for us, we don't need to do anything special when reading the bytes.

/// <summary>
/// Reads a unicode string of the specified length.
/// </summary>
/// <param name="stream">The stream to read the data from.</param>
/// <param name="length">The number of characters in the string.</param>
/// <returns>The string read from the stream.</returns>
private string ReadString(Stream stream, int length)
{
  byte[] buffer;

  buffer = new byte[length * 2];

  stream.Read(buffer, 0, buffer.Length);

  return Encoding.BigEndianUnicode.GetString(buffer);
}

Reading the file

With the preliminaries done with, lets read the file!

We start off by reading the file version so we know how to process the rest of the file, or at least the first part of it. If we don't have a version 1 or version 2 file, then we simply abort.

using (Stream stream = File.OpenRead(fileName))
{
  FileVersion version;

  // read the version, which occupies two bytes
  version = (FileVersion)this.ReadInt16(stream);

  if (version != FileVersion.Version1 && version != FileVersion.Version2)
    throw new InvalidDataException("Invalid version information.");

  colorPalette = this.ReadSwatches(stream, version);
  if (version == FileVersion.Version1)
  {
    version = (FileVersion)this.ReadInt16(stream);
    if (version == FileVersion.Version2)
      colorPalette = this.ReadSwatches(stream, version);
  }
}

In the above example, if a file has both versions, then I read them both (assuming the file contains version 1 followed by version 2). However, there's no point in doing this if you aren't going to do anything with the swatch name. For example, this demonstration program converts all the values into the standard .NET Color structure - which doesn't allow you to set the Name property. In this scenario, clearly it's a waste of time reading the version 2 data if you've just read the data from version 1. However, if you are storing the data in an object that supports the name, then it's probably a good idea to discard the previously read data and re-read the version 2 data.

Reading colour data

As the two documented file formats are almost identical, we can use the same code to handle reading the data, and then perform a little bit extra for the newer file format. The core of the code which reads the colour data looks like this.

// read the number of colors, which also occupies two bytes
colorCount = this.ReadInt16(stream);

for (int i = 0; i < colorCount; i++)
{
  ColorSpace colorSpace;
  int value1;
  int value2;
  int value3;
  int value4;

  // again, two bytes for the color space
  colorSpace = (ColorSpace)(this.ReadInt16(stream));

  // then the four values which comprise each color
  value1 = this.ReadInt16(stream);
  value2 = this.ReadInt16(stream);
  value3 = this.ReadInt16(stream);
  value4 = this.ReadInt16(stream);

  // and finally, the name of the swatch (version2 only)
  if (version == FileVersion.Version2)
  {
    int length;
    string name;

    length = ReadInt32(stream);
    name = this.ReadString(stream, length);
  }
}

Translating the colour spaces

Once we've read the colour space and the four values of the colour data, we need to process it.

The first space, RGB, is simple enough. The Adobe format is using the range 0-65535, so we just need to convert that to the standard 0-255 range:

switch (colorSpace)
{
  case ColorSpace.Rgb:
    int red;
    int green;
    int blue;

    red = value1 / 256; // 0-255
    green = value2 / 256; // 0-255
    blue = value3 / 256; // 0-255

    results.Add(Color.FromArgb(red, green, blue));
    break;

Next is HSL. How you process that depends on the class you are using, and the range of values it accepts.

case ColorSpace.Hsb:
  double hue;
  double saturation;
  double brightness;

  hue = value1 / 182.04; // 0-359
  saturation = value2 / 655.35; // 0-1
  brightness = value3 / 655.35; // 0-1

  results.Add(new HslColor(hue, saturation, brightness).ToRgbColor());
  break;

The last colour space we can easily support is gray scale.

case AdobePhotoshopColorSwatchColorSpace.Grayscale:

  int gray;

  // Grayscale.
  // The first value in the color data is the gray value, from 0...10000.
  gray = (int)(value1 / 39.0625);

  results.Add(Color.FromArgb(gray, gray, gray));
  break;

Files using the Lab or CMYK spaces will throw an exception as these are beyond the scope of this example.

  default:
    throw new InvalidDataException(string.Format("Color space '{0}' not supported.", colorSpace));
}

Although none of the sample files I tested mixed colour spaces, they were either all RGB, all Lab or all CMYK, the specification suggests that it's at least possible. In this case, throwing an exception might not be the right idea as it could be possible to load other colours. Therefore it may be a better idea to just ignore such errors to allow any valid data to be read.

Wrapping up

As with reading LBM colour maps, reading the Photoshop colour swatches was also quite an easy process.

You can download a fully working sample from the link below, and my next article will reverse the process to allow you to write your own aco files.

Downloads

All content Copyright (c) by Cyotek Ltd or its respective writers. Permission to reproduce news and web log entries and other RSS feed content in unmodified form without notice is granted provided they are not used to endorse or promote any products or opinions (other than what was expressed by the author) and without taking them out of context. Written permission from the copyright owner must be obtained for everything else.
Original URL of this content is https://www.cyotek.com/blog/reading-photoshop-color-swatch-aco-files-using-csharp?source=rss.

Writing Photoshop Color Swatch (aco) files using C#

$
0
0

The previous article in this mini-series described how to read files in Abode's Colour File format as used by applications such as Photoshop and other drawing programs.

In this second article, I'll describe how to write such files.

RGBHSLGrayscale

Getting started

I'm not going to go over the structure again, so if you haven't already done so, please read the previous article Reading Photoshop Color Swatch (aco) files using C# for full details on the file structure and how to read it.

Writing big-endian values

All the data in an aco file is stored in big-endian format and therefore needs to be reversed on Windows systems before writing it back into the file.

We can use the following two methods to write a short or a int respectively into a stream as a series of bytes. Of course, if you just want functions to convert these into bytes you could use similar code, just remove the bit-shift.

private void WriteInt16(Stream stream, short value)
{
  stream.WriteByte((byte)(value >> 8));
  stream.WriteByte((byte)(value >> 0));
}

private void WriteInt32(Stream stream, int value)
{
  stream.WriteByte((byte)((value & 0xFF000000) >> 24));
  stream.WriteByte((byte)((value & 0x00FF0000) >> 16));
  stream.WriteByte((byte)((value & 0x0000FF00) >> 8));
  stream.WriteByte((byte)((value & 0x000000FF) >> 0));
}

As with the equivalent read functions, the >> 0 shift is unnecessary but it does clarify the code.

We also need to store colour swatch names, so again we'll make use of the Encoding.BigEndianUnicode property to convert a string into a series of bytes to write out.

private void WriteString(Stream stream, string value)
{
  stream.Write(Encoding.BigEndianUnicode.GetBytes(value), 0, value.Length * 2);
}

Writing the file

When writing the file, I'm going to follow the specification's suggestion of writing a version 1 palette (for backwards compatibility), followed by a version 2 palette (for applications that support swatch names).

using (Stream stream = File.Create(fileName))
{
  this.WritePalette(stream, palette, FileVersion.Version1, ColorSpace.Rgb);
  this.WritePalette(stream, palette, FileVersion.Version2, ColorSpace.Rgb);
}

The core save routine follows. First, we write the version of format and then the number of colours in the palette.

private void WritePalette(Stream stream, ICollection<Color> palette, FileVersion version, ColorSpace colorSpace)
{
  int swatchIndex;

  this.WriteInt16(stream, (short)version);
  this.WriteInt16(stream, (short)palette.Count);

  swatchIndex = 0;

With that done, we loop through each colour, calculate the four values that comprise the colour data and then write that.

If it's a version 2 file, we also write the swatch name. As these basic examples are just using the Color class, there's no real flexibility in names, so we cheat - if it's a "named" colour, then we use the Color.Name property. Otherwise, we generate a Swatch <index> name.

  foreach (Color color in palette)
  {
    short value1;
    short value2;
    short value3;
    short value4;

    swatchIndex++;

    switch (colorSpace)
    {
      // Calculate color space values here!
      default:
        throw new InvalidOperationException("Color space not supported.");
    }

    this.WriteInt16(stream, (short)colorSpace);
    this.WriteInt16(stream, value1);
    this.WriteInt16(stream, value2);
    this.WriteInt16(stream, value3);
    this.WriteInt16(stream, value4);

    if (version == FileVersion.Version2)
    {
      string name;

      name = color.IsNamedColor ? color.Name : string.Format("Swatch {0}", swatchIndex);

      this.WriteInt32(stream, name.Length);
      this.WriteString(stream, name);
    }
  }
}

Converting colour spaces

As previously mentioned, the specification states that each colour is comprised of four values. Even if a particular colour space doesn't use all four (for example Grayscale just uses one, you still need to write the other values, typically as zero's.

Although it's a slight duplication, I'll include the description table for colour spaces to allow easy reference of the value types.

IdDescription
0RGB. The first three values in the colour data are red, green, and blue. They are full unsigned 16-bit values as in Apple's RGBColordata structure. Pure red = 65535, 0, 0.
1HSB. The first three values in the colour data are hue, saturation, and brightness. They are full unsigned 16-bit values as in Apple's HSVColordata structure. Pure red = 0,65535, 65535.
2CMYK. The four values in the colour data are cyan, magenta, yellow, and black. They are full unsigned 16-bit values. For example, pure cyan = 0,65535,65535,65535.
7Lab. The first three values in the colour data are lightness, a chrominance, and b chrominance. Lightness is a 16-bit value from 0...10000. Chrominance components are each 16-bit values from -12800...12700. Gray values are represented by chrominance components of 0. Pure white = 10000,0,0.
8Grayscale. The first value in the colour data is the gray value, from 0...10000.

While supporting CMYK colours are beyond the scope of this article as they require colour profiles, and I haven't the foggiest on the Lab space, we can easily support RGB, HSL and Grayscale spaces.

RGB is the simplest as .NET colours are already in this format. The only thing we have to do is multiple each channel by 256 as the specification uses the range 0-65535 rather than the typical 0-255.

Notice value4 is simply initialized to zero as this space only needs 3 of the 4 values.

      case ColorSpace.Rgb:
        value1 = (short)(color.R * 256);
        value2 = (short)(color.G * 256);
        value3 = (short)(color.B * 256);
        value4 = 0;
        break;

We can also support HSL without too much trouble as the Color class already includes methods for extracting these values. Again, we need to do a little fiddling to change the numbers into the range used by the specification.

      case ColorSpace.Hsb:
        value1 = (short)(color.GetHue() * 182.04);
        value2 = (short)(color.GetSaturation() * 655.35);
        value3 = (short)(color.GetBrightness() * 655.35);
        value4 = 0;
        break;

The last format we can easily support is grayscale. If the source colour is already grey (i.e. the red, green and blue channels are all the same value), then we use that, otherwise we'll average the 3 channels and use that as the value.

      case ColorSpace.Grayscale:
        if (color.R == color.G && color.R == color.B)
        {
          // already grayscale
          value1 = (short)(color.R * 39.0625);
        }
        else
        {
          // color is not grayscale, convert
          value1 = (short)(((color.R + color.G + color.B) / 3.0) * 39.0625);
        }
        value2 = 0;
        value3 = 0;
        value4 = 0;
        break;

Demo Application

The usual sample application is available from the links at the end of this article. The sample generates a random 256 colour palette, then writes this to a temporary file using the specified colour space. It then reads it back in, and displays both palettes side by side for comparison.

Downloads

All content Copyright (c) by Cyotek Ltd or its respective writers. Permission to reproduce news and web log entries and other RSS feed content in unmodified form without notice is granted provided they are not used to endorse or promote any products or opinions (other than what was expressed by the author) and without taking them out of context. Written permission from the copyright owner must be obtained for everything else.
Original URL of this content is https://www.cyotek.com/blog/writing-photoshop-color-swatch-aco-files-using-csharp?source=rss.

Adding drag handles to an ImageBox to allow resizing of selection regions

$
0
0

The ImageBox control is already a versatile little control and I use it for all sorts of tasks. One of the features I recently wanted was to allow users to be able to select a source region, then adjust this as needed. The control already allows you to draw a selection region, but if you need to adjust that ... well, you can't. You can only draw a new region.

This article describes how to extend the ImageBox to include the ability to resize the selection region. A older demonstration which shows how to drag the selection around has also been incorporated, in a more tidy fashion than the demo.

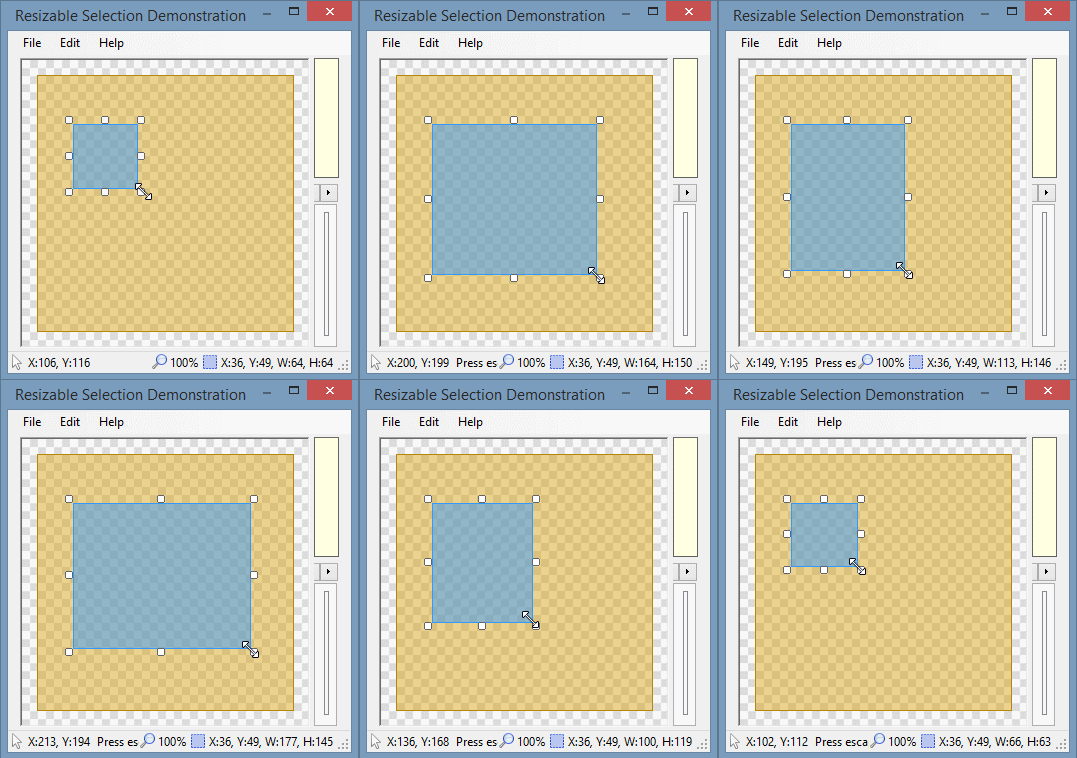
The control in action - and yes, you can resize even when zoomed in or out

Note: The code presented in this article has not been added to the core ImageBox control. Mostly this is because I don't want to clutter the control with bloat (something users of the old PropertiesList control might wish I'd done!) and partly because I don't want to add changes to the control that I'll regret down the line - I don't need another mess like the Color Picker Controls where every update seems to be a breaking change! It most likely will be added to the core control after it's been dog-fooded for a while with different scenarios.

Getting Started

As I mentioned above, this isn't part of the core control (yet) and so has been added to a new ImageBoxEx control. Not the most imaginative of names, but with it's current status of internal demonstration code, it matters not.

In addition to this new sub-classed control, we also need some helper classes. First amongst these is a new enum to describe the drag handle anchors, so we know which edges to resize.

internal enum DragHandleAnchor
{
  None,
  TopLeft,
  TopCenter,
  TopRight,
  MiddleLeft,
  MiddleRight,
  BottomLeft,
  BottomCenter,
  BottomRight
}

Next we have the class that describes an individual drag handle - nothing special here, although I have added Enabled and Visible properties to allow for more advanced scenarios, such as locking an edge, or only showing some handles.

internal class DragHandle
{
  public DragHandle(DragHandleAnchor anchor)
    : this()
  {
    this.Anchor = anchor;
  }

  protected DragHandle()
  {
    this.Enabled = true;
    this.Visible = true;
  }

  public DragHandleAnchor Anchor { get; protected set; }

  public Rectangle Bounds { get; set; }

  public bool Enabled { get; set; }

  public bool Visible { get; set; }
}

While you probably wouldn't do this, hiding one or two of the drag handles could be useful for some scenarios

The final support class is a collection for our drag handle objects - we could just use a List<> or some other generic collection but as a rule it's best not to expose these in a public API (and this code will be just that eventually) so we'll create a dedicated read-only collection.

internal class DragHandleCollection : IEnumerable<DragHandle>
{
  private readonly IDictionary<DragHandleAnchor, DragHandle> _items;

  public DragHandleCollection()
  {
    _items = new Dictionary<DragHandleAnchor, DragHandle>();
    _items.Add(DragHandleAnchor.TopLeft, new DragHandle(DragHandleAnchor.TopLeft));
    _items.Add(DragHandleAnchor.TopCenter, new DragHandle(DragHandleAnchor.TopCenter));
    _items.Add(DragHandleAnchor.TopRight, new DragHandle(DragHandleAnchor.TopRight));
    _items.Add(DragHandleAnchor.MiddleLeft, new DragHandle(DragHandleAnchor.MiddleLeft));
    _items.Add(DragHandleAnchor.MiddleRight, new DragHandle(DragHandleAnchor.MiddleRight));
    _items.Add(DragHandleAnchor.BottomLeft, new DragHandle(DragHandleAnchor.BottomLeft));
    _items.Add(DragHandleAnchor.BottomCenter, new DragHandle(DragHandleAnchor.BottomCenter));
    _items.Add(DragHandleAnchor.BottomRight, new DragHandle(DragHandleAnchor.BottomRight));
  }

  public int Count
  {
    get { return _items.Count; }
  }

  public DragHandle this[DragHandleAnchor index]
  {
    get { return _items[index]; }
  }

  public IEnumerator<DragHandle> GetEnumerator()
  {
    return _items.Values.GetEnumerator();
  }

  public DragHandleAnchor HitTest(Point point)
  {
    DragHandleAnchor result;

    result = DragHandleAnchor.None;

    foreach (DragHandle handle in this)
    {
      if (handle.Visible && handle.Bounds.Contains(point))
      {
        result = handle.Anchor;
        break;
      }
    }

    return result;
  }

  IEnumerator IEnumerable.GetEnumerator()
  {
    return this.GetEnumerator();
  }
}

Again, there's not much special about this class. As it is a custom class it does give us more flexibility, such as initializing the required drag handles, and providing a convenient HitTest method so we can check if a given point is within the bounds of a DragHandle.

Positioning drag handles around the selection region

The ImageBox control includes a nice bunch of helper methods, such as PointToImage, GetOffsetRectangle and more, which are very useful for adding scalable elements to an ImageBox instance. Unfortunately, they are all virtually useless for the drag handle code due to the fact that the handles themselves must not scale - the positions of course must update and resizing must be accurate whether at 100% zoom or not, but the size must not. This means we can't rely on the built in methods and must manually recalculate the handles whenever the control changes.

private void PositionDragHandles()
{
  if (this.DragHandles != null && this.DragHandleSize > 0)
  {
    if (this.SelectionRegion.IsEmpty)
    {
      foreach (DragHandle handle in this.DragHandles)
      {
        handle.Bounds = Rectangle.Empty;
      }
    }
    else
    {
      int left;
      int top;
      int right;
      int bottom;
      int halfWidth;
      int halfHeight;
      int halfDragHandleSize;
      Rectangle viewport;
      int offsetX;
      int offsetY;

      viewport = this.GetImageViewPort();
      offsetX = viewport.Left + this.Padding.Left + this.AutoScrollPosition.X;
      offsetY = viewport.Top + this.Padding.Top + this.AutoScrollPosition.Y;
      halfDragHandleSize = this.DragHandleSize / 2;
      left = Convert.ToInt32((this.SelectionRegion.Left * this.ZoomFactor) + offsetX);
      top = Convert.ToInt32((this.SelectionRegion.Top * this.ZoomFactor) + offsetY);
      right = left + Convert.ToInt32(this.SelectionRegion.Width * this.ZoomFactor);
      bottom = top + Convert.ToInt32(this.SelectionRegion.Height * this.ZoomFactor);
      halfWidth = Convert.ToInt32(this.SelectionRegion.Width * this.ZoomFactor) / 2;
      halfHeight = Convert.ToInt32(this.SelectionRegion.Height * this.ZoomFactor) / 2;

      this.DragHandles[DragHandleAnchor.TopLeft].Bounds = new Rectangle(left - this.DragHandleSize, top - this.DragHandleSize, this.DragHandleSize, this.DragHandleSize);
      this.DragHandles[DragHandleAnchor.TopCenter].Bounds = new Rectangle(left + halfWidth - halfDragHandleSize, top - this.DragHandleSize, this.DragHandleSize, this.DragHandleSize);
      this.DragHandles[DragHandleAnchor.TopRight].Bounds = new Rectangle(right, top - this.DragHandleSize, this.DragHandleSize, this.DragHandleSize);
      this.DragHandles[DragHandleAnchor.MiddleLeft].Bounds = new Rectangle(left - this.DragHandleSize, top + halfHeight - halfDragHandleSize, this.DragHandleSize, this.DragHandleSize);
      this.DragHandles[DragHandleAnchor.MiddleRight].Bounds = new Rectangle(right, top + halfHeight - halfDragHandleSize, this.DragHandleSize, this.DragHandleSize);
      this.DragHandles[DragHandleAnchor.BottomLeft].Bounds = new Rectangle(left - this.DragHandleSize, bottom, this.DragHandleSize, this.DragHandleSize);
      this.DragHandles[DragHandleAnchor.BottomCenter].Bounds = new Rectangle(left + halfWidth - halfDragHandleSize, bottom, this.DragHandleSize, this.DragHandleSize);
      this.DragHandles[DragHandleAnchor.BottomRight].Bounds = new Rectangle(right, bottom, this.DragHandleSize, this.DragHandleSize);
    }
  }
}

The code is fairly straightforward, but we need to call it from a few places, so we have a bunch of overrides similar to the below.

protected override void OnScroll(ScrollEventArgs se)
{
  base.OnScroll(se);

  this.PositionDragHandles();
}

We call PositionDragHandles from the constructor, and the Scroll, SelectionRegionChanged, ZoomChanged and Resize events.

Painting the drag handles

Painting the handles is simple enough - after normal painting has occurred, we draw our handles on top.

protected override void OnPaint(PaintEventArgs e)
{
  base.OnPaint(e);

  if (this.AllowPainting && !this.SelectionRegion.IsEmpty)
  {
    foreach (DragHandle handle in this.DragHandles)
    {
      if (handle.Visible)
      {
        this.DrawDragHandle(e.Graphics, handle);
      }
    }
  }
}

protected virtual void DrawDragHandle(Graphics graphics, DragHandle handle)
{
  int left;
  int top;
  int width;
  int height;
  Pen outerPen;
  Brush innerBrush;

  left = handle.Bounds.Left;
  top = handle.Bounds.Top;
  width = handle.Bounds.Width;
  height = handle.Bounds.Height;

  if (handle.Enabled)
  {
    outerPen = SystemPens.WindowFrame;
    innerBrush = SystemBrushes.Window;
  }
  else
  {
    outerPen = SystemPens.ControlDark;
    innerBrush = SystemBrushes.Control;
  }

  graphics.FillRectangle(innerBrush, left + 1, top + 1, width - 2, height - 2);
  graphics.DrawLine(outerPen, left + 1, top, left + width - 2, top);
  graphics.DrawLine(outerPen, left, top + 1, left, top + height - 2);
  graphics.DrawLine(outerPen, left + 1, top + height - 1, left + width - 2, top + height - 1);
  graphics.DrawLine(outerPen, left + width - 1, top + 1, left + width - 1, top + height - 2);
}

Disabled drag handles are painted using different colors

Updating the cursor

As the mouse travels across the control, we need to adjust the cursor accordingly - either to change it to one of the four resize cursors if the mouse is over an enabled handle, or to the drag cursor if it's within the bounds of the selection region. Of course, we also need to reset it if none of these conditions are true.

private void SetCursor(Point point)
{
  Cursor cursor;

  if (this.IsSelecting)
  {
    cursor = Cursors.Default;
  }
  else
  {
    DragHandleAnchor handleAnchor;

    handleAnchor = this.IsResizing ? this.ResizeAnchor : this.HitTest(point);
    if (handleAnchor != DragHandleAnchor.None && this.DragHandles[handleAnchor].Enabled)
    {
      switch (handleAnchor)
      {
        case DragHandleAnchor.TopLeft:
        case DragHandleAnchor.BottomRight:
          cursor = Cursors.SizeNWSE;
          break;
        case DragHandleAnchor.TopCenter:
        case DragHandleAnchor.BottomCenter:
          cursor = Cursors.SizeNS;
          break;
        case DragHandleAnchor.TopRight:
        case DragHandleAnchor.BottomLeft:
          cursor = Cursors.SizeNESW;
          break;
        case DragHandleAnchor.MiddleLeft:
        case DragHandleAnchor.MiddleRight:
          cursor = Cursors.SizeWE;
          break;
        default:
          throw new ArgumentOutOfRangeException();
      }
    }
    else if (this.IsMoving || this.SelectionRegion.Contains(this.PointToImage(point)))
    {
      cursor = Cursors.SizeAll;
    }
    else
    {
      cursor = Cursors.Default;
    }
  }

  this.Cursor = cursor;
}

Initializing a move or a drag

When the user first presses the left mouse button, check to see if the cursor is within the bounds of the selection region, or any visible drag handle. If so, we record the location of the cursor, and it's offset to the upper left corner of the selection region.

The original cursor location will be used as the origin, so once the mouse starts moving, we use this to determine if a move should occur, or a resize, or nothing.

The offset is used purely for moving, so that we reposition the selection relative to the cursor position - otherwise it would snap to the cursor which would look pretty awful.

protected override void OnMouseDown(MouseEventArgs e)
{
  Point imagePoint;

  imagePoint = this.PointToImage(e.Location);

  if (e.Button == MouseButtons.Left && (this.SelectionRegion.Contains(imagePoint) || this.HitTest(e.Location) != DragHandleAnchor.None))
  {
    this.DragOrigin = e.Location;
    this.DragOriginOffset = new Point(imagePoint.X - (int)this.SelectionRegion.X, imagePoint.Y - (int)this.SelectionRegion.Y);
  }
  else
  {
    this.DragOriginOffset = Point.Empty;
    this.DragOrigin = Point.Empty;
  }

  base.OnMouseDown(e);
}

Even if the user immediately moves the mouse, we don't want to trigger a move or a resize - the mouse may have just twitched. Instead, we wait until it moves beyond an area centred around the drag origin - once it has, then we trigger the action.

This drag rectangle is determined via the SystemInformation.DragSize(MSDN) property.

During a mouse move, as well as triggering a move or resize, we also need to process any in-progress action, as well as update the cursor as described in the previous section.

private bool IsOutsideDragZone(Point location)
{
  Rectangle dragZone;
  int dragWidth;
  int dragHeight;

  dragWidth = SystemInformation.DragSize.Width;
  dragHeight = SystemInformation.DragSize.Height;
  dragZone = new Rectangle(this.DragOrigin.X - (dragWidth / 2), this.DragOrigin.Y - (dragHeight / 2), dragWidth, dragHeight);

  return !dragZone.Contains(location);
}

protected override void OnMouseMove(MouseEventArgs e)
{
  // start either a move or a resize operation
  if (!this.IsSelecting && !this.IsMoving && !this.IsResizing && e.Button == MouseButtons.Left && !this.DragOrigin.IsEmpty && this.IsOutsideDragZone(e.Location))
  {
    DragHandleAnchor anchor;

    anchor = this.HitTest(this.DragOrigin);

    if (anchor == DragHandleAnchor.None)
    {
      // move
      this.StartMove();
    }
    else if (this.DragHandles[anchor].Enabled && this.DragHandles[anchor].Visible)
    {
      // resize
      this.StartResize(anchor);
    }
  }

  // set the cursor
  this.SetCursor(e.Location);

  // perform operations
  this.ProcessSelectionMove(e.Location);
  this.ProcessSelectionResize(e.Location);

  base.OnMouseMove(e);
}

Although I'm not going to include the code here as this article is already very code heavy, the StartMove and StartResize methods simply set some internal flags describing the control state, and store a copy of the SelectionRegion property - I'll explain why towards the end of the article. They also raise events, both to allow the actions to be cancelled, or to allow the application to update the user interface in some fashion.

Performing the move

Moving the selection around

Performing the move is simple - we calculate the new position of the selection region according to the cursor position, and including the offset from the original drag for a smooth move.

We also check to ensure that the full bounds of the selection region fit within the controls client area, preventing the user from dragging out outside the bounds of the underlying image/virtual size.

private void ProcessSelectionMove(Point cursorPosition)
{
  if (this.IsMoving)
  {
    int x;
    int y;
    Point imagePoint;

    imagePoint = this.PointToImage(cursorPosition, true);

    x = Math.Max(0, imagePoint.X - this.DragOriginOffset.X);
    if (x + this.SelectionRegion.Width >= this.ViewSize.Width)
    {
      x = this.ViewSize.Width - (int)this.SelectionRegion.Width;
    }

    y = Math.Max(0, imagePoint.Y - this.DragOriginOffset.Y);
    if (y + this.SelectionRegion.Height >= this.ViewSize.Height)
    {
      y = this.ViewSize.Height - (int)this.SelectionRegion.Height;
    }

    this.SelectionRegion = new RectangleF(x, y, this.SelectionRegion.Width, this.SelectionRegion.Height);
  }
}

Performing the resize

Resizing the selection

The resize code is also reasonably straight forward. We decide which edges of the selection region we're going to adjust based on the drag handle. Next, we get the position of the cursor within the underlying view - snapped to fit within the bounds, so that you can't size the region outside the view.

The we just update the edges based on this calculation. However, we also ensure that the selection region is above a minimum size. Apart from the fact that if the drag handles overlap it's going to be impossible to size properly, you probably want to force some minimum size constraints.

private void ProcessSelectionResize(Point cursorPosition)
{
  if (this.IsResizing)
  {
    Point imagePosition;
    float left;
    float top;
    float right;
    float bottom;
    bool resizingTopEdge;
    bool resizingBottomEdge;
    bool resizingLeftEdge;
    bool resizingRightEdge;

    imagePosition = this.PointToImage(cursorPosition, true);

    // get the current selection
    left = this.SelectionRegion.Left;
    top = this.SelectionRegion.Top;
    right = this.SelectionRegion.Right;
    bottom = this.SelectionRegion.Bottom;

    // decide which edges we're resizing
    resizingTopEdge = this.ResizeAnchor >= DragHandleAnchor.TopLeft && this.ResizeAnchor <= DragHandleAnchor.TopRight;
    resizingBottomEdge = this.ResizeAnchor >= DragHandleAnchor.BottomLeft && this.ResizeAnchor <= DragHandleAnchor.BottomRight;
    resizingLeftEdge = this.ResizeAnchor == DragHandleAnchor.TopLeft || this.ResizeAnchor == DragHandleAnchor.MiddleLeft || this.ResizeAnchor == DragHandleAnchor.BottomLeft;
    resizingRightEdge = this.ResizeAnchor == DragHandleAnchor.TopRight || this.ResizeAnchor == DragHandleAnchor.MiddleRight || this.ResizeAnchor == DragHandleAnchor.BottomRight;

    // and resize!
    if (resizingTopEdge)
    {
      top = imagePosition.Y;
      if (bottom - top < this.MinimumSelectionSize.Height)
      {
        top = bottom - this.MinimumSelectionSize.Height;
      }
    }
    else if (resizingBottomEdge)
    {
      bottom = imagePosition.Y;
      if (bottom - top < this.MinimumSelectionSize.Height)
      {
        bottom = top + this.MinimumSelectionSize.Height;
      }
    }

    if (resizingLeftEdge)
    {
      left = imagePosition.X;
      if (right - left < this.MinimumSelectionSize.Width)
      {
        left = right - this.MinimumSelectionSize.Width;
      }
    }
    else if (resizingRightEdge)
    {
      right = imagePosition.X;
      if (right - left < this.MinimumSelectionSize.Width)
      {
        right = left + this.MinimumSelectionSize.Width;
      }
    }

    this.SelectionRegion = new RectangleF(left, top, right - left, bottom - top);
  }
}

Finalizing the move/resize operations

So far, we've used the MouseDown and MouseMove events to control the initializing and processing of the actions. Now, we've use the MouseUp event to finish things off - to reset flags that describe the control state, and to raise events.

protected override void OnMouseUp(MouseEventArgs e)
{
  if (this.IsMoving)
  {
    this.CompleteMove();
  }
  else if (this.IsResizing)
  {
    this.CompleteResize();
  }

  base.OnMouseUp(e);
}

Cancelling a move or resize operation

Assuming the user has started moving the region or resizes it, and then changes their mind. How to cancel? The easiest way is to press the Escape key - and so that's what we'll implement.

We can do this by overriding ProcessDialogKey, checking for Escape and then resetting the control state, and restoring the SelectionRegion property using the copy we started at the start of the operation.

protected override bool ProcessDialogKey(Keys keyData)
{
  bool result;

  if (keyData == Keys.Escape && (this.IsResizing || this.IsMoving))
  {
    if (this.IsResizing)
    {
      this.CancelResize();
    }
    else
    {
      this.CancelMove();
    }

    result = true;
  }
  else
  {
    result = base.ProcessDialogKey(keyData);
  }

  return result;
}

Wrapping up

That covers most of the important code for making these techniques work, although it's incomplete, so please download the latest version for the full source. And I hope you find this addition to the ImageBox component useful!

Downloads

All content Copyright (c) by Cyotek Ltd or its respective writers. Permission to reproduce news and web log entries and other RSS feed content in unmodified form without notice is granted provided they are not used to endorse or promote any products or opinions (other than what was expressed by the author) and without taking them out of context. Written permission from the copyright owner must be obtained for everything else.
Original URL of this content is https://www.cyotek.com/blog/adding-drag-handles-to-an-imagebox-to-allow-resizing-of-selection-regions?source=rss.

ColorPicker Controls 1.0.4.0 Update

$
0
0

The ColorPicker Controls have been updated to version 1.0.4.0.

This is a fairly substantial update, with quite a few bug fixes and enhancements to the code.

What's next for the library?

I feel the code is starting to get a little bloated as the library is trying to serve two purposes - the primary purpose is for the selection of colours. However, it also provides the ability to load and save colour swatches in various formats, some of which has been the subject of posts on this blog.

Internally, we link to the individual files from the library in our core product assemblies - all the UI stuff is in Cyotek.Windows.Forms, and everything else is in Cyotek.Drawing. I think it would probably be a good idea to properly split up this library too. If you just want the UI, use one library, if you want the extended palette serialisation support, use the other. There is some overlap though so this will need to be considered a bit first.

Of course splitting the library is a massive breaking change. I think future versions of our open source libraries will change to use Semantic Versioning so that it will be much clearer when things are being broken. Of course, it would be preferable if breaking changes weren't introduced all the time! This is also why I haven't added a NuGet package yet, when you update a package you don't expect to have to change your source code too.

Changes and new features

  • Added new AdobePhotoShopColorSwatchSerializer serializer for reading and writing Adobe PhotoShop colour swatches (both version 1 and version 2)
  • You can now set the Columns property of a ColorGrid control to 0, which will then internally calculate columns based on the size of the control, the cell size, and the spacing. A new read-only ActualColumns property has been added which will allow you to get the real number of columns if required. The AutoSize behaviour has been changed so that only the vertical height of the control is adjusted when Columns is zero
  • Save Palette button in the ColorPickerDialog now obtains the serializer to use based on the selected filter index, allowing correct saving if multiple serializers use the same extension.
  • Added CanReadFrom method to IPaletteSerializer.
  • PaletteSerializer.GetSerializer now makes use of the above new method to access the relevant serializer rather than just matching extensions. This means if you have two serializers that support different .pal formatted files, these can now be loaded successfully, instead of one loading and one failing.
  • Added new RawPaletteSerializer which reads and writes palettes that are simply RGB triplets in byte form
  • Added new ShowAlphaChannel property to ColorEditor and ColorPickerDialog. This property allows the alpha channel editing controls to be hidden, for when working with 8-bit colours.
  • The rendering of the selected cell in a ColorGrid control who's SelectedCellStyle is Zoomed now uses Padding.Left and Padding.Top to determine the size of the zoom box, avoiding massive boxes the larger the CellSize gets.
  • Added a new standard 256 colour palette. You can use this in the ColorGrid by setting the Palette property to ColorPalette.Standard256 or obtain the array of colours by calling ColorPalettes.StandardPalette
  • ColorGrid and RgbaColorSlider controls now only create transparency brushes when required. A new virtual method SupportsTransparentBackColor allows inheritors to create their own brushes if required.
  • Added EditingColor event to ColorGrid, allowing the edit colour action to be cancelled, or replaced with a custom editor
  • Added CurrentCell property and GetCellOffset methods to the ColorGrid.
  • ColorCollection now implements IEquatable
  • Added more tests
  • Added new Navigate method to ColorGrid for easier moving within the cells of the grid

Bug Fixes

  • The ColorGrid control now tries to be smarter with painting, and only paints cells that intersect with the clip rectangle. In addition, where possible only individual cells are invalidated rather than the entire control.
  • Corrected invalid error messages from the Save Palette button in the ColorPickerDialog.
  • Load Palette and Save Palette buttons in the ColorPickerDialog now check the CanRead and CanWrite properties of the serializer.
  • Double clicking with any button other than the left in ColorGrid control no longer attempts to initiate colour editing
  • Setting the Color property of the ColorGrid control to Color.Empty no longer treats the value as a valid colour
  • The ColorGrid control no longer defines custom colour regions when the ShowCustomColors property was false. This manifested in hover and selection effects working if you moved your mouse over the bottom of a resized grid.
  • Clicking "white space" areas of a ColorWheel control will no longer incorrectly set the colour to the closest matching point on the wheel itself. However, starting to select a colour within the wheel and then moving outside the bounds will continue to select the closest match as usual.
  • Fixed a crash that occurred when creating controls that inherited from ColorGrid or RgbaColorSlider
  • When the AutoAddColors and ShowCustomColors properties are false, unmatched colours will no longer be silently added to the ColorGrid custom palette unexpectedly. This also resolves various crashes after the colour regions fix above was applied.
  • The ColorWheel control now makes use of ButtonRenderer.DrawParentBackground to draw itself, to avoid ugly blocks of solid colours when hosted in containers such as the TabControl
  • The ColorEditorManager control's ColorChanged event has now been marked as the default event, so when you double click the component in the designer, a code window now correctly opens.
  • If the underlying entry in a ColorCollection bound to a ColorGrid control was modified, and this particular entry was the selected colour, the ColorGrid would not keep its Color property in sync and would clear the selected index.
  • Attempting to set the Columns property to less than zero now throws an ArgumentOutOfRange exception rather than setting it, then crashing later on
  • Double clicking a colour in the grid of the ColorPickerDialog no longer opens another copy of the ColorPickerDialog
  • Fixed problems in the ColorGrid with keyboard navigation and initial focus if no valid colour index was set.
  • The ColorCollection.Find method now correctly works when adding named colours (e.g. Color.CornflowerBlue) to the collection, but searching by ARGB value (e.g. Color.FromArgb(100, 149, 237))
  • Fixed an issue where if the internal dictionary lookup in ColorCollection class had been created and the collection was then updated, in some cases the lookup wasn't correctly modified.

All content Copyright (c) by Cyotek Ltd or its respective writers. Permission to reproduce news and web log entries and other RSS feed content in unmodified form without notice is granted provided they are not used to endorse or promote any products or opinions (other than what was expressed by the author) and without taking them out of context. Written permission from the copyright owner must be obtained for everything else.
Original URL of this content is https://www.cyotek.com/blog/colorpicker-controls-1-0-4-0-update?source=rss.

Add Projects Extension - 1.0.1.0

$
0
0

A short and sweet post today...

I've been happily using the Add Projects extension since first writing it several months ago, and I actually find it a real time saver.

However, one thing that has been bugging me is trying to find specific projects in an ever growing list.

I've just updated the extension to version 1.0.1.0 by adding a handy filter option to the main dialog (sorry, it's still Windows Forms as opposed to XAML, so continues to look clunky in the VSIDE!)

I've also pushed the source to GitHub. At some point I'll convert it to XAML and properly publish it, but for now the (signed) package can be downloaded here.

One word of caution - I doubt the source code project will open in Visual Studio 2012 any more, as I had to install the VS2013 SDK and upgrade the project to work on this update. The compiled extension is supported on Visual Studio 2012 and Visual Studio 2013.

Downloading

The best place to get the extension is from the extension page on the Microsoft Visual Studio Gallery. This also ensures you get notifications when the extension is updated. (Don't forget to post a review!)

You can also grab the source directly from our GitHub page.

Legacy links available below are no longer maintained.

History

  • 18Apr2014 First published
  • 14Oct2014 Updated to include Visual Studio Gallery and GitHub links

All content Copyright (c) by Cyotek Ltd or its respective writers. Permission to reproduce news and web log entries and other RSS feed content in unmodified form without notice is granted provided they are not used to endorse or promote any products or opinions (other than what was expressed by the author) and without taking them out of context. Written permission from the copyright owner must be obtained for everything else.
Original URL of this content is https://www.cyotek.com/blog/add-projects-extension-1-0-1-0?source=rss.

CircularBuffer - a first-in, first-out collection of objects using a fixed buffer

$
0
0

I haven't had much time to work on blog posts recently, but I do have one quick post to make.

One of our current application prototype's stores a bunch of data. Data continuously arrives, but I only want to store so much of it. You could do this with something list a List<T> and just remove items when the collection is too big, but I wanted something a bit more efficient which didn't have to do any sort of resizing or allocation when adding and removing items. Enter the circular buffer.

What is a circular buffer?

To quote Wikipedia, a circular buffer, cyclic buffer or ring buffer is a data structure that uses a single, fixed-size buffer as if it were connected end-to-end. This structure lends itself easily to buffering data streams.

Indeed. Originally I didn't want to invent the wheel, so when I found Circular Buffer for .NET I thought I would use that. Unfortunately as soon as I started using, I hit some problems, both in the code and with what I was trying to do. So I stopped working on what I was doing and wrote a full set of tests for the class, fixing bugs as I went, and also adding some more features to handle what I wanted.

Eventually I decided I would put the code up on GitHub as Circular Buffer for .NET doesn't seem to be maintained any longer.

A generic CircularBuffer<T> class for .NET

On our GitHub page you can download a modified version of the original class. I'm not going into too many details here as it's very straightforward to use - if you've used Queue<Y> or Stack<T> then you'll be right at home.

  • Get - Removes and returns one or more items from the start of the buffer
  • Put - Adds one or more items to the end of the buffer. If the buffer is full, then items at the start will be overwritten
  • Peek - Retrieve one or more items from the start of the buffer, without removing them
  • PeekLast - Retrieve the last item in the buffer without removing it
  • ToArray - Return all items in the buffer
  • CopyTo - An advanced version of ToArray, allows you to copy items from the buffer into another array
  • Clear - Resets the buffer

There are also some properties to control behaviour or provide state information.

  • Capacity - The total number of items the buffer can hold
  • Size - The current number of items in the buffer
  • AllowOverwrite - When true, new items overwrite the oldest items when the buffer is full. Otherwise, an exception is thrown
  • IsEmpty - true if the buffer is empty
  • IsFull - true if the buffer is full and AllowOverwrite is false

Examples

This first example creates a CircularBuffer<T>, adds four items, then retrieves the first item.

CircularBuffer<string> target;
string firstItem;

target = new CircularBuffer<string>(10);
target.Put("Alpha");
target.Put("Beta");
target.Put("Gamma");

firstItem = target.Get(); // Returns Alpha

This second example shows how the buffer will automatically overwrite the oldest items when full.

CircularBuffer<string> target;
string firstItem;

target = new CircularBuffer<string>(3);
target.Put("Alpha");
target.Put("Beta");
target.Put("Gamma");
target.Put("Delta");

firstItem = target.Get(); // Returns beta

For more examples, see the test class CircularBufferTests as this has tests which cover almost all the code paths.

Requirements

.NET Framework 2.0 or later.

Download

Cyotek.Collections.Generic.CircularBuffer

All content Copyright (c) by Cyotek Ltd or its respective writers. Permission to reproduce news and web log entries and other RSS feed content in unmodified form without notice is granted provided they are not used to endorse or promote any products or opinions (other than what was expressed by the author) and without taking them out of context. Written permission from the copyright owner must be obtained for everything else.
Original URL of this content is https://www.cyotek.com/blog/circularbuffer-a-first-in-first-out-collection-of-objects-using-a-fixed-buffer?source=rss.

Batch Syntax Highlighting in the DigitalRune Text Editor Control

$
0
0

In a previous article I described how to create a CSS syntax highlighting definition file for use with the open source DigitalRune Text Editor Control.

Today I was testing events in one of our myriad of prototypes, which triggered an sample TextEditorControl to apply the BAT syntax definition found in BAT-Mode.xshd.

While it validated the particular piece of code I was working on rather nicely, I was less then enamoured with the highlighting. The image below shows an example of this.

My eyes! The original (and illegible) BAT syntax highlighting

Pretty ugly isn't it? However, I was actually doing a vaguely real-world test as I did want to see some simple batch file syntax highlighting. Perfect timing for a distraction to go look at another problem.

The following screenshot shows my new and improved syntax highlighting file, based on my experiences creating the CSS version. I couldn't do everything I tried/wanted, and I suspect this will be limitations of the TextEditorControl, but fixing that is "rainy day" stuff. Otherwise, simple as this was, it was a nice distraction with immediate benefits!

New and improved Joker products! Or, at least new and improved syntax highlighting

The XML Definition

The definition is very straightforward, as it's basically just keyword tokens and a single highlighting span for environment variables.

I was trying for something similar to how Notepad++ highlights batch files, in which if the first "word" on a line isn't a command, it's assumed to be a program and highlighted accordingly, but I couldn't get that working correctly so it's commented out in the definition - if you know of a trick or code patch to make it work, please let me know!

<?xml version="1.0" encoding="utf-8"?><!-- Batch File syntax highlighting for DigitalRune TextEditor. Created by Cyotek (http://cyotek.com/) --><SyntaxDefinition name="Batch" extensions="*.bat;*.cmd"><Environment><Default color="#000000" bgcolor="#ffffff" /></Environment><RuleSets><RuleSet ignorecase="true"><!-- Adding @ as a delimiter means the "ECHO" in "@ECHO OFF" will be highlighted. --><Delimiters>@:</Delimiters><!-- REM comment --><Span name="LineComment" bold="false" italic="false" color="#008000" stopateol="true"><Begin>REM</Begin></Span><!-- :: style comment --><Span name="LineComment2" bold="false" italic="false" color="#008000" stopateol="true"><Begin>::</Begin></Span><!-- label --><Span name="Label" bold="false" italic="false" color="#FF0000" bgcolor="#FFFF80" stopateol="true"><Begin startofline="true">:</Begin></Span><!-- Environment Variable --><Span name="Variable" bold="false" italic="false" color="#FF8000" bgcolor="#FCFFF0" stopateol="true"><Begin>%</Begin><End>%</End></Span><!-- Programs --><!-- The idea here is the first word on a line that isn't a keyword is a program.
           Doesn't work with the default TextEditorControl though. --><!--<Span name="Program" bold="false" italic="true" color="Red" bgcolor="#FCFFF0" stopateol="true"><Begin startofline="true" singleword="true"></Begin><End></End></Span>--><!-- Operators --><KeyWords name="Punctuation" bold="false" italic="false" color="#FF0000"><Key word="+" /><Key word="-" /><Key word="*" /><Key word="&lt;" /><Key word="&gt;" /><Key word="=" /><Key word="@" /></KeyWords><!-- Standard command.com keywords --><!-- http://en.wikipedia.org/wiki/COMMAND.COM --><KeyWords name="command.com-internalcommands" bold="true" italic="false" color="#0000FF"><Key word="break" /><Key word="chcp" /><Key word="chdir" /><Key word="cd" /><Key word="cls" /><Key word="copy" /><Key word="ctty" /><Key word="date" /><Key word="del" /><Key word="erase" /><Key word="dir" /><Key word="echo" /><Key word="exit" /><Key word="lfnfor" /><Key word="loadhigh" /><Key word="lh" /><Key word="lock" /><Key word="move" /><Key word="mkdir" /><Key word="md" /><Key word="path" /><Key word="prompt" /><Key word="ren" /><Key word="rename" /><Key word="rmdir" /><Key word="rd" /><Key word="set" /><Key word="time" /><Key word="truename" /><Key word="type" /><Key word="unlock" /><Key word="ver" /><Key word="verify" /><Key word="vol" /><!-- http://ss64.com/nt/ --><Key word="color" /><Key word="endlocal" /><Key word="ftype" /><Key word="mklink" /><Key word="popd" /><Key word="pushd" /><Key word="setlocal" /><Key word="start" /><Key word="title" /></KeyWords><KeyWords name="command.com-commands" bold="true" italic="false" color="#0000FF"><Key word="call" /><Key word="for" /><Key word="goto" /><Key word="if" /><Key word="in" /><Key word="do" /><Key word="pause" /><Key word="rem" /><Key word="shift" /></KeyWords><!-- Redirects --><KeyWords name="command.com-redirects" bold="true" italic="false" color="#0000FF"><Key word="nul" /><Key word="con" /><Key word="prn" /><Key word="aux" /><Key word="clock$" /><Key word="com0" /><Key word="com1" /><Key word="com2" /><Key word="com3" /><Key word="com4" /><Key word="com5" /><Key word="com6" /><Key word="com7" /><Key word="com8" /><Key word="com9" /><Key word="lpt0" /><Key word="lpt1" /><Key word="lpt2" /><Key word="lpt3" /><Key word="lpt4" /><Key word="lpt5" /><Key word="lpt6" /><Key word="lpt7" /><Key word="lpt8" /><Key word="lpt9" /></KeyWords></RuleSet></RuleSets></SyntaxDefinition>

A sample project

I've attached a basic sample project, which shows how to dynamic load in the definition file. And yes, that is a (stripped down) version of one of the build scripts used by Spriter. I'm still an old school guy at heart, and so I use msbuild to compile a solution, but for anything else I still tend to turn to batch scripts and custom console apps first rather than MSBuild tasks or PowerShell cmdlets.

Although the example project loads in the definition from an external file, I would recommend that you build it into the TextEditorControl assembly itself to make deployment easier. I covered this in the Compiling the definition into the assembly section of the previous article so I won't replicate that here.

Downloads

All content Copyright (c) by Cyotek Ltd or its respective writers. Permission to reproduce news and web log entries and other RSS feed content in unmodified form without notice is granted provided they are not used to endorse or promote any products or opinions (other than what was expressed by the author) and without taking them out of context. Written permission from the copyright owner must be obtained for everything else.
Original URL of this content is https://www.cyotek.com/blog/batch-syntax-highlighting-in-the-digitalrune-text-editor-control?source=rss.


Configuring the emulation mode of an Internet Explorer WebBrowser control

$
0
0

Occasionally I need to embed HTML in my applications. If it is just to display some simple layout with basic interactions, I might use a component such as HtmlRenderer. In most cases however, I need a more complex layout, JavaScript or I might want to display real pages from the internet - in which case I'm lumbered with the WebBrowser control.

I'm aware other embeddable browsers exist, but the idea of shipping additional multi-MB dependencies doesn't make sense unless an application makes heavy use of HTML interfaces

The WebBrowser control annoys me in myriad ways, but it does get the job done. One of the things that occasionally frustrates me is that by default it is essentially an embedded version of Internet Explorer 7 - or enabling Compatibility Mode in a modern IE session. Not so good as more and more sites use HTML5 and other goodies.

Rather fortunately however, Microsoft provide the ability to configure the emulation mode your application will use. It's not as simple as setting some properties on a control as it involves setting some registry values and other caveats, but it is still a reasonable process.

Do you really want to greet your users with script errors when displaying modern websites in the WebBrowser control?

About browser emulation versions

The table below (source) lists the currently supported emulation versions at the time of writing. As you can see, it's possible to emulate all "recent" versions of Internet Explorer in one of two ways - either by forcing a standards mode, or allowing !DOCTYPE directives to control the mode. The exception to this dual behaviour is version 7 which is as is.

According to the documentation the IE8 (8000) and IE9 (9000) modes will switch to IE10 (10000) mode if installed. The documentation doesn't mention if this is still the case regarding IE11 so I'm not sure on the behaviour in that regard.

ValueDescription
11001Internet Explorer 11. Webpages are displayed in IE11 edge mode, regardless of the !DOCTYPE directive.
11000IE11. Webpages containing standards-based !DOCTYPE directives are displayed in IE11 edge mode. Default value for IE11.
10001Internet Explorer 10. Webpages are displayed in IE10 Standards mode, regardless of the !DOCTYPE directive.
10000Internet Explorer 10. Webpages containing standards-based !DOCTYPE directives are displayed in IE10 Standards mode. Default value for Internet Explorer 10.
9999Windows Internet Explorer 9. Webpages are displayed in IE9 Standards mode, regardless of the !DOCTYPE directive.
9000Internet Explorer 9. Webpages containing standards-based !DOCTYPE directives are displayed in IE9 mode. Default value for Internet Explorer 9.
8888Webpages are displayed in IE8 Standards mode, regardless of the !DOCTYPE directive.
8000Webpages containing standards-based !DOCTYPE directives are displayed in IE8 mode. Default value for Internet Explorer 8
7000Webpages containing standards-based !DOCTYPE directives are displayed in IE7 Standards mode. Default value for applications hosting the WebBrowser Control.

Setting the browser emulation version

Browser emulation support is configured in the Registry

Setting the emulation version is very straightforward - add a value to the registry in the below key containing the name of your executable file and a value from the table above.

HKEY_LOCAL_MACHINE (or HKEY_CURRENT_USER)   SOFTWARE      Microsoft         Internet Explorer            Main               FeatureControl                  FEATURE_BROWSER_EMULATION                     yourapp.exe = (DWORD) version

Note: If you do this from an application you're debugging using Visual Studio and the Visual Studio Hosting Process option is enabled you'll find the executable name may not be what you expect. When enabled, a stub process with a slightly modified name is used instead. For example, if your application is named calc.exe, you'll need to add the value calc.vshost.exe in order to set the emulated version for the correct process.

Getting the Internet Explorer version

As it makes more sense to detect the version of IE installed on the user's computer and set the emulation version to match, first we need a way of detecting the IE version.

There are various ways of getting the installed IE version, but the sensible method is reading the value from the registry as everything else we are doing in this article involves the registry in some fashion.

HKEY_LOCAL_MACHINE   SOFTWARE      Microsoft         Internet Explorer            svcVersion or Version

Older versions of IE used the Version value, while newer versions use svcVersion. In either case, this value contains the version string.

We can use the following version to pull out the major digit.

private const string InternetExplorerRootKey = @"Software\Microsoft\Internet Explorer";

public static int GetInternetExplorerMajorVersion()
{
  int result;

  result = 0;

  try
  {
    RegistryKey key;

    key = Registry.LocalMachine.OpenSubKey(InternetExplorerRootKey);

    if (key != null)
    {
      object value;

      value = key.GetValue("svcVersion", null) ?? key.GetValue("Version", null);

      if (value != null)
      {
        string version;
        int separator;

        version = value.ToString();
        separator = version.IndexOf('.');
        if (separator != -1)
        {
          int.TryParse(version.Substring(0, separator), out result);
        }
      }
    }
  }
  catch (SecurityException)
  {
    // The user does not have the permissions required to read from the registry key.
  }
  catch (UnauthorizedAccessException)
  {
    // The user does not have the necessary registry rights.
  }

  return result;
}

Points to note:

  • I'm returning an int with the major version component rather a Version class. In this example, I don't need a full version to start with and it avoids crashes if the version string is invalid
  • For the same reason, I'm explicitly catching (and ignoring) SecurityException and UnauthorizedAccessException exceptions which will be thrown if the user doesn't have permission to access those keys. Again, I don't really want the function crashing for those reasons.

You can always remove the try block to have all exceptions thrown instead of the access exceptions being ignored.

Getting the browser emulation version

By using Internet Explorer's browser emulation support, we can choose how the WebControl behaves

The functions to get and set the emulation version are using HKEY_CURRENT_USER to make them per user rather than for the entire machine.

First we'll create an enumeration to handle the different versions described above so that we don't have to deal with magic numbers.

public enum BrowserEmulationVersion
{
  Default = 0,
  Version7 = 7000,
  Version8 = 8000,
  Version8Standards = 8888,
  Version9 = 9000,
  Version9Standards = 9999,
  Version10 = 10000,
  Version10Standards = 10001,
  Version11 = 11000,
  Version11Edge = 11001
}

Next, a function to detect the current emulation version in use by our application, and another to quickly tell if an emulation version has previously been set.

private const string BrowserEmulationKey = InternetExplorerRootKey + @"\Main\FeatureControl\FEATURE_BROWSER_EMULATION";

public static BrowserEmulationVersion GetBrowserEmulationVersion()
{
  BrowserEmulationVersion result;

  result = BrowserEmulationVersion.Default;

  try
  {
    RegistryKey key;

    key = Registry.CurrentUser.OpenSubKey(BrowserEmulationKey, true);
    if (key != null)
    {
      string programName;
      object value;

      programName = Path.GetFileName(Environment.GetCommandLineArgs()[0]);
      value = key.GetValue(programName, null);

      if (value != null)
      {
        result = (BrowserEmulationVersion)Convert.ToInt32(value);
      }
    }
  }
  catch (SecurityException)
  {
    // The user does not have the permissions required to read from the registry key.
  }
  catch (UnauthorizedAccessException)
  {
    // The user does not have the necessary registry rights.
  }

  return result;
}

public static bool IsBrowserEmulationSet()
{
  return GetBrowserEmulationVersion() != BrowserEmulationVersion.Default;
}

Setting the emulation version

And finally, we need to be able to set the emulation version. I've provided two functions for doing this, one which allows you to explicitly set a value, and another that uses the best matching value for the installed version of Internet Explorer.

public static bool SetBrowserEmulationVersion(BrowserEmulationVersion browserEmulationVersion)
{
  bool result;

  result = false;

  try
  {
    RegistryKey key;

    key = Registry.CurrentUser.OpenSubKey(BrowserEmulationKey, true);

    if (key != null)
    {
      string programName;

      programName = Path.GetFileName(Environment.GetCommandLineArgs()[0]);

      if (browserEmulationVersion != BrowserEmulationVersion.Default)
      {
        // if it's a valid value, update or create the value
        key.SetValue(programName, (int)browserEmulationVersion, RegistryValueKind.DWord);
      }
      else
      {
        // otherwise, remove the existing value
        key.DeleteValue(programName, false);
      }

      result = true;
    }
  }
  catch (SecurityException)
  {
    // The user does not have the permissions required to read from the registry key.
  }
  catch (UnauthorizedAccessException)
  {
    // The user does not have the necessary registry rights.
  }

  return result;
}

public static bool SetBrowserEmulationVersion()
{
  int ieVersion;
  BrowserEmulationVersion emulationCode;

  ieVersion = GetInternetExplorerMajorVersion();

  if (ieVersion >= 11)
  {
    emulationCode = BrowserEmulationVersion.Version11;
  }
  else
  {
    switch (ieVersion)
    {
      case 10:
        emulationCode = BrowserEmulationVersion.Version10;
        break;
      case 9:
        emulationCode = BrowserEmulationVersion.Version9;
        break;
      case 8:
        emulationCode = BrowserEmulationVersion.Version8;
        break;
      default:
        emulationCode = BrowserEmulationVersion.Version7;
        break;
    }
  }

  return SetBrowserEmulationVersion(emulationCode);
}

As mentioned previously, I don't really want these functions crashing for anticipated reasons, so these functions will also catch and ignore SecurityException and UnauthorizedAccessException exceptions. The SetBrowserEmulationVersion function will return true if a value was updated.

Simple Usage

If you just want "fire and forget" updating of the browser emulation version, you can use the following lines.

if (!InternetExplorerBrowserEmulation.IsBrowserEmulationSet())
{
  InternetExplorerBrowserEmulation.SetBrowserEmulationVersion();
}

This will apply the best matching IE version if an emulation version isn't set. However, it means if the user updates their copy if IE to something newer, your application will potentially continue to use the older version. I shall leave that as an exercise for another day!

Caveats and points to note

Changing the emulation version while your application is running

While experimenting with this code, I did hit a major caveat.

In the original application this code was written for, I was applying the emulation version just before the first window containing a WebBrowser control was loaded, and this worked perfectly well.

However, setting the emulation version doesn't seem to work if an instance of the WebBrowser control has already been created in your application. I tried various things such as recreating the WebBrowser control or reloading the Form the control was hosted on, but couldn't get the new instance to honour the setting without an application restart.

The attached demonstration program has gone with the "restart after making a selection" hack - please don't do this in production applications!

Should I change the emulation version of my application?

You should carefully consider where or not to change the emulation version of your application. If it's currently working fine, then it's probably better to leave it as is. If however, you wish to make use of modern standards compliant HTML, CSS or JavaScript then setting the appropriate emulation version will save you a lot of trouble.

Further Reading

The are a lot of different options you can apply to Internet Explorer and the WebBrowser control. These options allow you to change behaviours, supported features and quite a few more. This article has touched upon one of the more common requirements, but there are a number of other options that are worth looking at for advanced application scenarios.

An index of all available configuration options can be found on MSDN.

Downloads

All content Copyright (c) by Cyotek Ltd or its respective writers. Permission to reproduce news and web log entries and other RSS feed content in unmodified form without notice is granted provided they are not used to endorse or promote any products or opinions (other than what was expressed by the author) and without taking them out of context. Written permission from the copyright owner must be obtained for everything else.
Original URL of this content is https://www.cyotek.com/blog/configuring-the-emulation-mode-of-an-internet-explorer-webbrowser-control?source=rss.

Dragging items in a ListView control with visual insertion guides

$
0
0

I can't remember when it was I first saw something being dragged with an insertion mark for guidance. Whenever it was, it was a long long time ago and I'm just catching up now.

This article describes how to extend a ListView control to allow the items within it to be reordered, using insertion guides.

The demonstration project in action

Drag Drop vs Mouse Events

When I first decided that one of my applications needed the ability to move items around in a list, I knocked together some quick code by using the MouseDown, MouseMove and MouseUp events. It worked nicely but I ended up not using it, for the simple reason I couldn't work out how to change the cursor one of the standard drag/drop icons - such as Move, Scroll, or Link. So if anyone knows how to do this, I'd be happy to hear how (note I don't mean assigning a custom cursor, I mean using the true OS cursor). As it turns out, apart from the cursor business (and the incidental fact it looks... awful... if you enable shell styles), it's also reinventing a fairly large wheel as the ListView control already provides most of what we need.

An Elephant Never Forgets: The AllowDrop Property

I should probably have this tattooed upon my forehead as I think that whenever I try and add drag and drop to anything and it doesn't work, it's invariably because I didn't set the AllowDrop property of the respective object to true. And invariably it takes forever until I remember that that has to be done.

So... don't forget to set it!

Getting Started

The code below assumes you are working in a new class named ListView that inherits from System.Windows.Forms.ListView. You could do most of this by hooking into the events of an existing control, but that way leads to madness (and more complicated code). Or at least duplicate code, and more than likely duplicate bugs.

Drawing insertion marks

I originally started writing this article with the drag sections at the start, followed by the sections on drawing. Unfortunately, it was somewhat confusing to read as the drag is so heavily dependant on the drawing and insertion bits. So I'll talk about that first instead.

In order to draw our guides, and to know what to do when the drag is completed, we need to store some extra information - the index of the item where the item is to be inserted, and whether the item is to be inserted before or after the insertion item. Leaving behind the question on if that sentence even makes sense, on with some code!

public enum InsertionMode
{
  Before,

  After
}

protected int InsertionIndex { get; set; }

protected InsertionMode InsertionMode { get; set; }

protected bool IsRowDragInProgress { get; set; }

As we'll be drawing a nice guide so the user is clear on what is happening, we'll also provide the property to configure the colour of said guide.

[Category("Appearance")]
[DefaultValue(typeof(Color), "Red")]
public virtual Color InsertionLineColor
{
  get { return _insertionLineColor; }
  set { _insertionLineColor = value; }
}

We'll also need to initialize default values for these.

public ListView()
{
  this.DoubleBuffered = true;
  this.InsertionLineColor = Color.Red;
  this.InsertionIndex = -1;
}

Notice the call to set the DoubleBuffered property? This has to be done, otherwise your drag operation will be an epic exercise of Major Flickering. In my library code I use the LVS_EX_DOUBLEBUFFER style when creating the window, but in this example DoubleBuffered has worked just as well and is much easier to do.

Drawing on a ListView

The ListView control is a native control that is drawn by the operating system. In otherwords, overriding OnPaint isn't working to work.

So how do you draw on it? Well, you could always go even more old school than using Windows Forms in the first place, and use the Win32 to do some custom painting. However, it's a touch overkill and we can get around it for the most part.

Instead, we'll hook into WndProc, watch for the WM_PAINT message and then use the Control.CreateGraphics method to get a Graphics object bound to the window and do our painting that way.

private const int WM_PAINT = 0xF;

[DebuggerStepThrough]
protected override void WndProc(ref Message m)
{
  base.WndProc(ref m);

  switch (m.Msg)
  {
    case WM_PAINT:
      this.DrawInsertionLine();
      break;
  }
}

I'm not really sure that using CreateGraphics is the best way to approach this, but it seems to work and it was quicker than trying to recall all the Win32 GDI work I've done in the past.

Tip: The DebuggerStepThrough is useful for stopping the debugger from stepping into a method (including any manual breakpoints you have created). WndProc can be called thousands of times in a "busy" control, and if you're trying to debug and suddenly end up in here, it can be a pain.

The code for actually drawing the insertion line is in itself simple enough - we just draw a horizontal line with arrow heads at either side. We adjust the start and end of the line to ensure it always fits within the client area of the control, regardless of if the control is horizontally scrolled or the total width of the item.

private void DrawInsertionLine()
{
  if (this.InsertionIndex != -1)
  {
    int index;

    index = this.InsertionIndex;

    if (index >= 0 && index < this.Items.Count)
    {
      Rectangle bounds;
      int x;
      int y;
      int width;

      bounds = this.Items[index].GetBounds(ItemBoundsPortion.Entire);
      x = 0; // aways fit the line to the client area, regardless of how the user is scrolling
      y = this.InsertionMode == InsertionMode.Before ? bounds.Top : bounds.Bottom;
      width = Math.Min(bounds.Width - bounds.Left, this.ClientSize.Width); // again, make sure the full width fits in the client area

      this.DrawInsertionLine(x, y, width);
    }
  }
}

private void DrawInsertionLine(int x1, int y, int width)
{
  using (Graphics g = this.CreateGraphics())
  {
    Point[] leftArrowHead;
    Point[] rightArrowHead;
    int arrowHeadSize;
    int x2;

    x2 = x1 + width;
    arrowHeadSize = 7;
    leftArrowHead = new[]
                    {
                      new Point(x1, y - (arrowHeadSize / 2)), new Point(x1 + arrowHeadSize, y), new Point(x1, y + (arrowHeadSize / 2))
                    };
    rightArrowHead = new[]
                      {
                        new Point(x2, y - (arrowHeadSize / 2)), new Point(x2 - arrowHeadSize, y), new Point(x2, y + (arrowHeadSize / 2))
                      };

    using (Pen pen = new Pen(this.InsertionLineColor))
    {
      g.DrawLine(pen, x1, y, x2 - 1, y);
    }

    using (Brush brush = new SolidBrush(this.InsertionLineColor))
    {
      g.FillPolygon(brush, leftArrowHead);
      g.FillPolygon(brush, rightArrowHead);
    }
  }
}

And that's all there is to that part of the code. Don't forget to ensure the control is double buffered!

Initiating a drag operation

The ListView control has an ItemDrag event that is automatically raised when the user tries to drag an item. We'll use this to initiate our own drag and drop operation.

protected override void OnItemDrag(ItemDragEventArgs e)
{
  if (this.Items.Count > 1)
  {
    this.IsRowDragInProgress = true;
    this.DoDragDrop(e.Item, DragDropEffects.Move);
  }

  base.OnItemDrag(e);
}

Note: The code snippets in this article are kept concise to show only the basics of the technique. In most cases, I've expanded upon this to include extra support (in this case for raising an event allowing the operation to be cancelled), please download the sample project for the full class.

When the DroDragDrop is called, execution will halt at that point until the drag is complete or cancelled. You can use the DragEnter, DragOver, DragLeave, DragDrop and GiveFeedback events to control the drag, for example to specify the action that is currently occurring, and to handle what happens when the user releases the mouse cursor.

Updating the insertion index

We can use the DragOver event to determine which item the mouse is hovered over, and from there calculate if this is a "before" or "after" action.

protected override void OnDragOver(DragEventArgs drgevent)
{
  if (this.IsRowDragInProgress)
  {
    int insertionIndex;
    InsertionMode insertionMode;
    ListViewItem dropItem;
    Point clientPoint;

    clientPoint = this.PointToClient(new Point(drgevent.X, drgevent.Y));
    dropItem = this.GetItemAt(0, Math.Min(clientPoint.Y, this.Items[this.Items.Count - 1].GetBounds(ItemBoundsPortion.Entire).Bottom - 1));

    if (dropItem != null)
    {
      Rectangle bounds;

      bounds = dropItem.GetBounds(ItemBoundsPortion.Entire);
      insertionIndex = dropItem.Index;
      insertionMode = clientPoint.Y < bounds.Top + (bounds.Height / 2) ? InsertionMode.Before : InsertionMode.After;

      drgevent.Effect = DragDropEffects.Move;
    }
    else
    {
      insertionIndex = -1;
      insertionMode = this.InsertionMode;

      drgevent.Effect = DragDropEffects.None;
    }

    if (insertionIndex != this.InsertionIndex || insertionMode != this.InsertionMode)
    {
      this.InsertionMode = insertionMode;
      this.InsertionIndex = insertionIndex;
      this.Invalidate();
    }
  }

  base.OnDragOver(drgevent);
}

The code is a little long, but simple enough. We get the ListViewItem underneath the cursor. If there isn't one, we clear any existing insertion data. If we do have one, we check if the cursor is above or below half of the total height of the item in order to decide "before" or "after" status.

We also inform the underlying drag operation so that the appropriate cursor "Move" or "No Drag" is displayed.

Finally, we issue a call to Invalidate to force the control to repaint so that the new indicator is drawn (or the existing indicator cleared).

If the mouse leaves the confines of the control, then we use the DragLeave event to reset the insertion status. We don't need to use DragEnter as DragOver covers us in this case.

protected override void OnDragLeave(EventArgs e)
{
  this.InsertionIndex = -1;
  this.Invalidate();

  base.OnDragLeave(e);
}

Handling the drop

When the user releases the mouse, the DragDrop event is raised. Here, we'll do the actual removal and re-insertion of the source item.

protected override void OnDragDrop(DragEventArgs drgevent)
{
  if (this.IsRowDragInProgress)
  {
    ListViewItem dropItem;

    dropItem = this.InsertionIndex != -1 ? this.Items[this.InsertionIndex] : null;

    if (dropItem != null)
    {
      ListViewItem dragItem;
      int dropIndex;

      dragItem = (ListViewItem)drgevent.Data.GetData(typeof(ListViewItem));
      dropIndex = dropItem.Index;

      if (dragItem.Index < dropIndex)
      {
        dropIndex--;
      }
      if (this.InsertionMode == InsertionMode.After && dragItem.Index < this.Items.Count - 1)
      {
        dropIndex++;
      }

      if (dropIndex != dragItem.Index)
      {
        this.Items.Remove(dragItem);
        this.Items.Insert(dropIndex, dragItem);
        this.SelectedItem = dragItem;
      }
    }

    this.InsertionIndex = -1;
    this.IsRowDragInProgress = false;
    this.Invalidate();
  }

  base.OnDragDrop(drgevent);
}

We reuse the InsertionIndex and InsertionMode values we calculated in OnDragOver and then determine the index of the new item from these. Remove the source item, reinsert it at the new index, then clear the insertion values, force and repaint and we're done. Easy!

Sample Project

An example demonstration project with an extended version of the above code is available for download from the link below.

Downloads

All content Copyright (c) by Cyotek Ltd or its respective writers. Permission to reproduce news and web log entries and other RSS feed content in unmodified form without notice is granted provided they are not used to endorse or promote any products or opinions (other than what was expressed by the author) and without taking them out of context. Written permission from the copyright owner must be obtained for everything else.
Original URL of this content is https://www.cyotek.com/blog/dragging-items-in-a-listview-control-with-visual-insertion-guides?source=rss.

Dragging items in a ListBox control with visual insertion guides

$
0
0

In my last post, I described how to drag and drop items to reorder a ListView control. This time I'm going to describe the exact same technique, but this time for the more humble ListBox.

The demonstration project in action

Getting Started

The code below assumes you are working in a new class named ListBox that inherits from System.Windows.Forms.ListBox.

As it's only implementation details that are different between the two versions, I'll include the pertinent code and point out the differences but that's about it. As always a full example project is available from the link at the end of the article.

As with the previous article, you must set AllowDrop to true on any ListBox you wish to make use of this functionality.

Drawing on a ListBox

Just like the ListView, the ListBox control is a native control that is drawn by the operating system and so overriding OnPaint doesn't work. The ListBox also has a unique behaviour of built in owner draw support, so you have to make sure your painting works with all modes.

Fortunately, the exact same method of painting I used with the ListView works fine here too - that is, I capture WM_PAINT messages and use Graphics.FromControl to get something I can work with.

The only real difference is getting the boundaries of the item to draw due to the differences in the API's of the two controls - the ListView uses ListViewItem.GetBounds whilst the ListBox version is ListView.GetItemRectangle.

private void DrawInsertionLine()
{
  if (this.InsertionIndex != InvalidIndex)
  {
    int index;

    index = this.InsertionIndex;

    if (index >= 0 && index < this.Items.Count)
    {
      Rectangle bounds;
      int x;
      int y;
      int width;

      bounds = this.GetItemRectangle(this.InsertionIndex);
      x = 0; // aways fit the line to the client area, regardless of how the user is scrolling
      y = this.InsertionMode == InsertionMode.Before ? bounds.Top : bounds.Bottom;
      width = Math.Min(bounds.Width - bounds.Left, this.ClientSize.Width); // again, make sure the full width fits in the client area

      this.DrawInsertionLine(x, y, width);
    }
  }
}

Flicker flicker flicker

The ListBox is a flickery old beast when owner draw is being used. Unlike the ListView control where I just invalidate the entire control and trust the double buffering, unfortunately setting double buffering on the ListBox seems to have no effect and it flickers like crazy as you drag things around.

To help combat this, I've added a custom Invalidate method that accepts the index of a single item to redraw. It also checks if an insertion mode is set, and if so adjusts the bounds of the rectangle to include the next/previous item (otherwise, bits of the insertion guides will be left behind as it tries to flicker free paint). It will then invalidate only that specific rectangle and reduce overall flickering. It's not perfect but it's a lot better than invalidating the whole control.

protected void Invalidate(int index)
{
  if (index != InvalidIndex)
  {
    Rectangle bounds;

    bounds = this.GetItemRectangle(index);
    if (this.InsertionMode == InsertionMode.Before && index > 0)
    {
      bounds = Rectangle.Union(bounds, this.GetItemRectangle(index - 1));
    }
    else if (this.InsertionMode == InsertionMode.After && index < this.Items.Count - 1)
    {
      bounds = Rectangle.Union(bounds, this.GetItemRectangle(index + 1));
    }

    this.Invalidate(bounds);
  }
}

When you call Control.Invalidate it does not trigger an immediate repaint. Instead it sends a WM_PAINT message to the control to do a paint when next possible. This means multiple calls to Invalidate with custom rectangles will more than likely have them all combined into a single large rectangle, thus repainting more of the control that you might anticipate.

Initiating a drag operation

Unlike theListView control and its ItemDrag event, the ListBox doesn't have one. So we'll roll our own using similar techniques to those I've described before.

protected int DragIndex { get; set; }

protected Point DragOrigin { get; set; }

protected override void OnMouseDown(MouseEventArgs e)
{
  base.OnMouseDown(e);

  if (e.Button == MouseButtons.Left)
  {
    this.DragOrigin = e.Location;
    this.DragIndex = this.IndexFromPoint(e.Location);
  }
  else
  {
    this.DragOrigin = Point.Empty;
    this.DragIndex = InvalidIndex;
  }
}

When the user first presses a button, I record both the position of the cursor and which item is under it.

protected override void OnMouseMove(MouseEventArgs e)
{
  if (this.AllowItemDrag && !this.IsDragging && e.Button == MouseButtons.Left && this.IsOutsideDragZone(e.Location))
  {
    this.IsDragging = true;
    this.DoDragDrop(this.DragIndex, DragDropEffects.Move);
  }

  base.OnMouseMove(e);
}

private bool IsOutsideDragZone(Point location)
{
  Rectangle dragZone;
  int dragWidth;
  int dragHeight;

  dragWidth = SystemInformation.DragSize.Width;
  dragHeight = SystemInformation.DragSize.Height;
  dragZone = new Rectangle(this.DragOrigin.X - (dragWidth / 2), this.DragOrigin.Y - (dragHeight / 2), dragWidth, dragHeight);

  return !dragZone.Contains(location);
}

As it would be somewhat confusing to the user (not to mention rude) if we suddenly initiated drag events whenever they click the control and their mouse wiggles during it, we check to see if the mouse cursor has moved sufficient pixels away from the drag origin using metrics obtained from SystemInformation.

If the user has dragged the mouse outside this region, then we call DoDragDrop to initialize the drag and drop operation.

Updating the insertion index

In exactly the same way as with the ListView version, we can use the DragOver event to determine which item the mouse is hovered over, and from there calculate if this is a "before" or "after" action.

protected override void OnDragOver(DragEventArgs drgevent)
{
  if (this.IsDragging)
  {
    int insertionIndex;
    InsertionMode insertionMode;
    Point clientPoint;

    clientPoint = this.PointToClient(new Point(drgevent.X, drgevent.Y));
    insertionIndex = this.IndexFromPoint(clientPoint);

    if (insertionIndex != InvalidIndex)
    {
      Rectangle bounds;

      bounds = this.GetItemRectangle(insertionIndex);
      insertionMode = clientPoint.Y < bounds.Top + (bounds.Height / 2) ? InsertionMode.Before : InsertionMode.After;

      drgevent.Effect = DragDropEffects.Move;
    }
    else
    {
      insertionIndex = InvalidIndex;
      insertionMode = InsertionMode.None;

      drgevent.Effect = DragDropEffects.None;
    }

    if (insertionIndex != this.InsertionIndex || insertionMode != this.InsertionMode)
    {
      this.Invalidate(this.InsertionIndex); // clear the previous item
      this.InsertionMode = insertionMode;
      this.InsertionIndex = insertionIndex;
      this.Invalidate(this.InsertionIndex); // draw the new item
    }
  }

  base.OnDragOver(drgevent);
}

The logic is the same, just the implementation differences in getting the hovered item (use ListBox.IndexFromPoint and the item bounds). I've also added a dedicated InsertionMode.None option this time, which is mainly so I don't unnecessarily invalidate larger regions that I wanted as described in "Flicker flicker flicker" above.

If the mouse leaves the confines of the control, then we use the DragLeave event to reset the insertion status. Again no differences per se, I set the insertion mode now, and I also call Invalidate first with the current index before resetting it.

protected override void OnDragLeave(EventArgs e)
{
  this.Invalidate(this.InsertionIndex);
  this.InsertionIndex = InvalidIndex;
  this.InsertionMode = InsertionMode.None;

  base.OnDragLeave(e);
}

Handling the drop

When the user releases the mouse, the DragDrop event is raised. Here, we'll do the actual removal and re-insertion of the source item.

protected override void OnDragDrop(DragEventArgs drgevent)
{
  if (this.IsDragging)
  {
    try
    {
      if (this.InsertionIndex != InvalidIndex)
      {
        int dragIndex;
        int dropIndex;

        dragIndex = (int)drgevent.Data.GetData(typeof(int));
        dropIndex = this.InsertionIndex;

        if (dragIndex < dropIndex)
        {
          dropIndex--;
        }
        if (this.InsertionMode == InsertionMode.After && dragIndex < this.Items.Count - 1)
        {
          dropIndex++;
        }

        if (dropIndex != dragIndex)
        {
          object dragItem;

          dragItem = this.Items[dragIndex];

          this.Items.Remove(dragItem);
          this.Items.Insert(dropIndex, dragItem);
          this.SelectedItem = dragItem;
        }
      }
    }
    finally
    {
      this.Invalidate(this.InsertionIndex);
      this.InsertionIndex = InvalidIndex;
      this.InsertionMode = InsertionMode.None;
      this.IsDragging = false;
    }
  }

  base.OnDragDrop(drgevent);
}

Just as simple as the ListView version!

Sample Project

An example demonstration project with an extended version of the above code is available for download from the link below.

Downloads

All content Copyright (c) by Cyotek Ltd or its respective writers. Permission to reproduce news and web log entries and other RSS feed content in unmodified form without notice is granted provided they are not used to endorse or promote any products or opinions (other than what was expressed by the author) and without taking them out of context. Written permission from the copyright owner must be obtained for everything else.
Original URL of this content is https://www.cyotek.com/blog/dragging-items-in-a-listbox-control-with-visual-insertion-guides?source=rss.

Adding Double Click support to the ComboBox control

$
0
0

I was recently using a ComboBox control with the DropDownStyle set to Simple, effectively turning into a combined text box and list box.

However, when I wanted an action to occur on double clicking an item in the list I found that the control doesn't actually offer double click support. I suppose I should have just ripped out the combo box at that point and went with dedicated controls but instead I decided to extend ComboBox to support double clicks.

Double click events from a simple mode ComboBox control

Hmm, no WM_LBUTTONDBLCLK message?

I had assumed I could simply get the handle of the list component, set the CS_DBLCLKS style, and start receiving WM_LBUTTONDBLCLK messages. Unfortunately I couldn't get this to work. Something to revisit another day perhaps.

Fine, lets fake it with WM_LBUTTONUP instead!

So plan A was a bust. Not to worry, I had another idea. In a previous post I described how to use the GetComboBoxInfo Win32 API call to obtain the handles to the integrated controls. We'll use this along with a NativeWindow to watch for WM_LBUTTONUP messages and handle our double clicks that way.

What is NativeWindow?

I haven't described NativeWindow in any previous post, so I'll briefly cover it now. NativeWindow is a managed wrapper around a Win32 window handle, and allows you to easily hook into it's window procedure (WndProc) in order to capture and process messages sent to the window. Very tidy. The most important class members are

  • AssignHandle - attaches the class to a window
  • ReleaseHandle - detaches the handle once you're finished with it
  • WndProc - allows you to process messages, otherwise there's not really much point in using the class!

One final point, in most cases you're probably going to want to subclass NativeWindow as WndProc is protected. And that's what we'll do here, using a new ListBoxNativeWindow class.

Attaching the handle

As I mentioned above, you have to explicitly attached your NativeWindow implementation to a window. For this demonstration control we'll do it when the control handle is created, and when the drop down list style is changed. I'll also add a AllowDoubleClick property to control the new behaviour, so we'll also set it from there.

NativeWindow doesn't implement IDisposable so for best practice you should make sure you manually clean up by calling ReleaseHandle when you are done.

As I've previously covered the COMBOBOXINFO structure and GetComboBoxInfo call I won't go over these again - please refer to my previous post if you need more info.

Assuming we successfully obtain the combo box information, we instantiate a new instance of our ListBoxNativeWindow and attach it to the handle of the list box.

private ListBoxNativeWindow _listBoxWindow;

private void AttachHandle()
{
  this.ReleaseHandle();

  if (this.IsHandleCreated && this.AllowDoubleClick && this.DropDownStyle == ComboBoxStyle.Simple)
  {
    COMBOBOXINFO info;

    info = new COMBOBOXINFO();
    info.cbSize = Marshal.SizeOf(info);

    if (GetComboBoxInfo(this.Handle, ref info))
    {
      IntPtr hWnd;

      hWnd = info.hwndList;

      _listBoxWindow = new ListBoxNativeWindow(this);
      _listBoxWindow.AssignHandle(hWnd);
    }
  }
}

Our new class is also storing a reference to the owner ComboBox control so that we can raise events as appropriate later on.

As we should clean up behind ourselves, there's a helper method to release any existing handles which we will call when assigning a new handle, or when disposing of the control.

private void ReleaseHandle()
{
  if (_listBoxWindow != null)
  {
    _listBoxWindow.ReleaseHandle();
    _listBoxWindow = null;
  }
}

Now it's time to watch for some messages.

Intercepting messages

Intercepting messages in a NativeWindow is no different to that of a normal control - just override WndProc and wait for something interesting.

const int WM_LBUTTONUP = 0x0202;

protected override void WndProc(ref Message m)
{
  if (m.Msg == WM_LBUTTONUP)
  {
    // do stuff!
  }

  base.WndProc(ref m);
}

Double clicks

A double click is a pretty simple thing - it is the second click to occur within a defined interval and with the cursor within the region of the first click. These system values are configurable by the end user so we shouldn't hard code our own values.

The DoubleClickSize and DoubleClickTime properties of the SystemInformation class provide managed access to these system values, and so we can now populate our WndProc template with some real code.

if (m.Msg == NativeMethods.WM_LBUTTONUP)
{
  long previousMessageTime;
  long currentMessageTime;
  Point currentLocation;

  previousMessageTime = _lastMessageTime;
  currentMessageTime = DateTime.Now.Ticks;
  currentLocation = this.GetPoint(m.LParam);

  if (_lastMessageTime > 0)
  {
    Rectangle doubleClickBounds;
    Size doubleClickSize;

    doubleClickSize = SystemInformation.DoubleClickSize;
    doubleClickBounds = new Rectangle(_lastMousePosition.X - (doubleClickSize.Width / 2), _lastMousePosition.Y - (doubleClickSize.Height / 2), doubleClickSize.Width, doubleClickSize.Height);

    if (previousMessageTime + (SystemInformation.DoubleClickTime * TimeSpan.TicksPerMillisecond) > currentMessageTime && doubleClickBounds.Contains(currentLocation))
    {
      MouseEventArgs e;

      e = new MouseEventArgs(MouseButtons.Left, 2, currentLocation.X, currentLocation.Y, 0);

      _owner.RaiseDoubleClick(e);
    }
  }

  _lastMessageTime = currentMessageTime;
  _lastMousePosition = currentLocation;
}

Although it might look a little complicated at first glance, it should be straight forward.

  • The very first time you click with the left mouse button, we record the current time and the cursor location
  • Each subsequent click then
    • Compares the current cursor position against a rectangle centered on the previous position
    • Compares the previous click time with the current time subtracted from the interval
    • If both the interval since the last click has not elapsed and the cursor is in the same general area, then we have our double click
    • Regards of if an event is to be raised or not, we then update the time and position for the next click

Raising the event

Although I'd like to do the "right thing" and trigger a WM_LBUTTONDBLCLK message, the control doesn't support it and there's not really much point in adding it when it's not going to have any real value. So we'll manually do it.

I start by adding an internal method to our ComboBox control - I tend to avoid internals where possible but I don't really see a need to expose this publicly.

internal void RaiseDoubleClick(MouseEventArgs e)
{
  this.OnDoubleClick(EventArgs.Empty);

  this.OnMouseDoubleClick(e);
}

Short and to the point, it simply raises the two different events .NET controls have for double clicks.

And back in our WndProc, we construct a new MouseEventArgs object and then call the new method.

MouseEventArgs e;

e = new MouseEventArgs(MouseButtons.Left, 2, currentLocation.X, currentLocation.Y, 0);

_owner.RaiseDoubleClick(e);

It's worth pointing out the fudge in this - the magic number 2 which represents the number of times the button was clicked. The 0, while still magic, represents a mouse wheel delta which is not appropriate for this event.

And with that code in place, this slightly long winded article has gotten to the point and you now have fully working events.

Really? I can't see them!

Oh of course. As the ComboBox control doesn't support the DoubleClick and MouseDoubleClick events, the DoubleClick event has been hidden (but not MouseDoubleClick for some reason). Easy enough to bring it back - just redefine DoubleClick with the new keyword set the EditorBrowsable and Browsable attributes so it will appear in designers.

[EditorBrowsable(EditorBrowsableState.Always)]
[Browsable(true)]
public new event EventHandler DoubleClick
{
  add { base.DoubleClick += value; }
  remove { base.DoubleClick -= value; }
}

Always a catch

This was yet another blog post that was written in a hurry after writing some code in a hurry. I'm positive there must be a better way using normal window styles and messages rather than the manual approach I've taken.

There's also a flaw in the code - if you triple click (or more) then you'll get two (or more) double click events. I don't know of too many people who spam double clicks so I'm going to ignore this for now. Possibly at some point I'll be bored enough to take another look at this and see where I went wrong with the pure API approach.

Finally, given the hurry with which both of these items were written, it hasn't had any robust testing, and so may be a flawed piece of work.

As always, a demonstration project accompanies this article.

Downloads

All content Copyright (c) by Cyotek Ltd or its respective writers. Permission to reproduce news and web log entries and other RSS feed content in unmodified form without notice is granted provided they are not used to endorse or promote any products or opinions (other than what was expressed by the author) and without taking them out of context. Written permission from the copyright owner must be obtained for everything else.
Original URL of this content is https://www.cyotek.com/blog/adding-double-click-support-to-the-combobox-control?source=rss.

Creating a code signing certificate with StartSSL

$
0
0

Edit 02Jan2017: Even if you wanted to ignore the revelations of dubious practices of StartSSL and with them now being owned by WoSign, there is another matter to consider - StartSSL authenticode certificates don't support lifetime signing. Meaning, when your certificate has expired, your signed binaries are no longer trusted, negating the point of signing them in the first place. For this reason, I don't recommend using StartSSL any further.

The process of obtaining a code signing certificate from StartSSL differs significantly from the process I originally went through with Comodo. This blog post serves to document how I did it for StartSSL, both as a reference for myself and for anyone else! Personally I find this approach easier than fiddling around exporting certificates from a browser, and it gives you a lot more control.

This post assumes you have already validated a level 2 personal/organization identity with StartSSL. Free level 1 validations cannot be used to create code signing certificates.

The usual caveat applies - I have tested this process and signed software with the final certificate and all seems well. However, it's entirely possible I'm missing something and something drastic given the apparent compromising of the previous certificate. I'll update this post should I discover anything untoward, but your mileage may vary. I am not a security expert.

Prerequisites

In order to generate the certificate signing request (CSR) and convert the certificate, you're going to need to use OpenSSL. As I'm running on Windows, you'll more than likely want to download pre-compiled Win32 binaries - you can find these here. I mostly use 64bit versions of Windows, but I found the 32bit version of OpenSSL to suffice.

The OPENSSL_CONF environment variable, or avoiding "WARNING: can't open config file: /usr/local/ssl/openssl.cnf"

When trying to use the OpenSSL command line tools, you may receive WARNING: can't open config file: /usr/local/ssl/openssl.cnf. It might be a warning, but it is a fatal one.

If this happens, just run the following line in your command window (or add it to your batch script), replacing the path as appropriate for your local installation.

SET OPENSSL_CONF=C:\OpenSSL-Win32\bin\openssl.cfg

As a side note, the OpenSSL installer does register this as a global environment variable, but it doesn't seem to kick in right away - I received this warning when initially testing on a Windows 8.1 development machine, and I received it again when installing on an XP VM for testing as I write this post.

A note on paths

By default, the OpenSSL installer linked to above will install the binaries to your Windows system directory. If (as I did) you choose not to do this, you will either need to include the OpenSSL bin folder in your path, include the path in the executable call, or set the current directory to the OpenSSL bin folder. Whatever method you choose, the rest of this article assumes that this has been done.

Generating the certificate signing request

A CSR or Certificate Signing request is a block of encrypted text that is generated on the server that the certificate will be used on. It contains information that will be included in your certificate such as your organization name, common name (domain name), locality, and country source.

StartSSL requires a CSR that you need to create yourself. Although this might sound a little ominous (and something StartSSL could improve upon, as they offer zero guidance on the subject) it's pretty easy to do.

Open a command window and run the following command, replacing yournamehere as appropriate.

openssl req -out yournamehere.csr -new -newkey rsa:2048 -nodes -keyout yournamehere.key

When you run the command, you'll be asked for a number of different values, such as Country, State,Common Name and so on. Make sure these values match the details you have validated with StartSSL.

Once you have submitted all the requested values, OpenSSL will generate both a certificate request and a private key with a bit size of 2048. By default it will use the SHA1 algorithm. For a more secure key, change 2048 to a larger value such as 4096. Do not use a value lower that 2048 however.

You've probably heard that Google is doing away with SHA1 SSL and while I don't think this applies to code signing certificates, you may wish to use something newer, for example appending to the above command line -sha256 will use SHA2. However, I didn't discover this option until after I'd created the certificate so I can't say if this works or not. I also remember Windows XP didn't support one of the .NET SHA algorithms so this too may factor into your choice.

Copy yournamehere.key somewhere secure. If you lose this file, you won't be able to generate any more certificates from that CSR. And you don't want anyone else getting their hands on the key either.

Make sure all details are correct before submitting the CSR to StartSSL. You won't be able to create a new certificate without revoking the previous one - and StartSSL will charge you for this.

Open up yournamehere.csr in your favourite text editor, copy out the entire contents of the file and paste it into StartSSL's CSR request field and submit the form.

Creating the certificate

Once StartSSL has processed your request, you'll be able to download the certificate. When you request your certificate from them you'll be presented with another unfriendly form containing a block of text. Copy this into a new file and save it somewhere with a .crt extension.

If you double click this file from Windows Explorer, then it should display the certificate allowing you to check all the details.

The certificate you have just downloaded is actually in PEM format, but Windows doesn't recognize the .pem extension in order to view it as described above.

However, you're not quite done. Microsoft's signtool.exe command requires that certificates be in the Personal Information Exchange (PFX) format instead. So we'll need to convert the certificate using the private key we created earlier.

Open a command window and run the following, as usual replacing file names as appropriate. If you omit the -password argument then OpenSSL will prompt for one. Older versions of Windows only support password lengths of 32 characters. Make sure the password is as secure as you can, random characters, symbols, the works.

If your chosen password includes the & character, surround the password in double quotes otherwise the command parser will get a little confused and the command will fail

openssl pkcs12 -export -out yournamehere.pfx -inkey yournamehere.key -in yournamehere.crt -password pass:"yourpasswordhere"

This should then generate yournamehere.pfx in a format that signtool.exe will understand. Don't lose the password, you'll need it whenever you use the certificate to sign files or to import the certificate into a store.

Unlike with the .crt file, trying to open the .pfx file will display a wizard for importing the certificate into your store.

And you're done

With these simple steps complete you now have a certificate that you can use to code sign your programs. Good luck!

Example signtool.exe usage

Although this article is about creating the certificate, it only make sense to quickly outline the right parameters for signing your files. Again, I'm assuming that signtool.exe is somewhere in your path for the below command line to work.

Edit 2016Jul27: According to Micheal Herrmann's comment, the time stamping URL is now http://tsa.startssl.com/rfc3161, so if the example below no longer works try this URL instad.

signtool sign /f yournamehere.pfx /p yourpasswordhere /tr http://www.startssl.com/timestamp yourfilehere.exe

If you've previously use another timestamping service, you may have used /t http://timestampurlhere.com - this won't work with StartSSL's timestamp server, you must use the /tr parameter instead.

All content Copyright (c) by Cyotek Ltd or its respective writers. Permission to reproduce news and web log entries and other RSS feed content in unmodified form without notice is granted provided they are not used to endorse or promote any products or opinions (other than what was expressed by the author) and without taking them out of context. Written permission from the copyright owner must be obtained for everything else.
Original URL of this content is https://www.cyotek.com/blog/creating-a-code-signing-certificate-with-startssl?source=rss.

Viewing all 559 articles
Browse latest View live