Quantcast
Channel: cyotek.com Blog Summary Feed
Viewing all 559 articles
Browse latest View live

SQL Woes - Mismatched parameter types in stored procedures

$
0
0

We had a report of crashes occurring for certain users when accessing a system. From the stack data in the production logs, a timeout was occurring when running a specific stored procedure. This procedure was written around 5 years ago and is in use in many customer databases without issue. Why would the same SQL suddenly start timing out in one particular database?

The stored procedure in question is called for users with certain permissions to highlight outstanding units of work that their access level permits them to do, and is a fairly popular (and useful) feature of the software.

After obtaining session information from the crash logs, it was time to run the procedure on a copy of the live database with session details. The procedure only reads information, but doing this on a copy helps ensure no ... accidents occur.

EXEC [Data].[GetX] @strSiteId = 'XXX', @strUserGroupId = 'XXX', @strUserName = 'XXX'

And it took... 27 seconds to return 13 rows. Not good, not good at all.

An example of a warning and explanation in a query plan

Viewing the query plan showed something interesting though - one of the nodes was flagged with a warning symbol, and when the mouse was hovered over it it stated

Type conversion in expression (CONVERT_IMPLICIT(nvarchar(50),[Pn].[SiteId],0)) may affect "CardinalityEstimate" in query plan choice

Time to check the procedure's SQL as there shouldn't actually be any conversions being done, let alone implicit ones.

I can't publish the full SQL in this blog, so I've chopped out all the table names and field names and used dummy aliases. The important bits for the purposes of this post are present though, although I apologize that it's less than readable now.

CREATE PROCEDURE [Data].[GetX]
  @strSiteId nvarchar (50)
, @strUserGroupId varchar (20)
, @strUserName nvarchar (50)
AS
BEGIN

  SELECT [Al1].[X]
       , [Al1].[X]
       , [Al1].[X]
       , [Al1].[X]
    INTO [#Access]
    FROM [X].[X] [Al1]
   WHERE [Al1].[X] = @strUserName
     AND [Al1].[X] = @strUserGroupId
     AND [Al1].[X] = 1
     AND [Al1].[X] = 1

  SELECT DISTINCT [Pn].[Id] [X]
             FROM [Data].[X] [Pn]
       INNER JOIN [Data].[X] [Al2]
               ON [Al2].[X]      = [Pn].[Id]
              AND [Al2].[X]      = 0
       INNER JOIN [Data].[X] [Al3]
               ON [Al3].[X]      = [Al2].[Id]
              AND [Al3].[X]      = 0
       INNER JOIN [Data].[X] [Al4]
               ON [Al4].[X]      = [Al3].[Id]
              AND [Al4].[X]      = 0
       INNER JOIN [Data].[X] [Al5]
               ON [Al5].[X]     = [Al4].[Id]
              AND [Al5].[X]     = 0
              AND [Al5].[X]     = 1
              AND [Al5].[X]     = 0
       INNER JOIN [#Access]
               ON [#Access].[X] = [Al5].[X]
              AND [#Access].[X] = [Al2].[X]
              AND [#Access].[X] = [Al3].[X]
              AND [#Access].[X] = [Al4].[X]
            WHERE EXISTS (
                           SELECT [X]
                             FROM [X].[X] [Al6]
                            WHERE [Al5].[X]   = [Al6].[X]
                              AND [Al5].[X]   = [Al6].[X]
                              AND [Al6].[X]   = 1
                         )
              AND [Pn].[SiteId] = @strSiteId;

  DROP TABLE [#Access]

END;

The SQL is fairly straight forward - we join a bunch of different data tables together based on permissions, data status and where the [SiteId] column matches the lookup value, return return a unique list of core identifiers. With the exception of [SiteId] all those joins on [Id] columns are integers.

Yes, [SiteId] is the primary key in a table. Yes, I know it isn't a good idea using string keys. It was a design decision made over 8 years ago and I'm sure at some point these anomalies will be changed. But it's a side issue to what this post is about.

As the warning from the query plan is quite explicit about the column it's complaining about, it is now time to check the definition of the table containing the [SiteId] column. Again, I'm not at liberty to include anything other than the barest information to show the problem.

CREATE TABLE [X].[X]
(
  [SiteId] varchar(50) NOT NULL CONSTRAINT [PK_X] PRIMARY KEY
  ...
);
GO

Can you see the problem? The table defines [SiteId] as varchar(50) - that is, up to 50 ASCII characters. The stored procedure on the other hand defines the @strSiteId parameter (that is used as a WHERE clause for [SiteId]) as nvarchar(50), i.e. up to 50 Unicode characters. And there we go, implicit conversion from Unicode to ASCII that for some (still unknown at this stage) reason destroyed the performance of this particular database.

After changing the stored procedure (remember I'm on a copy of the production database!) to remove that innocuous looking n, I reran the procedure which completed instantly. And the warning has disappeared from the plan.

A plan for the same procedure after deleting a single character

The error probably originally occurred as a simple oversight - almost all character fields in the database are nvarchar's. Those that are varchar are ones that control definition data that cannot be entered, changed or often even viewed by end users. Anything that the end user can input is always nvarchar due to the global nature of the software in question.

Luckily, it's a simple fix, although potentially easy to miss, especially as you might immediately assume the SQL itself is to blame and try to optimize that.

The take away from this story is simple - ensure that the data types for variables you use in SQL match the data types of the fields to avoid implicit conversions that can cause some very unexpected and unwelcome performance issues - even years after you originally wrote the code.

All content Copyright (c) by Cyotek Ltd or its respective writers. Permission to reproduce news and web log entries and other RSS feed content in unmodified form without notice is granted provided they are not used to endorse or promote any products or opinions (other than what was expressed by the author) and without taking them out of context. Written permission from the copyright owner must be obtained for everything else.
Original URL of this content is https://www.cyotek.com/blog/sql-woes-mismatched-parameter-types-in-stored-procedures?source=rss.


Implementing events more efficiently in .NET applications

$
0
0

One of the things that frequently annoys me about third party controls (including those built into the .NET Framework) are properties that either aren't virtual, or don't have corresponding change events / virtual methods. Quite often I find myself wanting to perform an action when a property is changed, and if neither of those are present I end up having to create a custom version of the property, and as a rule, I don't like using the new keyword unless there is no other alternative.

As a result of this, whenever I add properties to my WinForm controls, I tend to ensure they have a change event, and most often they are also virtual as I have a custom code snippet to build the boilerplate. That can mean some controls have an awful lot of events (for example, the ImageBox control has (at the time of writing) 42 custom events on top of those it inherits, some for actions but the majority for properties). Many of these events will be rarely used.

As an example, here is a typical property and backing event

private bool _allowUnfocusedMouseWheel;

[Category("Behavior"), DefaultValue(false)]
public virtual bool AllowUnfocusedMouseWheel
{
  get { return _allowUnfocusedMouseWheel; }
  set
  {
    if (_allowUnfocusedMouseWheel != value)
    {
      _allowUnfocusedMouseWheel = value;

      this.OnAllowUnfocusedMouseWheelChanged(EventArgs.Empty);
    }
  }
}

[Category("Property Changed")]
public event EventHandler AllowUnfocusedMouseWheelChanged;

protected virtual void OnAllowUnfocusedMouseWheelChanged(EventArgs e)
{
  EventHandler handler;

  handler = this.AllowUnfocusedMouseWheelChanged;

  handler?.Invoke(this, e);
}

Quite straightforward - a backing field, a property definition, a change event, and a protected virtual method to raise the change event the "safe" way. It's an example of an event that will be rarely used, but you never know and so I continue to follow this pattern.

Despite all the years I've been writing C# code, I never actually thought about how the C# compiler implements events, beyond the fact that I knew it created add and remove methods, in a similar fashion to how a property creates get and set methods.

From browsing the .NET Reference Source in the past, I knew the Control class implemented events slightly differently to above, but I never thought about why. I assumed it was something they had done in .NET 1.0 and never changed with Microsoft's mania for backwards compatibility.

I am currently just under halfway through CLR via C# by Jeffrey Richter. It's a nicely written book, and probably would have been of great help many years ago when I first started using C# (and no doubt as I get through the last third of the book I'm going to find some new goodies). As it is, I've been ploughing through it when I hit the chapter on Events. This chapter started off by describing how events are implemented by the CLR and expanding on what I already knew. It then dropped the slight bombshell that this is quite inefficient as it requires more memory, especially for events that are never used. Given I liberally sprinkle my WinForms controls with events and I have lots of other classes with events, mainly custom observable collections and classes implementing INotifyPropertyChanged (many of those!), it's a safe bet that I'm using a goodly chunk of ram for no good reason. And if I can save some memory "for free" as it were... well, every little helps.

The book then continued with a description of how to explicitly implement an event, which is how the base Control class I mentioned earlier does it, and why the reference source code looked different to typical. While the functionality is therefore clearly built into .NET, he also proposes and demonstrates code for a custom approach which is possibly better than the built in version.

In this article, I'm only going to cover what is built into the .NET Framework. Firstly, because I don't believe in taking someone else's written content, deleting the introductions and copyright information and them passing it off as my own work. And secondly, as I'm going to start using this approach with my myriad libraries of WinForm controls, their base implementations already have this built in, so I just need to bolt my bits on top of it.

How big is my class?

Before I made any changes to my code, I decided I wanted to know how much memory the ImageBox control required. (Not that I doubted Jeffrey, but it doesn't hurt to be cautious, especially given the mountain of work this will entail if I start converting all my existing code). There isn't really a simple way of getting the size of an object, but this post on StackOverflow (where else!) has one method.

unsafe
{
  RuntimeTypeHandle th = typeof(ImageBox).TypeHandle;
  int size = *(*(int**)&th + 1);

  Console.WriteLine(size);
}

When running this code in the current version of the ImageBox, I get a value of 968. It's a fairly meaningless number, but does give me something to compare. However, as I didn't quite trust it I also profiled the demo program with a memory profiler. After profiling, dotMemory also showed the size of the ImageBox control to be 968 bytes. Lucky me.

Explicitly implementing an event

At the start of the article, I showed a typical compiler generated event. Now I'm going to explicitly implement it. This is done by using a proxy class to store the event delegates. So instead of having delegates automatically created for each event, they will only be created when explicitly binding the event. This is where Jeffrey prefers a custom approach, but I'm going to stick with the class provided by the .NET Framework, the EventHandlerList class.

As the proxy class is essentially a dictionary, we need a key to identify the event. As we're trying to save memory, we create a static object which will be used for all occurrences of this event, no matter how many instances of our component are created.

private static readonly object EventAllowUnfocusedMouseWheelChanged = new object();

Next, we need to implement the add and remove accessors of the event ourselves

public event EventHandler AllowUnfocusedMouseWheelChanged
{
  add
  {
    this.Events.AddHandler(EventAllowUnfocusedMouseWheelChanged, value);
  }
  remove
  {
    this.Events.RemoveHandler(EventAllowUnfocusedMouseWheelChanged, value);
  }
}

As you can see, the definition is the same, but now we have created add and remove accessors which call either the AddHandler or RemoveHandler methods of a per-instance EventHandlerList component, using the key we defined earlier, and of course the delegate value to add or remove.

In a WinForm's control, this is automatically provided via the protected Events property. If you're explicitly implementing events in a class which doesn't offer this functionality, you'll need to create and manage an instance of the EventHandlerList class yourself

Finally, when it's time to invoke the method, we need to retrieve the delegate from the EventHandlerList, once again with our event key, and if it isn't null, invoke it as normal.

protected virtual void OnAllowUnfocusedMouseWheelChanged(EventArgs e)
{
  EventHandler handler;

  handler = (EventHandler)this.Events[EventAllowUnfocusedMouseWheelChanged];

  handler?.Invoke(this, e);
}

There are no generic overloads, so you'll need to cast the returned Delegate into the appropriate EventHandler, EventHandler<T> or custom delegate.

Simple enough, and you can easily have a code snippet do all the grunt work. The pain will come from if you decide to convert existing code.

Does this break anything?

No. You're only changing the implementation, not how other components interact with your events. You won't need to make any code changes to any code that interacts with your updated component, and possibly won't even need to recompile the other code (strong naming and binding issues aside!).

In other words, unless you do something daft like change your the visibility of your event, or accidentally rename it, explicitly implementing a previously implicitly defined event is not a breaking change.

How big is my class, redux

I modified the ImageBox control (you can see the changed version on this branch in GitHub) so that all the events were explicitly implemented. After running the new version of the code through the memory profiler / magic unsafe code, the size of the ImageBox is now 632 bytes, knocking nearly a third of the size off. No magic bullet, and isn't a full picture, but I'll take it!

In all honesty, I don't know if this has really saved memory or not. But I do know I have a plethora of controls with varying numbers of events. And I know Jeffrey's CLR book is widely touted as a rather good tome. And I know this is how Microsoft have implemented events in the base Control classes (possibly elsewhere too, I haven't looked). So with all these "I knows", I also know I'm going to have all new events follow this pattern in future, and I'll be retrofitting existing code when I can.

An all-you-can-eat code snippet

I love code snippets and tend to create them whenever I have boilerplate code to implement repeatedly. In fact, most of my snippets actually are variations of property and event implementations, to handle things like properties with change events, or properties in classes that implement INotifyPropertyChanged and other similar scenarios. I have now retired my venerable basic property-with-event and standalone-event snippets with new versions that do explicit event implementing. As I haven't prepared a demonstration program for this article, I instead present this code snippet for generating properties with backing events - I hope someone finds them as useful as I do.

<?xml version="1.0" encoding="utf-8" ?><CodeSnippets  xmlns="http://schemas.microsoft.com/VisualStudio/2005/CodeSnippet"><CodeSnippet Format="1.0.0"><Header><Title>Property with Backing Event</Title><Shortcut>prope</Shortcut><Description>Code snippet for property with backing field and a change event</Description><Author>Richard Moss</Author><SnippetTypes><SnippetType>Expansion</SnippetType></SnippetTypes></Header><Snippet><Declarations><Literal><ID>type</ID><ToolTip>Property type</ToolTip><Default>int</Default></Literal><Literal><ID>name</ID><ToolTip>Property name</ToolTip><Default>MyProperty</Default></Literal><Literal><ID>field</ID><ToolTip>The variable backing this property</ToolTip><Default>myVar</Default></Literal></Declarations><Code Language="csharp"><![CDATA[private $type$ $field$;

    [Category("")]
    [DefaultValue("")]
    public $type$ $name$
    {
      get { return $field$; }
      set
      {
        if ($field$ != value)
        {
          $field$ = value;

          this.On$name$Changed(EventArgs.Empty);
        }
      }
    }

    private static readonly object Event$name$Changed = new object();

    /// <summary>
    /// Occurs when the $name$ property value changes
    /// </summary>
    [Category("Property Changed")]
    public event EventHandler $name$Changed
    {
      add
      {
        this.Events.AddHandler(Event$name$Changed, value);
      }
      remove
      {
        this.Events.RemoveHandler(Event$name$Changed, value);
      }
    }

    /// <summary>
    /// Raises the <see cref="$name$Changed" /> event.
    /// </summary>
    /// <param name="e">The <see cref="EventArgs" /> instance containing the event data.</param>
    protected virtual void On$name$Changed(EventArgs e)
    {
      EventHandler handler;

      handler = (EventHandler)this.Events[Event$name$Changed];

      handler?.Invoke(this, e);
    }

  $end$]]></Code></Snippet></CodeSnippet></CodeSnippets>

All content Copyright (c) by Cyotek Ltd or its respective writers. Permission to reproduce news and web log entries and other RSS feed content in unmodified form without notice is granted provided they are not used to endorse or promote any products or opinions (other than what was expressed by the author) and without taking them out of context. Written permission from the copyright owner must be obtained for everything else.
Original URL of this content is https://www.cyotek.com/blog/implementing-events-more-efficiently-in-net-applications?source=rss.

Adding keyboard accelerators and visual cues to a WinForms control

$
0
0

Some weeks ago I was trying to make parts of WebCopy's UI a little bit simpler via the expedient of hiding some of the more advanced (and consequently less used) options. And to do this, I created a basic toggle panel control. This worked rather nicely, and while I was writing it I also thought I'd write a short article on adding keyboard support to WinForm controls - controls that are mouse only are a particular annoyance of mine.

A demonstration control

Below is an fairly simple (but functional) button control that works - as long as you're a mouse user. The rest of the article will discuss how to extend the control to more thoroughly support keyboard users, and you what I describe below in your own controls.

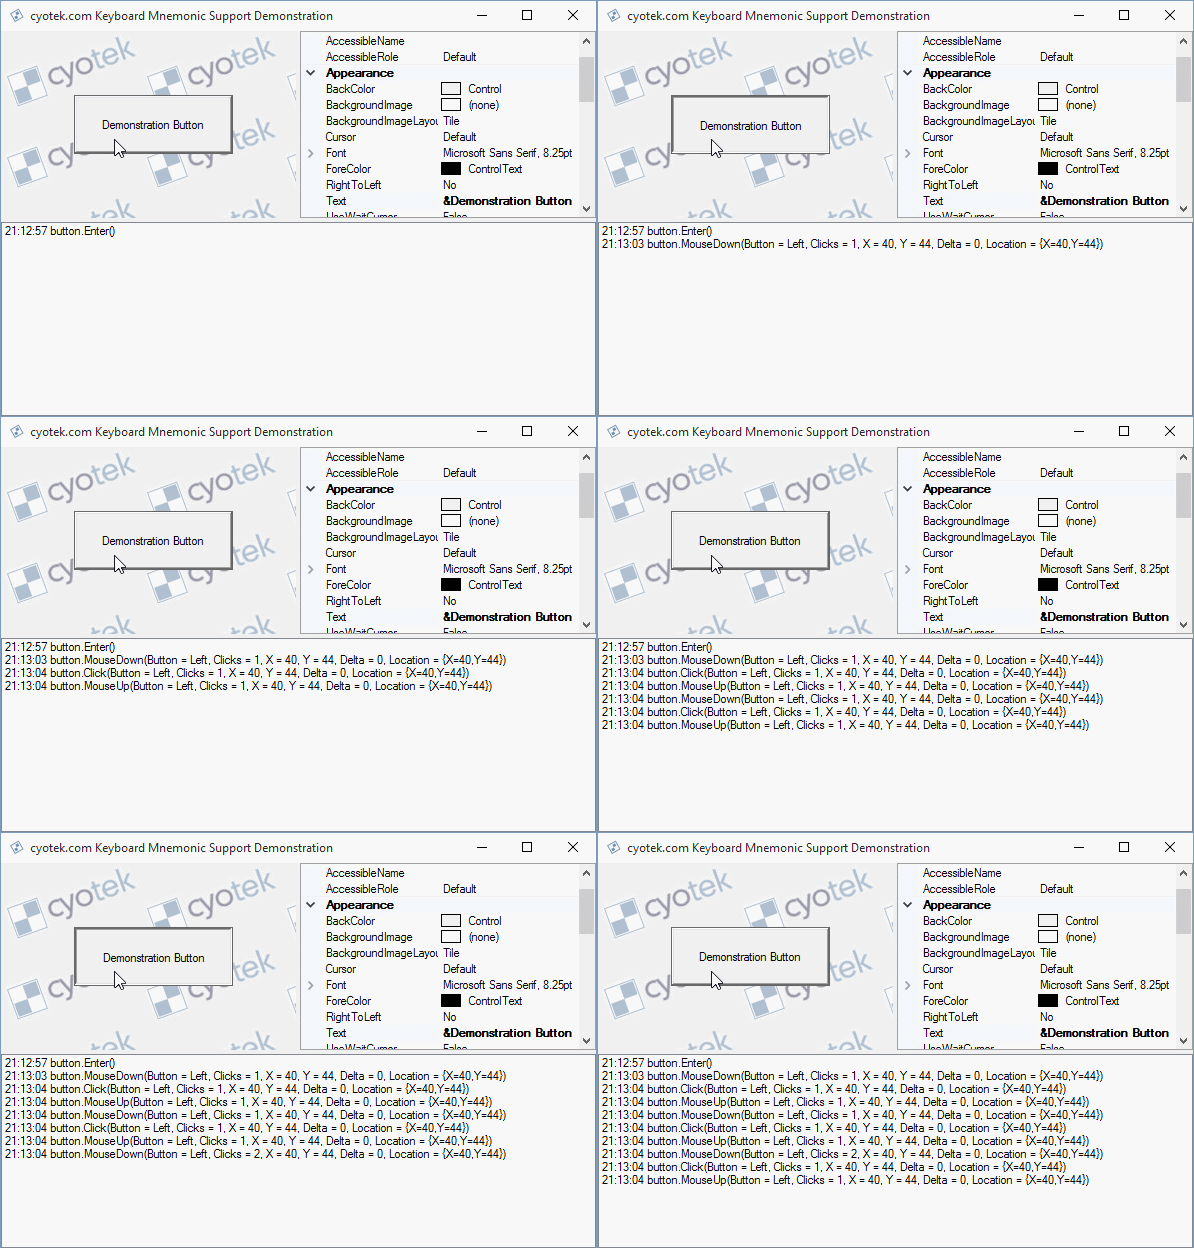
A button control that currently only supports the mouse

internal sealed class Button : Control, IButtonControl
{
  #region Constants

  private const TextFormatFlags _defaultFlags = TextFormatFlags.NoPadding | TextFormatFlags.SingleLine | TextFormatFlags.HorizontalCenter | TextFormatFlags.VerticalCenter | TextFormatFlags.EndEllipsis;

  #endregion

  #region Fields

  private bool _isDefault;

  private ButtonState _state;

  #endregion

  #region Constructors

  public Button()
  {
    this.SetStyle(ControlStyles.AllPaintingInWmPaint | ControlStyles.OptimizedDoubleBuffer | ControlStyles.ResizeRedraw, true);
    this.SetStyle(ControlStyles.StandardDoubleClick, false);
    _state = ButtonState.Normal;
  }

  #endregion

  #region Events

  [Browsable(false)]
  [DesignerSerializationVisibility(DesignerSerializationVisibility.Hidden)]
  public new event EventHandler DoubleClick
  {
    add { base.DoubleClick += value; }
    remove { base.DoubleClick -= value; }
  }

  [Browsable(false)]
  [DesignerSerializationVisibility(DesignerSerializationVisibility.Hidden)]
  public new event MouseEventHandler MouseDoubleClick
  {
    add { base.MouseDoubleClick += value; }
    remove { base.MouseDoubleClick -= value; }
  }

  #endregion

  #region Methods

  protected override void OnBackColorChanged(EventArgs e)
  {
    base.OnBackColorChanged(e);

    this.Invalidate();
  }

  protected override void OnEnabledChanged(EventArgs e)
  {
    base.OnEnabledChanged(e);

    this.SetState(this.Enabled ? ButtonState.Normal : ButtonState.Inactive);
  }

  protected override void OnFontChanged(EventArgs e)
  {
    base.OnFontChanged(e);

    this.Invalidate();
  }

  protected override void OnForeColorChanged(EventArgs e)
  {
    base.OnForeColorChanged(e);

    this.Invalidate();
  }

  protected override void OnMouseDown(MouseEventArgs e)
  {
    base.OnMouseDown(e);

    this.SetState(ButtonState.Pushed);
  }

  protected override void OnMouseUp(MouseEventArgs e)
  {
    base.OnMouseUp(e);

    this.SetState(ButtonState.Normal);
  }

  protected override void OnPaint(PaintEventArgs e)
  {
    Graphics g;

    base.OnPaint(e);

    g = e.Graphics;

    this.PaintButton(g);
    this.PaintText(g);
  }

  protected override void OnTextChanged(EventArgs e)
  {
    base.OnTextChanged(e);

    this.Invalidate();
  }

  private void PaintButton(Graphics g)
  {
    Rectangle bounds;

    bounds = this.ClientRectangle;

    if (_isDefault)
    {
      g.DrawRectangle(SystemPens.WindowFrame, bounds.X, bounds.Y, bounds.Width - 1, bounds.Height - 1);
      bounds.Inflate(-1, -1);
    }

    ControlPaint.DrawButton(g, bounds, _state);
  }

  private void PaintText(Graphics g)
  {
    Color textColor;
    Rectangle textBounds;
    Size size;

    size = this.ClientSize;
    textColor = this.Enabled ? this.ForeColor : SystemColors.GrayText;
    textBounds = new Rectangle(3, 3, size.Width - 6, size.Height - 6);

    if (_state == ButtonState.Pushed)
    {
      textBounds.X++;
      textBounds.Y++;
    }

    TextRenderer.DrawText(g, this.Text, this.Font, textBounds, textColor, _defaultFlags);
  }

  private void SetState(ButtonState state)
  {
    _state = state;

    this.Invalidate();
  }

  #endregion

  #region IButtonControl Interface

  public void NotifyDefault(bool value)
  {
    _isDefault = value;

    this.Invalidate();
  }

  public void PerformClick()
  {
    this.OnClick(EventArgs.Empty);
  }

  [Category("Behavior")]
  [DefaultValue(typeof(DialogResult), "None")]
  public DialogResult DialogResult { get; set; }

  #endregion
}

About mnemonic characters

I'm fairly sure most developers would know about mnemonic characters / keyboard accelerators, but I'll quickly outline regardless. When attached to a UI element, the mnemonic character tells users what key (usually combined with Alt) to press in order to activate it. Windows shows the mnemonic character with an underline, and this is known as a keyboard cue.

For example, File would mean press Alt+F.

Specifying the keyboard accelerator

In Windows programming, you generally use the & character to denote the mnemonic in a string. So for example, &Demo means the d character is the mnemonic. If you actually wanted to display the & character, then you'd just double them up, e.g. Hello && Goodbye.

While the underlying Win32 API uses the & character, and most other platforms such as classic Visual Basic or Windows Forms do the same, WPF uses the _ character instead. Which pretty much sums up all of my knowledge of WPF in that one little fact.

Painting keyboard cues

If you useTextRenderer.DrawText to render text in your controls (which produces better output than Graphics.DrawString) then by default it will render keyboard cues.

Older versions of Windows used to always render these cues. However, at some point (with Window 2000 if I remember correctly) Microsoft changed the rules so that applications would only render cues after the user had first pressed the Alt character. In practice, this means you need to check to see if cues should be rendered and act accordingly. There used to be an option to specify if they should always be shown or not, but that seems to have disappeared with the march towards dumbing the OS down to mobile-esque levels.

The first order of business then is to update our PaintText method to include or exclude keyboard cues as necessary.

private const TextFormatFlags _defaultFlags = TextFormatFlags.NoPadding | TextFormatFlags.SingleLine | TextFormatFlags.HorizontalCenter | TextFormatFlags.VerticalCenter | TextFormatFlags.EndEllipsis;

private void PaintText(Graphics g)
{
  // .. snip ..

  TextRenderer.DrawText(g, this.Text, this.Font, textBounds, textColor, _defaultFlags);
}

TextRenderer.DrawText is a managed wrapper around the DrawTextEx Win32 API, and most of the members of TextFormatFlags map to various DT_* constants. (Except for NoPadding... I really don't know why TextRenderer adds left and right padding by default but it's really annoying - I always set NoPadding (when I'm not directly calling GDI via p/invoke)

As I noted the default behaviour is to draw the cues, so we need to detect when cues should not be displayed and instruct our paint code to skip them. To determine whether or not to display keyboard cues, we can check the ShowKeyboardCues property of the Control class. To stop DrawText from painting the underline, we use the TextFormatFlags.HidePrefix flag (DT_HIDEPREFIX).

So we can update our PaintText method accordingly

private void PaintText(Graphics g)
{
  TextFormatFlags flags;

  // .. snip ..

  flags = _defaultFlags;

  if (!this.ShowKeyboardCues)
  {
    flags |= TextFormatFlags.HidePrefix;
  }

  TextRenderer.DrawText(g, this.Text, this.Font, textBounds, textColor, flags);
}

Now our button will now hide and show accelerators based on how the end user is working.

If for some reason you want to use Graphics.DrawString, then you can use something similar to the below - just set the HotkeyPrefix property of a StringFormat object to be HotkeyPrefix.Show or HotkeyPrefix.Hide. Note that the default StringFormat object doesn't show prefixes, in a nice contradiction to TextRenderer.

using (StringFormat format = new StringFormat(StringFormat.GenericDefault)
{
  HotkeyPrefix = HotkeyPrefix.Show,
  Alignment = StringAlignment.Center,
  LineAlignment =StringAlignment.Center,
  Trimming = StringTrimming.EllipsisCharacter
})
{
  g.DrawString(this.Text, this.Font, SystemBrushes.ControlText, this.ClientRectangle, format);
}

The button control now reacts to keyboard cues

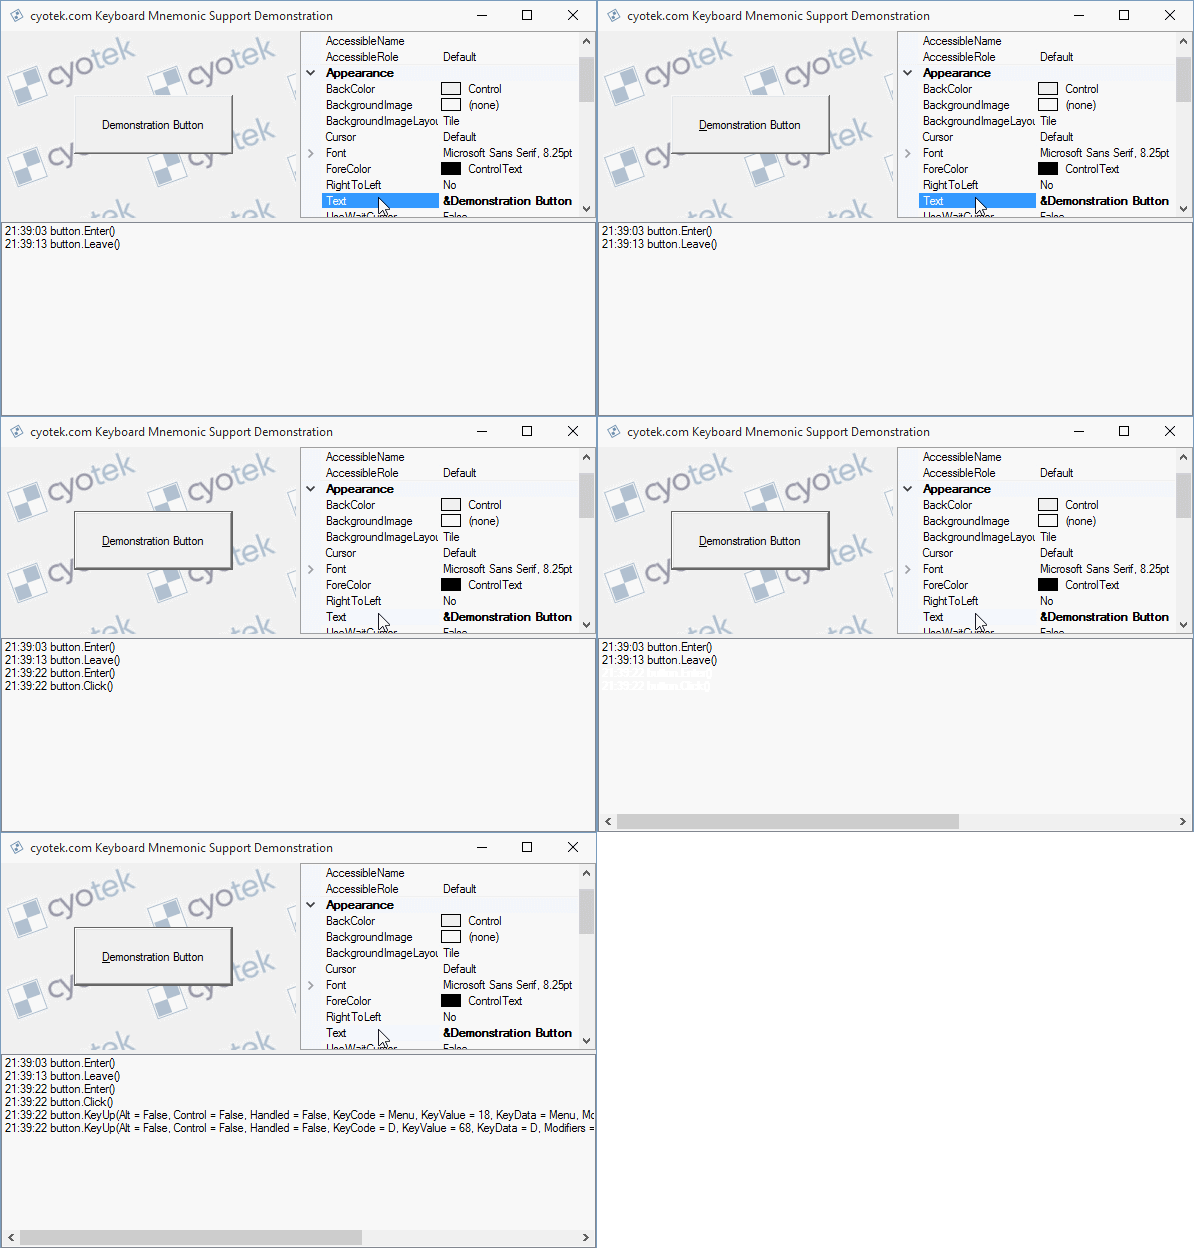
As the above animation is just a GIF file, there's no audio - but when I ran that demo, pressing Alt+D triggered a beep sound as there was nothing on the form that could handle the accelerator.

Painting focus cues

Focus cues are highlights that show which element has the keyboard focus. Traditionally Windows would draw a dotted outline around the text of an element that performs a single action (such as a button or checkbox), or draws an item using both a different background and foreground colours for an element that has multiple items (such as a listbox or a menu). Normally (for single action controls at least) focus cues only appear after the Tab key has been pressed, memory fails me as to whether this has always been the case or if Windows use to always show a focus cue.

You can use the Focused property of a Control to determine if it currently has keyboard focus and the ShowFocusCues property to see if the focus state should be rendered.

After that, the simplest way of drawing a focus rectangle would be to use the ControlPaint.DrawFocusRectangle. However, this draws using fixed colours. Old-school focus rectangles inverted the pixels by drawing with a dotted XOR pen, meaning you could erase the focus rectangle by simply drawing it again - this was great for rubber banding (or dancing ants if you prefer). If you want that type of effect then you can use the DrawFocusRect Win32 API.

private void PaintButton(Graphics g)
{
  // .. snip ..

  if (this.ShowFocusCues && this.Focused)
  {
    bounds.Inflate(-3, -3);

    ControlPaint.DrawFocusRectangle(g, bounds);
  }
}

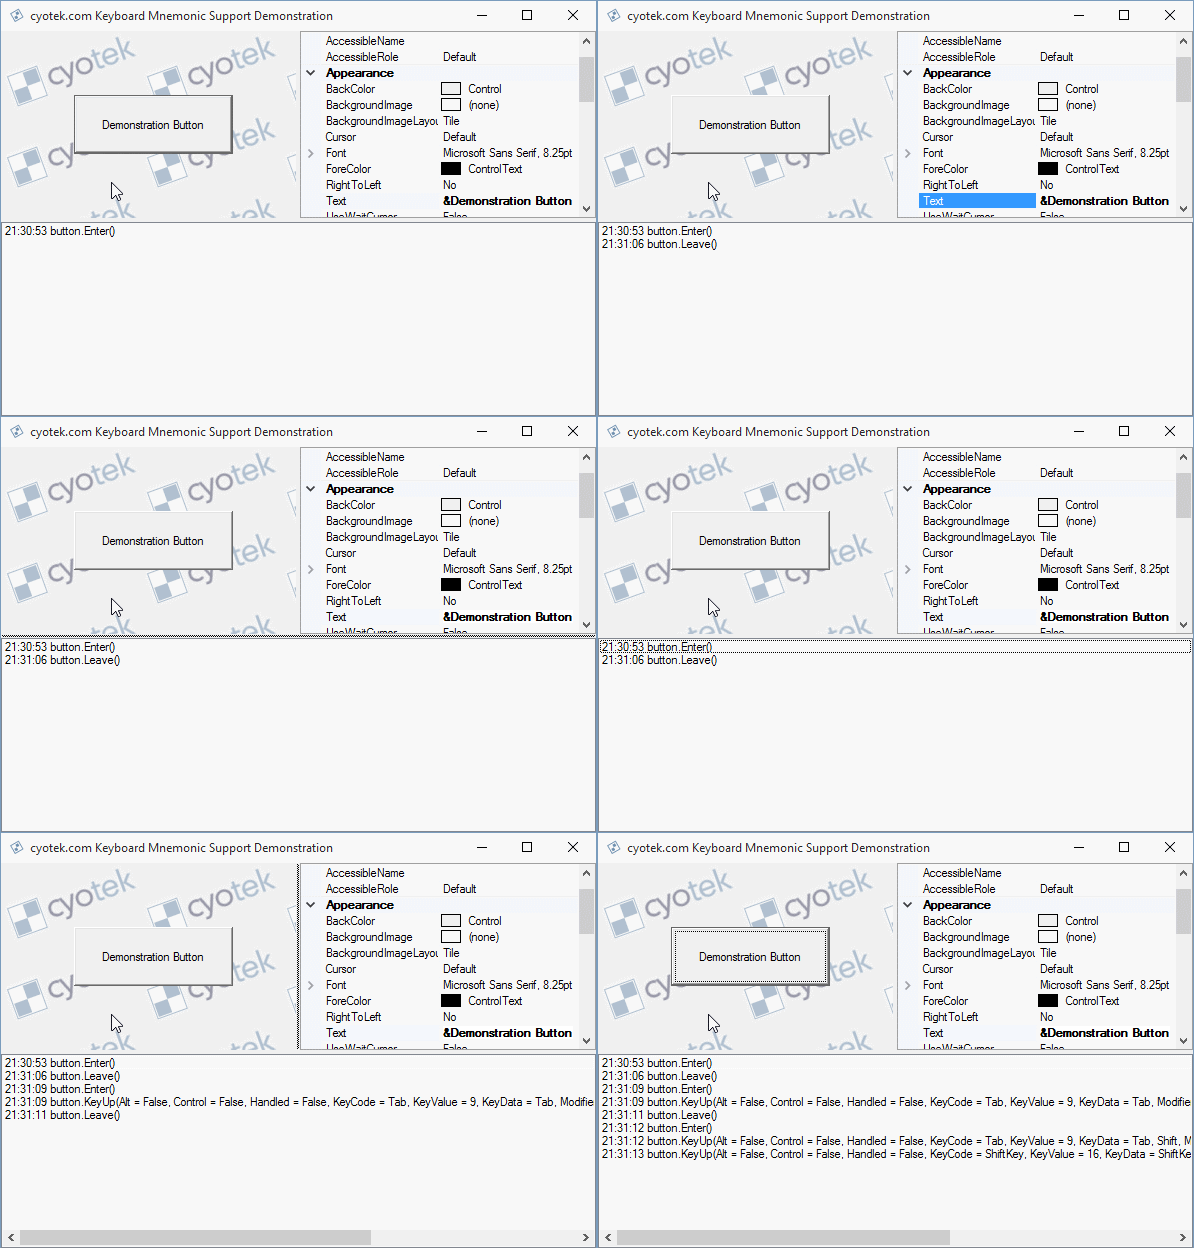
The button control showing focus cues as focus is cycled with the tab key

Notice in the demo above how focus cues and keyboard cues are independent from each other.

So, about those accelerators

Now that we've covered painting our control to show focus / keyboard cues as appropriate, it's time to actually handle accelerators. Once again, the Control class has everything we need built right into it.

To start with, we override the ProcessMnemonic method. This method is automatically called by .NET when a user presses an Alt key combination and it is up to your component to determine if it should process it or not. If the component can't handle the accelerator, then it should return false. If it can, then it should perform the action and return true. The method includes a char argument that contains the accelerator key (e.g. just the character code, not the alt modifier).

So how do you know if your component can handle it? Luckily the Control class offers a static IsMnemonic method that takes a char and a string as arguments. It will return true if the source string contains a mnemonic matching the passed character. Note that it expects the & character is used to identify the mnemonic. I assume WPF has a matching version of this method, but I don't know where.

We can now implement the accelerator handling quite simply using the following snippet

protected override bool ProcessMnemonic(char charCode)
{
  bool processed;

  processed = this.CanFocus && IsMnemonic(charCode, this.Text);

  if (processed)
  {
    this.Focus();
    this.PerformClick();
  }

  return processed;
}

We check to make sure the control can be focused in addition to checking if our control has a match for the incoming mnemonic, and if both are true then we set focus to the control and raise the Click event. If you don't need (or want) to set focus to the control, then you can skip the CanFocus check and Focus call.

In this final demonstration, we see pressing Alt+D triggering the Click event of the button. Mission accomplished!

Bonus Points: Other Keys

Some controls accept other keyboard conventions. For example, a button accepts the Enter or Space keys to click the button (the former acting as an accelerator, the latter acting as though the mouse were being pressed and released), combo boxes accept F4 to display drop downs and so on. If your control mimics any standard controls, it's always worthwhile adding support for these conventions too. And don't forget about focus!

For example, in the sample button, I modify OnMouseDown to set focus to the control if it isn't already set

protected override void OnMouseDown(MouseEventArgs e)
{
  base.OnMouseDown(e);

  if (this.CanFocus)
  {
    this.Focus();
  }

  this.SetState(ButtonState.Pushed);
}

I also add overrides for OnKeyDown and OnKeyUp to mimic the button being pushed and then released when the user presses and releases the space bar

protected override void OnKeyDown(KeyEventArgs e)
{
  base.OnKeyDown(e);

  if(e.KeyCode == Keys.Space && e.Modifiers == Keys.None)
  {
    this.SetState(ButtonState.Pushed);
  }
}

protected override void OnKeyUp(KeyEventArgs e)
{
  base.OnKeyUp(e);

  if((e.KeyCode & Keys.Space) == Keys.Space)
  {
    this.SetState(ButtonState.Normal);

    this.PerformClick();
  }
}

However, I'm not adding anything to handle the enter key. This is because I don't need to - in this example, the Button control implements the IButtonControl interface and so it's handled for me without any special actions. For non-button controls, I would need to explicitly handle enter key presses if appropriate.

Downloads

All content Copyright (c) by Cyotek Ltd or its respective writers. Permission to reproduce news and web log entries and other RSS feed content in unmodified form without notice is granted provided they are not used to endorse or promote any products or opinions (other than what was expressed by the author) and without taking them out of context. Written permission from the copyright owner must be obtained for everything else.
Original URL of this content is https://www.cyotek.com/blog/adding-keyboard-accelerators-and-visual-cues-to-a-winforms-control?source=rss.

Creating and restoring bacpac files without using a GUI

$
0
0

Almost all databases I use are SQL Server databases. They are created with hand written SQL scripts and upgraded with hand written SQL scripts - it is very rare I'll use SQL Server Management Studio's (SSMS) designers to work with database objects. When backing up or restoring databases, I have various SQL scripts to do this, which works fine when SQL Server has access to your file system, or you theirs.

This isn't always the case. Last year I replaced our woefully inadequate error logging system with something slightly more robust and modern, and this system is hosted on Microsoft's Azure platform using SaaS. No direct file access there!

Rather than using traditional database backups, for Azure hosted databases you need to use Data-tier Applications. While these do serve more advanced purposes than traditional backups, in my scenario I am simply treating them as a means of getting a database from A to B.

SSMS allows you to work with these files, but only via GUI commands - there's no SQL statements equivalent to BACKUP DATABASE or RESTORE DATABASE, which is a royal pain. Although I have my Azure database backed up to blog storage once a week, I want to make my own backups more frequently, and be able to restore these locally for development work and performance profiling. Doing this using SQL Server's GUI tools is not conductive to an easy workflow.

A CLI for working with BACPAC files

Fortunately, as I work with Visual Studio I have the SQL Server Data Tools (SSDT) installed, which includes SqlPackage.exe, a magical tool that will let me import and export BACPAC files locally and remotely.

Less fortunately, it isn't part of the path and so we can't just merrily type sqlpackage into a command window the same way you can type sqlcmd and expect it to work; it won't. And it doesn't seem to have a convenient version-independent way of grabbing it from the registry either. On my machine it is located at C:\Program Files (x86)\Microsoft SQL Server\120\DAC\bin, but this may change based on what version of the tools you have installed.

Creating a BACPAC file from an existing database

To export a database into a BACPAC file, you can run the following command. Note that this works for databases on a local/remote SQL Server instance or Azure SQL Database.

sqlpackage.exe /a:Export/ssn:<ServerName>/sdn:<DatabaseName>/su:<UserName>/sp:<Password>/tf:<ExportFileName>

Listed below are the arguments we're using. In my example above, I'm using the short form, you can use either long or short forms to suit your needs.

  • /Action (a) - the action to perform, in this case Export
  • /SourceServerName (ssn) - the source server name. Can be either the URI of an Azure database server, or the more traditional ServerName\InstanceName
  • /SourceDatabaseName (sdn) - the name of the database to export
  • /SourceUser (su) - the login user name
  • /SourcePassword (sp) - the login password

For trusted connections, you can skip the su and sp arguments.

Exporting an Azure SQL Database to a data-tier application file via the command line

The screenshot above shows typical output.

Restoring a database from a BACPAC file

Restoring a database is just as easy, just use an action of Import instead of export, and invert source and target in arguments.

sqlpackage.exe /a:Import/tsn:<ServerName>/tdn:<DatabaseName>/tu:<UserName>/tp:<Password>/sf:<ExportFileName>

There are a couple of caveats however - if the target database already exists and contains objects such as tables or views, then the import will fail. The database must either not exist, or be completely empty.

Sadly, despite the fact that you have separate source and target arguments, it doesn't appear to be possible to do a direct copy from the source server to the target server.

Importing a data-tier application into a local SQL Server instance from a BACPAC file via the command line

An automated batch script for restoring a database

The following batch file is a simple script I use to restore the newest available bacpac file in a given directory. The script also deletes any existing local database using sqlcmd prior to importing the database via sqlpackage, resolving a problem where non-empty SQL databases can't be restored using the package tool.

It's a very simple script, and not overly robust but it does the job I need it to do. I still tend to use batch files over PowerShell for simple tasks, no complications about loaded modules, slow startup, just swift execution without fuss.

@ECHO OFF

SETLOCAL

REM This is the directory where the SQL data tools are installed
SET SQLPCKDIR=C:\Program Files (x86)\Microsoft SQL Server\120\DAC\bin\
SET SQLPCK="%SQLPCKDIR%SqlPackage.exe"

REM The directory where the bacpac files are stored
SET DBDIR=D:\Backups\azuredbbackups\

REM The name of the database to import
SET DBNAME=MyDatabase

REM The SQL Server name / instance
SET SERVERNAME=.

REM SQL statement to delete the import database as SQLPACKAGE won't import to an existing database
SET DROPDATABASESQL=IF EXISTS (SELECT * FROM [sys].[databases] WHERE [name] = '%DBNAME%') DROP DATABASE [%DBNAME%];

REM Try and find the newest BACPAC file
FOR /F "tokens=*" %%a IN ('DIR %DBDIR%*.bacpac /B /OD /A-D') DO SET PACNAME=%%a

IF "%PACNAME%"=="" GOTO :bacpacnotfound

SET DBFILE=%DBDIR%%PACNAME%

SQLCMD -S %SERVERNAME% -E -Q "%DROPDATABASESQL%" -b
IF %errorlevel% NEQ 0 GOTO :error

%SQLPCK% /a:Import /sf:%DBFILE% /tdn:%DBNAME% /tsn:%SERVERNAME%
IF %errorlevel% NEQ 0 GOTO :error

GOTO :done

:bacpacnotfound
ECHO No bacpac file found to import.
EXIT /B 1

:error
ECHO Failed to import bacpac file.
EXIT /B 1

:done
ENDLOCAL

All content Copyright (c) by Cyotek Ltd or its respective writers. Permission to reproduce news and web log entries and other RSS feed content in unmodified form without notice is granted provided they are not used to endorse or promote any products or opinions (other than what was expressed by the author) and without taking them out of context. Written permission from the copyright owner must be obtained for everything else.
Original URL of this content is https://www.cyotek.com/blog/creating-and-restoring-bacpac-files-without-using-a-gui?source=rss.

Retrieving font and text metrics using C#

$
0
0

In several of my applications, I need to be able to line up text, be it blocks of text using different fonts, or text containers of differing heights. As far as I'm aware, there isn't a way of doing this natively in .NET, however with a little platform invoke we can get the information we need to do it ourselves.

Obtaining metrics using GetTextMetrics

The GetTextMetrics metrics function is used to obtain metrics based on a font and a device context by populating a TEXTMETRICW structure.

[DllImport("gdi32.dll", CharSet = CharSet.Auto)]
public static extern bool GetTextMetrics(IntPtr hdc, out TEXTMETRICW lptm);

[StructLayout(LayoutKind.Sequential, CharSet = CharSet.Unicode)]
public struct TEXTMETRICW
{
  public int tmHeight;
  public int tmAscent;
  public int tmDescent;
  public int tmInternalLeading;
  public int tmExternalLeading;
  public int tmAveCharWidth;
  public int tmMaxCharWidth;
  public int tmWeight;
  public int tmOverhang;
  public int tmDigitizedAspectX;
  public int tmDigitizedAspectY;
  public ushort tmFirstChar;
  public ushort tmLastChar;
  public ushort tmDefaultChar;
  public ushort tmBreakChar;
  public byte tmItalic;
  public byte tmUnderlined;
  public byte tmStruckOut;
  public byte tmPitchAndFamily;
  public byte tmCharSet;
}

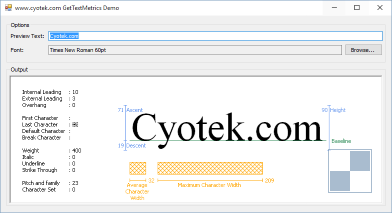
Although there's a lot of information available (as you can see in the demonstration program), for the most part I tend to use just the tmAscent value which returns the pixels above the base line of characters.

A quick note on leaks

I don't know how relevant clean up is in modern versions of Windows, but in older versions of Windows it used to be very important to clean up behind you. If you get a handle to something, release it when you're done. If you create a GDI object, delete it when you're done. If you select GDI objects into a DC, store and restore the original objects when you're done. Not doing these actions used to be a good source of leaks. I don't use GDI anywhere near as much as I used to years ago as a VB6 developer, but I assume the principles still apply even in the latest versions of Windows

Calling GetTextMetrics

As GetTextMetrics is a Win32 GDI API call, it requires a device context, which is basically a bunch of graphical objects such as pens, brushes - and fonts. Generally you would use the GetDC or CreateDC API calls, but fortunately the .NET Graphics object is essentially a wrapper around a device context, so we can use this.

A DC can only have one object of a specific type activate at a time. For example, in order to draw a line, you need to tell the DC the handle of the pen to draw with. When you do this, Windows will tell you the handle of the pen that was originally in the DC. After you have finished drawing your line, it is up to you to both restore the state of the DC, and to destroy your pen. The GDI calls SelectObject and DeleteObject can do this.

[DllImport("gdi32.dll", CharSet = CharSet.Auto, SetLastError = true)]
public static extern bool DeleteObject(IntPtr hObject);

[DllImport("gdi32.dll", CharSet = CharSet.Auto)]
public static extern IntPtr SelectObject(IntPtr hdc, IntPtr hgdiObj);

The following helper functions can be used to get the font ascent, either for the specified Control or for a IDeviceContext and Font combination.

I haven't tested the performance of using Control.CreateGraphics versus directly creating a DC. If you are calling this functionality a lot it may be worth caching the values or avoiding CreateGraphics and trying pure Win32 API calls.

private int GetFontAscent(Control control)
{
  using (Graphics graphics = control.CreateGraphics())
  {
    return this.GetFontAscent(graphics, control.Font);
  }
}

private int GetFontAscent(IDeviceContext dc, Font font)
{
  int result;
  IntPtr hDC;
  IntPtr hFont;
  IntPtr hFontDefault;

  hDC = IntPtr.Zero;
  hFont = IntPtr.Zero;
  hFontDefault = IntPtr.Zero;

  try
  {
    NativeMethods.TEXTMETRICW textMetric;

    hDC = dc.GetHdc();

    hFont = font.ToHfont();
    hFontDefault = NativeMethods.SelectObject(hDC, hFont);

    NativeMethods.GetTextMetrics(hDC, out textMetric);

    result = textMetric.tmAscent;
  }
  finally
  {
    if (hFontDefault != IntPtr.Zero)
    {
      NativeMethods.SelectObject(hDC, hFontDefault);
    }

    if (hFont != IntPtr.Zero)
    {
      NativeMethods.DeleteObject(hFont);
    }

    dc.ReleaseHdc();
  }

  return result;
}

In the above code you can see how we first get the handle of the underlying device context by calling GetDC. This essentially locks the device context, as in the same way that only a single GDI object of each type can be associated with a GDI, only one thread can use the DC at a time. (It's little more complicated than that, but this will suffice for this post).

Next, we convert the managed .NET Font into an unmanaged HFONT.

You are responsible for deleting the handle returned by Font.ToHfont

Once we have our font handle, we set that to be the current font of the device context using SelectObject, which returns the existing font handle - we store this for later.

Now we can call GetTextMetrics passing in the handle of the DC, and a TEXTMETRIC instance to populate. Note that the GetTextMetrics call could fail, and if so the function call will return false. In this demonstration code, I'm not checking for success or failure and assuming the call will always succeed.

Once we've called GetTextMetrics, it's time to reverse some of the steps we did earlier.

Note the use of a finally block, so even if a crash occurs during processing, our clean up operations will still get called

First we restore the original font handle that we obtained from the first call to SelectObject.

Now it's safe to delete our HFONT - so we do that with DeleteObject.

It's important to do these steps in order - deleting the handle to a GDI object that is currently associated with a device context isn't a great idea!

Finally, we release the DC handle we created earlier via ReleaseDC.

And that's pretty much all there is to it - we've got our font ascent, cleaned up everything behind us and can now get on with the whatever purpose we needed that value for!

What about the other information?

The example code above focuses on the tmAscent value as this is mostly what I use. However, you could adapt the function to return the TEXTMETRICW structure directly, or to populate a more .NET friendly object using .NET naming conventions and converting things like tmPitchAndFamily to friendly enums etc.

Downloads

All content Copyright (c) by Cyotek Ltd or its respective writers. Permission to reproduce news and web log entries and other RSS feed content in unmodified form without notice is granted provided they are not used to endorse or promote any products or opinions (other than what was expressed by the author) and without taking them out of context. Written permission from the copyright owner must be obtained for everything else.
Original URL of this content is https://www.cyotek.com/blog/retrieving-font-and-text-metrics-using-csharp?source=rss.

Aligning Windows Forms custom controls to text baselines using C#

$
0
0

One of the nice things about the Visual Studio WinForms designers are the guidelines it draws onto design surfaces, aiding you in perfectly positioning your controls. These guidelines are known internally as snap lines, and by default each visual component inheriting from Control gets four of these, representing the values of the control's Margin property.

A problem arises when you have multiple controls that have different heights, and contain a display string - in this case aligning along one edge isn't going to work and will probably look pretty ugly. Instead, you more than likely want to align the different controls so that the text appears on the same line.

Aligning everything along one edge just doesn't look right

Fortunately for us developers, the designers do include this functionality - just not by default. After all, while all controls have a Text property, not all of them use it, and how could the default designers know where your owner-draw control is going to paint text?

Aligning the controls so all text is at the same level looks much better

The image above shows a Label, ComboBox and Button control all aligned along the text baseline (the magenta line). We can achieve the same thing by creating a custom designer.

Aligning a custom control with other controls using the text baseline

Creating the designer

The first thing therefore is to create a new class and inherit from System.Windows.Forms.Design.ControlDesigner. You may also need to add a reference to System.Design to your project (which rules out Client Profile targets).

.NET conventions generally recommend that you put these types of classes in a sub-namespace called Design.

So, assuming I had a control named BetterTextBox, then the associated designer would probably look similar to the following.

using System.Windows.Forms.Design;

namespace DesignerSnapLinesDemo.Design
{
  public class BetterTextBoxDesigner : ControlDesigner
  {
  }
}

If you use a tool such as Resharper to fill in namespaces, note that by default it will try and use System.Web.UI.Design.ControlDesigner which unsurprisingly won't work for WinForms controls.

Adding a snap line

To add or remove snap lines, we override the SnapLines property and manipulate the list it returns. There are only a few snap lines available, the one we want to add is Baseline

For the baseline, you'll need to calculate where the control will draw the text, taking into consideration padding, borders, text alignments and of course the font. My previous article retrieving font and text metrics using C# describes how to do this.

public override IList SnapLines
{
  get
  {
    IList snapLines;
    int textBaseline;
    SnapLine snapLine;

    snapLines = base.SnapLines;

    textBaseline = this.GetTextBaseline(); // Font ascent

    // TODO: Increase textBaseline by anything else that affects where your text is rendered, such as
    // * The value of the Padding.Top property
    // * If your control has a BorderStyle
    // * If you reposition the text vertically for centering etc

    snapLine = new SnapLine(SnapLineType.Baseline, textBaseline, SnapLinePriority.Medium);

    snapLines.Add(snapLine);

    return snapLines;
  }
}

Note: Resharper seems to think the SnapLines property can return a null object. At least for the base WinForms ControlDesigner, this is not true and it will always return a list containing every possible snapline except for BaseLine

Linking the designer to your control

You can link your custom control to your designer by decorating your class with the System.ComponentModel.DesignerAttribute. If your designer type is in the same assembly as the control (or is referenced), then you can call it with the direct type as with the following example.

[Designer(typeof(BetterTextBoxDesigner))]
public class BetterTextBox : Control
{
}

However, if the designer isn't directly available to your control, all is not lost - the DesignerAttribute can also take a string value that contains the assembly qualified designer type name. Visual Studio will then figure out how to load the type if it can.

[Designer("DesignerSnapLinesDemo.Design.BetterTextBoxDesigner, DesignerSnapLinesDemo, Version=1.0.0.0, Culture=neutral, PublicKeyToken=null")]
public class BetterTextBox : Control
{
}

After rebuilding the project, you'll find that your control now uses your designer rather than the default.

I seem to recall that when using older versions of Visual Studio once the IDE had loaded my custom designer contained in a source code project it seemed to cache it. This meant that if I then changed the designer code and recompiled, it wouldn't be picked up unless I restarted Visual Studio. I haven't noticed that happening in VS2015, so either I'm imagining the whole thing, or it was fixed. Regardless, if you get odd behaviour in older versions of VS, a restart of the IDE might be just what you need.

The following image shows a zoomed version of the BetterTextbox (which is just a garishly painted demo control and so is several lies for the price of one) showing all three controls are perfectly aligned to the magenta BaseLine guideline.

Aligning a custom control via its text baseline

Bonus Chatter: Locking down how the control is sized

The default ControlDesigner allows controls to be resized along any edge at will. If your control automatically sets its height or width to fit its contents, then this behaviour can be undesirable. By overriding the SelectionRules property, you can define how the control can be processed. The following code snippet shows an example which prevents the control from being resized vertically, useful for single-line text box style controls.

public override SelectionRules SelectionRules
{
  get { return SelectionRules.Visible | SelectionRules.Moveable | SelectionRules.LeftSizeable | SelectionRules.RightSizeable; }
}

All content Copyright (c) by Cyotek Ltd or its respective writers. Permission to reproduce news and web log entries and other RSS feed content in unmodified form without notice is granted provided they are not used to endorse or promote any products or opinions (other than what was expressed by the author) and without taking them out of context. Written permission from the copyright owner must be obtained for everything else.
Original URL of this content is https://www.cyotek.com/blog/aligning-windows-forms-custom-controls-to-text-baselines-using-csharp?source=rss.

Displaying multi-page tiff files using the ImageBox control and C#

$
0
0

Earlier this week I received a support request from a user wanting to know if it was possible to display multi-page tiff files using the ImageBox control. As I haven't wrote anything about this control for a while, it seemed a good opportunity for a short blog post.

Viewing pages in a multi-page file

Getting the number of pages in a TIFF file

One you have obtained an Image instance containing your tiff graphic, you can use the GetFrameCount method in conjunction with a predefined FrameDimension object in order to determine how many pages there are in the image.

private int GetPageCount(Image image)
{
  FrameDimension dimension;

  dimension = FrameDimension.Page;

  return image.GetFrameCount(dimension);
}

I have tested this code on several images, and even types which don't support pages (such as standard bitmaps) have always return a valid value. However, I have no way of knowing if this will always be the case (I have experienced first hand differences in how GDI+ handles actions between different versions of Windows). The Image object does offer a FrameDimensionsList property which returns a list of GUID's for the dimensions supported by the image, so you can always check the contents of this property first if you want to be extra sure.

Selecting a page

To change the active page the Image object represents, you can its SelectActiveFrame method, passing in a FrameDimension object and the zero-based page index. Again, we can use the predefined FrameDimension.Page property, similar to the following

image.SelectActiveFrame(FrameDimension.Page, page - 1);

After which, we need to instruct our ImageBox control (or whatever control we have bound the image to) to repaint to pick up the new image data.

imageBox.Invalidate();

You don't need to reassign the image (which probably won't work anyway if the control does an equality check), simply instructing it to repaint via Invalidate or Refresh ought to be sufficient.

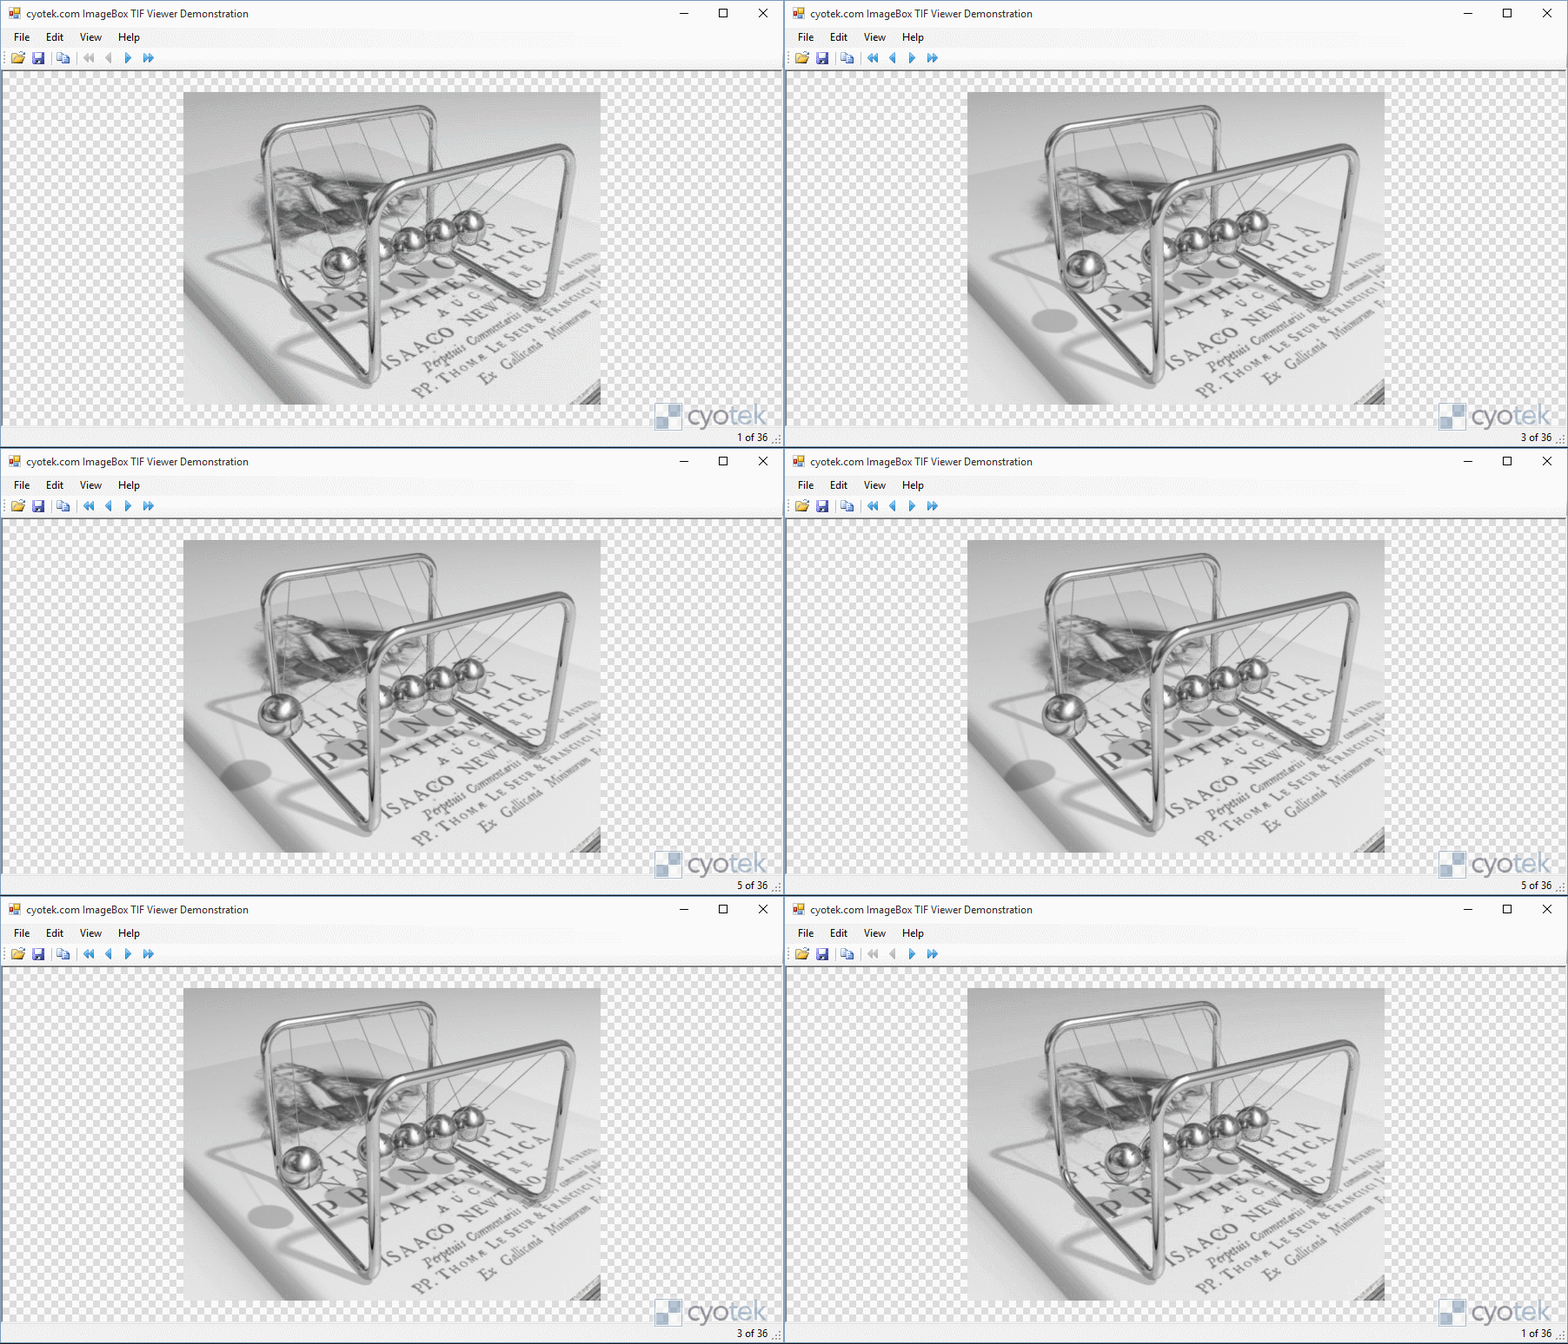
A sample multi-page tiff file

As multi-page tiffs aren't exactly common images to be found in plenty on the internet, I've prepared a sample image based on a Newton's Cradle animation from Wikipedia.

Download NewtonsCradle.tif (4MB)

Short and sweet

The sample application in action

That is all the information we need to create a viewer - you can download the project shown in the above animation from the links below.

Downloads

All content Copyright (c) by Cyotek Ltd or its respective writers. Permission to reproduce news and web log entries and other RSS feed content in unmodified form without notice is granted provided they are not used to endorse or promote any products or opinions (other than what was expressed by the author) and without taking them out of context. Written permission from the copyright owner must be obtained for everything else.
Original URL of this content is https://www.cyotek.com/blog/displaying-multi-page-tiff-files-using-the-imagebox-control-and-csharp?source=rss.

Error "DEP0001 : Unexpected Error: -1988945902" when deploying to Windows Mobile 10

$
0
0

Last month, I foolishly upgraded my Lumia 630 to a 650 even though I had every intention of abandoning the Windows Mobile platform after watching Microsoft flounder without hope. However, after using an Android phone as an experiment for a couple of weeks, I decided that despite the hardware (a Galaxy S5) being much better than the budget phones I typically buy, I just don't like Android. As Microsoft also reneged on their promise of a Windows 10 upgrade for the 630, I grabbed a 650 to amuse myself with.

Today I wrote a simple UWP application, which was multiple fun learning curves for the price of one, such as XAML, forced use of async/await, and of course the UWP paradigm itself.

After getting my application (a Notepad clone, a nice and simple thing to start with!) working on my desktop, I decided to see what would happen if I ran it on my phone - both the desktop and the phone are running Windows 10 Anniversary Edition, so why not.

However, each time I attempted to deploy, I received this useless error:

DEP0001 : Unexpected Error: -1988945902

Sigh. What a helpful error Microsoft! After trying multiple times to deploy it finally occurred to me I was being a bit silly. I had to enable Developer Mode on my desktop in order to test the x86 version, so it stands to reason that I'd have to do it on the phone as well. So, after doing a fairly good Picard Facepalm, I enabled it on the phone.

  • Open the settings app on the phone
  • Select the Upgrade & security section
  • Select the For developers sub section
  • Select the Developer mode radio button
  • Confirm the security warning

There are additional advanced options (Device discovery and Device Portal) but they didn't seem to be required, even for debugging. And, unlike the desktop, the phone didn't need a reboot.

Now when I tried to deploy, it worked, and my application was installed on the phone. Ran it and it looked identical to the desktop version and worked fine, at least until I tried to save a previously opened file and it promptly crashed. That aside, I was actually rather impressed - Universal indeed. I was even more impressed when I debugged said crash on the phone via the desktop machine.

I decided to write this short post in case any one else was as forgetful as I, and so I switched developer mode on the phone off again so I could reproduce the original error in case there was any extra information. Bad idea, Visual Studio really didn't like that and just crashed and burned each time I tried to deploy.

After several long waits while VS crashed and restarted, eventually I uninstalled the application from the phone and tried again, and to my surprise, while at least it didn't crash VS this time, it did come out with a completely different error message.

DEP0200 : Ensure that the device is developer unlocked. For details on developer unlock, visit http://go.microsoft.com/fwlink/?LinkId=317976. 0x-2147009281: To install this application you need either a Windows developer license or a sideloading-enabled system. (Exception from HRESULT: 0x80073CFF)

Now that's more like it! Why on earth didn't it display that error the first time around? Perhaps it was because that mode had never been enabled previously, I don't know. And for the record, everything worked fine when I switched developer mode back on on the phone.

All content Copyright (c) by Cyotek Ltd or its respective writers. Permission to reproduce news and web log entries and other RSS feed content in unmodified form without notice is granted provided they are not used to endorse or promote any products or opinions (other than what was expressed by the author) and without taking them out of context. Written permission from the copyright owner must be obtained for everything else.
Original URL of this content is https://www.cyotek.com/blog/error-dep0001-unexpected-error-1988945902-when-deploying-to-windows-mobile-10?source=rss.


FTP Server Easter Eggs

$
0
0

I've recently being working on integrating FTP into our CopyTools application. As a result of this, I have been staring at quite a lot at FTP logs as the various tests and processes do their work.

This morning I was running the CopyTools GUI client watching the progress bar climb upwards as I was putting the support through it's final paces. At the same time, the output from the FTP commands were being printed to the debug log. I was idly watching that too, when all of a sudden the following entries appeared

PASV
227 Entering Passive Mode (91,208,99,4,171,236)
RETR /cyowcopy/images/regexedit_thumb.png
150-Accepted data connection
150-The computer is your friend. Trust the computer
150 58.2 kbytes to download
226-File successfully transferred
226 0.060 seconds (measured here), 0.95 Mbytes per second

At first glance, that might appear to be perfectly normal FTP input/output, but have a look at line 5

150-The computer is your friend. Trust the computer

That was... unexpected, I haven't seen a message like that appear before. The FTP server I've been testing with identifies itself as PureFTP; I have no idea if it's an egg only in that particular server or if other servers do it too. While I haven't read the FTP RFC's in great details, I'm fairly sure they don't make mention of that!

I wonder how many Easter eggs are built into software we've been using for years without ever noticing? And while I'm probably very late to the party for noticing this egg, it's pretty cool that they are still out there and software can have some humour while going about thankless dull tasks.

All content Copyright (c) by Cyotek Ltd or its respective writers. Permission to reproduce news and web log entries and other RSS feed content in unmodified form without notice is granted provided they are not used to endorse or promote any products or opinions (other than what was expressed by the author) and without taking them out of context. Written permission from the copyright owner must be obtained for everything else.
Original URL of this content is https://www.cyotek.com/blog/ftp-easter-eggs?source=rss.

Tools we use - 2016 edition

$
0
0

Happy New Year! Once again it's that time for the list of software products I use throughout the year. Not much change again overall, but given what I see happening in the web developer world when even your package manager needs a package manager I find the stability refreshing.

Operating Systems

  • Windows Home Server 2011 - file server, SVN repository, backup host, CI server
  • Windows 10 Professional - development machines
  • Windows XP (virtualized) - testing - We don't support XP anymore
  • Windows Vista (virtualized) - testing. Windows updates are broken on every single Vista snapshot we have which is annoying

Development Tools

  • Postman is a absolutely brilliant client for testing REST services.
  • Visual Studio 2015 Premium - best IDE bar none
  • DotPeek - a decent replacement to .NET Reflector that can view things that Reflector can't, making it a worthwhile replacement despite some bugs and being chronically slow to start

Visual Studio Extensions

  • OzCocde - still my number one tool and one I'd be lost without, I can no longer abide debugging on machines without this beauty
  • Cyotek Add Projects - a simple extension I created that I use pretty much any time I create a new solution to add references to my standard source code libraries (at least until I finish converting them into Nuget packages)
  • EditorConfig - useful for OSS projects to avoid space-vs-tab wars and now built into Visual Studio 2017
  • File Nesting - allows you to easily nest (or unnest!) files, great for TypeScript or T4 templates
  • Open Command Line - easily open command prompts, PowerShell prompts, or other tools to your project / solution directories
  • VSColorOutput - add colour coding to Visual Studio's Output window
  • Indent Guides - easily see where you are in nested code
  • Resharper - originally as a replacement for Regionerate, this swiftly became a firm favourite every time it told me I was doing something stupid.
  • NCrunch for Visual Studio - (version 3!) automated parallel continuous testing tool. Works with NUnit, MSTest and a variety of other test systems. Great for TDD and picking up how a simple change you made to one part of your project completely destroys another part. We've all been there!

Analytics

Profiling

  • New!dotTrace - although I prefer the ANTS profiler, dotTrace is a very usable profiler and given it is included in my Resharper subscription, it's a no-brainer to use
  • New!dotMemory - memory profiling is hard, need all the help we can get

Documentation Tools

  • Innovasys Document! X - Currently we use this to produce the user manuals for our applications
  • Atomineer Pro Documentation - automatically generate XML comment documentation in your source code
  • MarkdownEdit - a no frills minimalist markdown editor that is actively maintained and Just Works
  • Notepad++ - because Notepad hasn't changed in 20 years (moving menu items around doesn't count!)

Continuous Integration

  • New!Jenkins - although the UI is fairly horrible (Jenkins Material Theme helps!), Jenkins is easy to install, doesn't need a database server and has a rich plugin ecosystem, even for .NET developers. I use this to build, test and even deploy. TeamCity may be more powerful, but Jenkins is easier to maintain

Graphics Tools

  • Paint.NET - brilliant bitmap editor with extensive plugins
  • Axialis IconWorkshop - very nice icon editor, been using this for untold years now since Microangelo decided to become the Windows Paint of icon editing
  • Cyotek Spriter - sprite / image map generation software
  • Cyotek Gif Animator - gif animation creator that is shaping up nicely, when I have time to work on it

Virtualization

Version Control

File/directory tools

  • WinMerge - excellant file or directory comparison utility
  • WinGrep - another excellent tool for swiftly searching directories for filters containing specified strings or expressions

Backups

  • Cyotek CopyTools - we use this for offline backups of source code, assets and resources, documents, actually pretty much anything we generate; including backing up the backups!
  • CrashPlan - CrashPlan creates an online backup of the different offline backups that CopyTools does. If you've ever lost a harddisk before with critical data on it that's nowhere else, you'll have backups squirrelled away everywhere too!

Security

  • StartSSL / Comodo / ??? - my code signing certificate just expired and rather unfortunately our previous vendor of choice, StartSSL, is having a few trust issues (to put it mildly) in addition to having been bought out by a Chinese CA. I've used Comodo in the past, but they have have the distinction of having the absolute worst customer service I have ever had the displeasure of experiencing. And the rest cost far to much for such a small studio as Cyotek. A conundrum...Update 05Jan2015 I went with Comodo after discovering the StartSSL was crippled and this time the process was mostly smoth and stress free
  • New!Dan Pollocks hosts file blocks your computer from connecting to many thousands of dubious internet hosts and is continuously updated

Other

  • f.lux - not really sure why I haven't mentioned this before, I've been using this utterly fantastic software for years. It adapts your monitor to the time of day, removing blue light as evening approaches and helps reduce eye strain when coding at night

All content Copyright (c) by Cyotek Ltd or its respective writers. Permission to reproduce news and web log entries and other RSS feed content in unmodified form without notice is granted provided they are not used to endorse or promote any products or opinions (other than what was expressed by the author) and without taking them out of context. Written permission from the copyright owner must be obtained for everything else.
Original URL of this content is https://www.cyotek.com/blog/tools-we-use-2016-edition?source=rss.

StartSSL code signing certificates are crippled

$
0
0

TL;DR: StartSSL code signing certificates are crippled and your binaries no longer trusted once they have expired, even if they have been counter signed.

Two years ago I purchase a code signing certificate from StartSSL which was extremely smooth - I originally documented the process in a blog post.

Fast forward two years of happily signing binaries and the certificate was due to expire - time to renew. StartSSL has recently had some trouble and their root certificates were going to be distrusted by some of the major browsers. Although this was a concern, I still probably would have purchased a new code signing certificate from them, except for a "lucky" incident.

What is the problem with the certificates

This blog post had quite long introduction as we haven't had the best of luck with code certificates, but I decided against publishing it. Suffice to say, I delayed purchasing a new certificate until after it expired while I tried to determine if we were going to go with another CA. By chance, I was testing one of our signed setup programs in a virtual machine while looking at an unrelated deployment issue. The binaries had been countersigned before the expiry and by rights should have been perfectly fine. Should have.

Instead of the usual Windows Vista UAC dialog (we use Vista VM's for testing) I was expecting, I got the following instead

Why would this dialog be displayed for digitally signed software?

As I noted that binary was signed before the certificate expired and the certificate hadn't been revoked, so what was the problem? After all, signed software doesn't normally stop being trusted after the natural lifetime of a certificate. (I tested using a decade old copy of the Office 2003 setup to confirm).

On checking the signed programs properties and viewing the signature, I was greeted with this

I swore a lot when I saw this

Now fortunately, this is a) after the fact and b) I try to keep my writing professional given that anything you write on the internet has a habit of hanging around. But there was substantial amounts of swearing going on when I saw this. (And a wry chuckle that at least I'd removed the validation checks so I wouldn't have a repeat of all software breaking again. (Something else I subsequently verified as our build process checks our binaries to make sure they are signed, now any Cyotek binary which came from a Nuget package failed the deployment check)).

Not being a security expert and unable to find answers with searching, I took to StackOverflow and got a helpful response

Not all publisher certificates are enabled to permit timestamping to provide indefinite lifetime. If the publisher’s signing certificate contains the lifetime signer OID (OID_KP_LIFETIME_SIGNING 1.3.6.1.4.1.311.10.3.13), the signature becomes invalid when the publisher’s signing certificate expires, even if the signature is timestamped. This is to free a Certificate Authority from the burden of maintaining Revocation lists (CRL, OCSP) in perpetuity.

That sounded easy enough to verify, so I checked the certificate properties, and there it was

Oh look, a kill switch

That innocuous looking Lifetime Signing value is anything but - it's like a hidden kill switch, and is the reason that the binaries are now untrusted. Except this time around instead of 9 months of affected files, I've got two years worth of untrusted files.

Checking other certificates (such as that Office 2003 setup) just had the Code Signing entry, including my original two Comodo certificates.

The solution?

Maybe StartSSL stopped doing this in the past two years, but somehow it seems unlikely. It may also be that only some classes of certificates are affected by this (the first two I had from Comodo and the one from StartSSL were class 2. I can say that the Comodo certificates weren't crippled however.)

Regardless of whether class 3 aren't affected, or if they don't do this anymore, I'm not using them in future. There wasn't even the hint of a suggestion that the certificate I'd bought in good faith was time bombed - clearly I would never have bought it if I knew this would happen.

Add that and the fact that StartSSL are now owned by WoSign (a Chinese CA I'd never heard of before), and are being distrusted due to certain practices, it doesn't seem like a good idea for me personally to use their services.

Against my better judgement I went back to Comodo as I couldn't justify the price of other CA's. However, bar an initial hiccup, the validation process is complete and we have our new company certificate - I can switch the CI server back on now that the builds aren't going to fail! And in fact, the process this time was even easier and just involved the web browser.

And best of all, no kill switch in the certificate...

Our new certificate with not a kill switch in sight

I wonder what will go wrong with code signing next? Hopefully nothing and I won't be writing another post bemoaning authenticode in future.

All content Copyright (c) by Cyotek Ltd or its respective writers. Permission to reproduce news and web log entries and other RSS feed content in unmodified form without notice is granted provided they are not used to endorse or promote any products or opinions (other than what was expressed by the author) and without taking them out of context. Written permission from the copyright owner must be obtained for everything else.
Original URL of this content is https://www.cyotek.com/blog/startssl-code-signing-certificates-are-crippled?source=rss.

Finding nearest colors using Euclidean distance

$
0
0

I've recently been updating our series on dithering to include ordered dithering. However, in order to fully demonstrate this I also updated the sample to include basic color quantizing with a fixed palette.

While color reduction and dithering are related, I didn't want to cover both topics in a single blog post, so here we are with a first post on finding the nearest color via Euclidean distance, and I'll follow up in another post on ordered dithering.

A demo showing the distance between two colors, and mapping those colors to the nearest color in a fixed palette

Getting the distance between two colors

Getting the distance between two colors is a matter of multiplying the difference of each channel between the two colors and then adding it all together, or if you want a formula, Wikipedia obliges handily

Three-dimensional Euclidean space formula

In C# terms, that translates to a helper function similar to the below

public static int GetDistance(Color current, Color match)
{
  int redDifference;
  int greenDifference;
  int blueDifference;

  redDifference = current.R - match.R;
  greenDifference = current.G - match.G;
  blueDifference = current.B - match.B;

  return redDifference * redDifference + greenDifference * greenDifference + blueDifference * blueDifference;
}

Note that the distance is the same between two colours no matter which way around you call GetDistance with them.

Finding the nearest color

With the ability to identify the distance between two colours, it is now a trivial matter to scan a fixed array of colors looking for the closest match. The closest match is merely the color with the lowest distance. A distance of zero means the colors are a direct match.

public static int FindNearestColor(Color[] map, Color current)
{
  int shortestDistance;
  int index;

  index = -1;
  shortestDistance = int.MaxValue;

  for (int i = 0; i < map.Length; i++)
  {
    Color match;
    int distance;

    match = map[i];
    distance = GetDistance(current, match);

    if (distance < shortestDistance)
    {
      index = i;
      shortestDistance = distance;
    }
  }

  return index;
}

Optimizing finding the match

While the initial code is simple, using it practically isn't. In the demonstration program attached to this post, the FindNearestColor is only called once and so you probably won't notice any performance impact. However, if you are performing many searches (for example to reduce the colors in an image), then you may find the code quite slow. In this case, you probably want to look at caching the value of FindNearestColor along with the source color, so that future calls just look in the cache rather than performing a full scan (a normal Dictionary<Color, int> worked fine in my limited testing). Of course the more colours in the map, the slower it will be as well.

While I haven't tried this yet, using an ordered palette may allow the use of linear searching. When combined with a cached lookup, that ought to be enough for most scenarios.

What about the Alpha channel?

For my purposes I don't need to consider the alpha value of a color. However, if you do want to use it, then adjust GetDistance to include the channel, and it will work just fine.

public static int GetDistance(Color current, Color match)
{
  int redDifference;
  int greenDifference;
  int blueDifference;
  int alphaDifference;

  alphaDifference = current.A - match.A;
  redDifference = current.R - match.R;
  greenDifference = current.G - match.G;
  blueDifference = current.B - match.B;

  return alphaDifference * alphaDifference + redDifference * redDifference + greenDifference * greenDifference + blueDifference * blueDifference;
}

The images below were obtained by setting the value of the box on the left to 0, 0, 220, 0, and the right 255, 0, 220, 0 - same RGB, just different alpha.

Distance from the same color with different alpha

Downloads

All content Copyright (c) by Cyotek Ltd or its respective writers. Permission to reproduce news and web log entries and other RSS feed content in unmodified form without notice is granted provided they are not used to endorse or promote any products or opinions (other than what was expressed by the author) and without taking them out of context. Written permission from the copyright owner must be obtained for everything else.
Original URL of this content is https://www.cyotek.com/blog/finding-nearest-colors-using-euclidean-distance?source=rss.

Using a Jenkins Pipeline to build and publish Nuget packages

$
0
0

I've mentioned elsewhere on this blog that our core products are built using standard batch files, which are part of the products source so they can be either build manually or from Jenkins. Over the last year I've been gradually converting our internal libraries onto Nuget packages, hosted on private servers. These packages are also built with a simple batch file, although they currently aren't part of the CI processes and also usually need editing before they can be ran again.

After recently discovering that my StartSSL code signing certificate was utterly useless, I spent the better part of a day rebuilding and publishing all the different packages with a new non-crippled certificate. After that work was done, I decided it was high time I built the packages using the CI server.

Rather than continue with the semi-manual batch files, I decided to make use of the pipeline functionality that was added to Jenkins, which to date I hadn't looked at.

What we are replacing

I suppose to start with it would be helpful to see an existing build file for one of our libraries and then show how I created a pipeline to replace this file. The library in question is named Cyotek.Core and has nothing to do with .NET Core, but has been the backbone of our common functionality since 2009.

@ECHO OFF

SETLOCAL

CALL ..\..\..\build\initbuild.bat

REM Build and sign the file
%msbuildexe% Cyotek.Core.sln /p:Configuration=Release /verbosity:minimal /nologo /t:Clean,Build
CALL signcmd src\bin\Release\Cyotek.Core.dll

REM Create the package
PUSHD %CD%
IF NOT EXIST nuget MKDIR nuget
CD nuget
%nugetexe% pack ..\src\Cyotek.Core.csproj -Prop Configuration=Release
POPD

REM Publish
%nugetexe% push nuget\Cyotek.Core.1.3.0.nupkg -s <YOURPACKAGEURI><YOURAPIKEY>

ENDLOCAL

These are the steps involved for building one of our Nuget packages

  • Get the source out of SVN (manual)
  • Edit the AssemblyInfo.cs file with a new version (manual)
  • Edit the batch file to mirror the version change (manual)
  • Restore Nuget packages (manual, if required)
  • Build the project in release mode
  • Run the associated testing library if present (manual)
  • Apply a digital signature to the release binary
  • Create a new Nuget package
  • Publish the package

A few inconvenient manual steps there, lets see how Jenkins will help.

About Cyotek.Core's Project Structure

As it turns out, due to the way my environment is set up and how projects are built, my scenario is a little bit more complicated that it might otherwise be.

Our SVN repository is laid out as follows

  • / - Contains a nuget.config file so that all projects share a single package folder, and also contains the strong name key used by internal libraries
  • /build - Numerous batch scripts for performing build actions and InnoSetup includes for product deployment
  • /lib - Native libraries for which a Nuget package isn't (or wasn't) available
  • /resources - Graphics and other media that can be linked by individual projects without having multiple copies of common images scattered everywhere
  • /source - Source code
  • /tools - Binaries for tools such as NUnit and internal deployment tools so build agents have the resources they need to work correctly

Our full products check out a full copy of the entire repository and while that means there is generally no issues about missing files, it also means that new workspaces take a very long time to checkout a large amount of data.

All of our public libraries (such as ImageBox) are self contained. For the most part the internal ones are too, except for the build processes and/or media resources. There are the odd exceptions however with one being Cyotek.Core - we use a number of Win32 API calls in our applications, normally defined in a single interop library. However, there's a couple of key libraries which I want dependency free and Cyotek.Core is one of them. That doesn't mean I want to duplicate the interop declarations though. Our interop library groups calls by type (GDI, Resources, Find etc) and has separate partial code files for each one. The libraries I want dependency free can then just link the necessary files, meaning no dependencies, no publicly exposed interop API, and no code duplication.

What is a pipeline?

At the simplest level, a pipeline breaks your build down into a series of discrete tasks, which are then executed sequentially. If you've used Gulp or Grunt then the pattern should be familiar.

A pipeline is normally comprised of one or more nodes. Each node represents a build agent, and you can customise which agents are used (for example to limit some actions to being only performed on a Windows machine).

Nodes then contain one or more stages. A stage is a collection of actions to perform. If all actions in the stage complete successfully, the next stage in the current node is then executed. The Jenkins dashboard will show how long each stage took to execute and if the execution of the stage was successful. Jenkins will also break the log down into sections based on the stages, so when you click a stage in the dashboard, you can view only the log entries related to that stage, which can make it easier to diagnose some build failures (the full output log is of course still available).

The screenshot below shows a pipeline comprised of 3 stages.

A pipeline comprised of three stages showing two successful runs plus test results

Pipelines are written in custom DSL based on a language named Groovy, which should be familiar to anyone used to C-family programming languages. The following snippet shows a sample job that does nothing but print out a message into the log.

node {
  stage('Message') {
    echo 'Hello World'
  }
}

Jenkins offers a number of built in commands but the real power of the pipeline (as with freestyle jobs) is the ability to call any installed plugin, even if they haven't been explicitly designed with pipelines in mind.

Creating a pipeline

To create a new pipeline, choose New Item from Jenkins, enter a name then select the Pipeline option. Click OK to create the pipeline ready for editing.

Compared to traditional freestyle jobs, there's very few configuration options as you will be writing script to do most of the work.

Ignore all the options for now and scroll to the bottom of the page where you'll find the pipeline editor.

Defining our pipeline

As the screenshot above shows, I divided the pipeline into 3 stages, each of which will perform some tasks

  • Build
    • Get the source and required resources from SVN
    • Setup the workspace (creating required directories, cleaning up old artefacts)
    • Update AssemblyInfo.cs
    • Restore Nuget packages
    • Build the project
  • Test
    • Run the tests for the library using NUnit 2
    • Publish the test results
  • Deploy
    • Digitally sign the release binary
    • Create a Nuget package
    • Publish the package
    • Archive artefacts

Quite a list! Lets get started.

Jenkins recommends you create the pipeline script in a separate Jenkinsfile and check this into version control. This might be a good idea once you have finalised your script, but while developing it is probably a better idea to save it in-line.

With that said, I still recommend developing the script in a separate editor and then copying and pasting it into Jenkins. I don't know if it is the custom theme I use or something else, but the editor is really buggy and the cursor doesn't appear in the right place, making deleting or updating characters an interesting game of chance.

I want all the actions to occur in the same workspace / agent, so I'll define a single node containing my three stages. As a lot of my packages will be compiled the same way, I'm going to try and make it easier to copy and paste the script and adjust things in one place at the top of the file, so I'll declare some variables with these values.

node
{
  def libName     = 'Cyotek.Core'
  def testLibName = 'Cyotek.Core.Tests'

  def slnPath     = "${WORKSPACE}\\source\\Libraries\\${libName}\\"
  def slnName     = "${slnPath}${libName}.sln"
  def projPath    = "${slnPath}src\\"
  def projName    = "${projPath}${libName}.csproj"
  def testsPath   = "${slnPath}tests\\"

  def svnRoot     = '<YOURSVNTRUNKURI>'
  def nugetApiKey = '<YOURNUGETAPIKEY>'
  def nugetServer = '<YOURNUGETSERVERURI>'

  def config      = 'Release'

  def nunitRunner = "\"${WORKSPACE}\\tools\\nunit2\\bin\\nunit-console-x86.exe\""
  def nuget       = "\"${WORKSPACE}\\tools\\nuget\\nuget.exe\""

  stage('Build')
  {
    // todo
  }

  stage('Test')
  {
    // todo
  }

  stage('Deploy')
  {
    // todo
  }
}

In the above snippet, you may note I used a combination of single and double quoting for strings. Similar to PowerShell, Groovy does different things with strings depending on if they are single or double quoted. Single quoted strings are treated as-is, whereas double quoted strings will be interpolated - the ${TOKEN} patterns will be automatically replaced with appropriate value. In the example above, I'm interpolating both variables I've defined in the script and also standard Jenkins environment variables.

You'll also note the use of escape characters as if you're using backslashes you need to escape them. You also need to escape single/double quotes if they match the quote the string itself is using.

Checking out the repository

I hadn't noticed this previously given that I was always checking out the entire repository, but the checkout command lets you specify multiple locations, customising both the remote source and the local destination. This is perfect, as it means I can now grab the bits I need. I add a checkout command to the Build stage as follows

checkout(
  [
    $class: 'SubversionSCM',
    additionalCredentials: [],
    excludedCommitMessages: '',
    excludedRegions: '',
    excludedRevprop: '',
    excludedUsers: '',
    filterChangelog: false,
    ignoreDirPropChanges: true,
    includedRegions: '',
    locations:
      [
        [credentialsId: '<SVNCREDENTIALSID>', depthOption: 'files'   , ignoreExternalsOption: true, local: '.'                              , remote: "${svnRoot}"],
        [credentialsId: '<SVNCREDENTIALSID>', depthOption: 'infinity', ignoreExternalsOption: true, local: './build'                        , remote: "${svnRoot}/build"],
        [credentialsId: '<SVNCREDENTIALSID>', depthOption: 'infinity', ignoreExternalsOption: true, local: './tools'                        , remote: "${svnRoot}/tools"],
        [credentialsId: '<SVNCREDENTIALSID>', depthOption: 'infinity', ignoreExternalsOption: true, local: './source/Libraries/Cyotek.Win32', remote: "${svnRoot}/source/Libraries/Cyotek.Win32"]
        [credentialsId: '<SVNCREDENTIALSID>', depthOption: 'infinity', ignoreExternalsOption: true, local: "./source/Libraries/${libName}"  , remote: "${svnRoot}/source/Libraries/${libName}"]
      ],

    workspaceUpdater: [$class: 'UpdateUpdater']
  ]
)

I didn't write the bulk of the checkout commands by hand, instead I used Jenkins built in Snippet Generator to set all the parameters using the familiar GUI and generate the required script from that, at which point I could start adding extra locations, tinkering formatting etc.

As you can see, I can have configured different local and remote attributes for each location to mimic the full repo. I've also set the root location to only get the files at the root level using the depthOption - otherwise it would check out the entire repository anyway!

If I now run the build, everything is swiftly checked out to the correct locations. Excellent start!

Preventing polling for triggering builds for satellite folders

Well actually, it wasn't. While I was testing this pipeline, I was also checking in files elsewhere to the repository. And as I'd enabled polling for the pipeline, it kept triggering builds without need due to the fact I'd included the repository root for the strong name key. (After this blog post is complete I think I'll do a little spring cleaning on the repository!)

In freestyle projects, I configure patterns so that builds are only triggered when the changes made to the folders that actually contain the application files. However, I could not get the checkout command to honour either the includedRegions or excludedRegions properties. Fortunately, when I took another look at the built-in Snippet Generator, I noticed the command supported two new properties - changelog and poll, the latter of which controls if polling is enabled. So the solution seemed simple - break the checkout command into two different commands, one to do the main project checkout and another (with poll set to false) to checkout supporting files.

The Build stage now looks as follows. Note that I had to put the "support" checkout first, otherwise it would delete the results of the previous checkout (again, probably due to the root level location... sigh). You can always check the Subversion Polling Log for your job to see what SVN URI's its looking for.

checkout(changelog: false, poll: false, scm:
  [
    $class: 'SubversionSCM',
    additionalCredentials: [],
    excludedCommitMessages: '',
    excludedRegions: '',
    excludedRevprop: '',
    excludedUsers: '',
    filterChangelog: false,
    ignoreDirPropChanges: true,
    includedRegions: '',
    locations:
      [
        [credentialsId: '<SVNCREDENTIALSID>', depthOption: 'files'   , ignoreExternalsOption: true, local: '.'                              , remote: "${svnRoot}"],
        [credentialsId: '<SVNCREDENTIALSID>', depthOption: 'infinity', ignoreExternalsOption: true, local: './build'                        , remote: "${svnRoot}/build"],
        [credentialsId: '<SVNCREDENTIALSID>', depthOption: 'infinity', ignoreExternalsOption: true, local: './tools'                        , remote: "${svnRoot}/tools"],
        [credentialsId: '<SVNCREDENTIALSID>', depthOption: 'infinity', ignoreExternalsOption: true, local: './source/Libraries/Cyotek.Win32', remote: "${svnRoot}/source/Libraries/Cyotek.Win32"]
      ],
      workspaceUpdater: [$class: 'UpdateUpdater']
  ]
)

checkout(
  [
    $class: 'SubversionSCM',
    additionalCredentials: [],
    excludedCommitMessages: '',
    excludedRegions: '',
    excludedRevprop: '',
    excludedUsers: '',
    filterChangelog: false,
    ignoreDirPropChanges: true,
    includedRegions: '',
    locations: [[credentialsId: '<SVNCREDENTIALSID>', depthOption: 'infinity', ignoreExternalsOption: true, local: "./source/Libraries/${libName}", remote: "${svnRoot}/source/Libraries/${libName}"]],
    workspaceUpdater: [$class: 'UpdateUpdater']
  ]
)

A few minutes later I checked something else in... and wham, the pipeline built itself again (it behaved fine after that though). I had a theory that it was because Jenkins stored the repository poll data separately and only parsed it from the DSL when the pipeline was actually ran rather than saved, but on checking the raw XML for the job there wasn't anything extra. So that will have to remain a mystery for now.

Deleting and creating directories

As I'm going to be generating Nuget packages and running tests, I'll need some folders to put the output into. I already know that NUnit won't run if the specified test results folder doesn't exist, and I don't want to clutter the root of the workspace with artefacts even if it is a temporary location.

For all its apparent power, the pipeline DSL also seems quite limiting at times. It provides a (semi useless) remove directory command, but doesn't have a command for actually creating directories. Not to worry though as it does have bat and sh commands for invoking either Windows batch or Unix shell files. As I'm writing this blog post from a Windows perspective, I'll be using ye-olde DOS commands.

But, before I create the directories, I'd better delete any existing ones to make sure any previous artefacts are removed. There's a built-in deleteDir command which recursively deletes a directory. The current directory, which I why I referred to it as semi-useless above - I would prefer to delete a directory by name.

Another built-in command is dir. Not synonymous with the DOS command, this helpful command changes directory, performs whatever actions you define, then restores the original directory - the equivalent of the PUSHD, CD and POPD commands in my batch file at the top of this post.

The following snippets will delete the nuget and testresults directories if they exist. If they don't then nothing will happen. I found this a bit surprising - I would have expected it to crash given I told it to delete a directory that doesn't exist.

dir('nuget')
{
  deleteDir()
}
dir('testresults')
{
  deleteDir()
}

We can then issue commands to create the directories. Normally I'd use IF NOT EXIST <NAME> MKDIR <NAME>, but as we have already deleted the folders we can just issue create commands.

bat('MKDIR testresults')
bat('MKDIR nuget')

And now our environment is ready - time to build.

Building a project

First thing to do is to restore packages by calling nuget restore along with the filename of our solution

bat("${nuget} restore \"${slnName}\"")

Earlier I mentioned that I usually had to edit the projects before building a Nuget package - this is due to needing to update the version of the package as by default Nuget servers don't allow you to overwrite packages with the same version number. Our .nuspec files are mostly set up to use the $version$ token, which then pulls the true version from the AssemblyInformationVersion attribute in the source project. The core products run a batch command called updateversioninfo3 will will replace part of that version with the contents of the Jenkins BUILD_NUMBER environment variable, so I'm going to call that here.

I don't want to get sidetracked as this post is already quite long, so I'll probably cover this command in a different blog post.

bat("""
CALL .\\build\\initbuild
CALL updateversioninfo3 \"${projPath}Properties\\AssemblyInfo.cs\"
""")

If you're paying attention, you'll see the string above looks different from previous commands. To make it easy to specify tool locations and other useful values our command scripts may need, we have a file named initbuild.bat that sets up these values in a single place.

However, each Jenkins bat call is a separate environment. Therefore if I call initbuild from one bat, the values will be lost in the second. Fortunately Groovy supports multi-line strings, denoted by wrapping them in triple quotes (single or double). As I'm using interpolation in the string as well, I need to use double.

All preparation is completed and it's now time to build the project. Although my initbuild script sets up a msbuildexe variable, I wanted to test Jenkins tool commands and so I defined a MSBuild tool named MSBuild14. The tool command returns that value, so I can then use it to execute a release build

def msbHome = tool name: 'MSBuild14', type: 'hudson.plugins.msbuild.MsBuildInstallation'
bat("\"${msbHome}\" \"${slnName}\" /p:Configuration=${config} /verbosity:minimal /nologo /t:Clean,Build")

Running tests

With our Build stage complete, we can now move onto the Test stage - which is a lot shorter and simpler.

I use NUnit to perform all of the testing of our library code. By combining that with the NUnit Plugin it means the rest results are directly visible in the Jenkins dashboard, and I can see new tests, failed tests, or if the number of tests suddenly drops.

Note that the NUnit plugin hasn't been updated to support reports generated by NUnit version 3, so I am currently restricted to using NUnit 2

bat("${nunitRunner} \"${testsPath}bin/${config}/${testLibName}.dll\" /xml=\"./testresults/${testLibName}.xml\" /nologo /nodots /framework:net-4.5")

After that's ran, I call the publish. Note that this plugin doesn't participate with the Jenkins pipeline API and so it doesn't have a dedicated command. Instead, you can use the step command to execute the plugin.

step([$class: 'NUnitPublisher', testResultsPattern: 'testresults/*.xml', debug: false, keepJUnitReports: true, skipJUnitArchiver: false, failIfNoResults: true])

Rather unfortunately the Snippet Editor wouldn't work correctly for me when trying to generating the above step. It would always generate the code <object of type hudson.plugins.nunit.NUnitPublisher>. Fortunately Ola Eldøy had the answer.

However, there's actually a flaw with this sequence - if the bat command that executes NUnit returns a non-zero exit code (for example if the test run fails), the rest of the pipeline is skipped and you won't actually see the failed tests appear in the dashboard.

The solution is to wrap the bat call in try ... finally block. If you aren't familiar with the try...catch pattern, basically you try an operation, catch any problems, and finally perform an action even if the initial operation failed. In our case, we don't care if any problems occur, but we do want to publish any available results.

try
{
  bat("${nunitRunner} \"${testsPath}bin/${config}/${testLibName}.dll\" /xml=\"./testresults/${testLibName}.xml\" /nologo /nodots /framework:net-4.5")
}
finally
{
  step([$class: 'NUnitPublisher', testResultsPattern: 'testresults/*.xml', debug: false, keepJUnitReports: true, skipJUnitArchiver: false, failIfNoResults: true])
}

Now even if tests fail, the publish step will still attempt to execute.

Building the package

With building and testing out of the way, it's time to create the Nuget package. As all our libraries that are destined for packages have .nuspec files, then we just call nuget pack with the C# project filename.

Optionally, if you have an authenticode code signing certificate, now would be a good time to apply it.

I create a Deploy stage containing the appropriate commands for signing and packaging, as follows

bat("""
CALL .\\build\\initbuild
CALL .\\build\\signcmd ${projPath}bin\\${config}\\${libName}.dll
""")

dir('nuget')
{
  bat("${nuget} pack \"${projName}\" -Prop Configuration=${config}")
}

Publishing the package

Once the package has been built, then we can publish it. In my original batch files, I have to manually update the file to change the version. However, NUGET.EXE actually supports wildcards - and given that the first stage in our pipeline deletes previous artefacts from the build folder, then there can't be any existing packages. Therefore, assuming our updateversioninfo3 did its job properly, and our .nuspec files use $version$, we shouldn't be creating packages with duplicate names and have no need to hard-code filenames.

stage('Deploy')
{
  dir('nuget')
  {
    bat("${nuget} push *.nupkg -s ${nugetServer} ${nugetApiKey}")
  }
}

All Done?

And that seems to be it. With the above script in place, I can now build and publish Nuget packages for our common libraries automatically. Which should serve as a good incentive to get as much of our library code into packages as possible!

My Jenkins dashboard showing four pipeline projects using variations of the above script

During the course of writing this post, I have tinkered and adapted the original build script multiple times. After finalising both the script and this blog post, I used the source script to create a further 3 pipelines. In each case all I had to do was change the libName and testsName variables, remove the unnecessary Cyotek.Win32 checkout location, and in one case add a new checkout location for the libs folder. There are now four pipelines happily building packages, so I'm going to class this as a success and continue migrating my Nuget builds into Jenkins.

My freestyle jobs have a step to email individuals when the builds are broken, but I haven't added this to the pipeline jobs yet. As subsequent stages don't execute if the previous stage has failed, that implies I'd need to add a mail command to each stage in another try ... finally block - something to investigate another day.

The complete script can be downloaded from a link at the end of this post.

Downloads

All content Copyright (c) by Cyotek Ltd or its respective writers. Permission to reproduce news and web log entries and other RSS feed content in unmodified form without notice is granted provided they are not used to endorse or promote any products or opinions (other than what was expressed by the author) and without taking them out of context. Written permission from the copyright owner must be obtained for everything else.
Original URL of this content is https://www.cyotek.com/blog/using-a-jenkins-pipeline-to-build-and-publish-nuget-packages?source=rss.

Using parameters with Jenkins pipeline builds

$
0
0

After my first experiment in building and publishing our Nuget packages using Jenkins, I wasn't actually anticipating writing a follow up post. As it transpires however, I was unhappy with the level of duplication - at the moment I have 19 packages for our internal libraries, and there are around 70 other non-product libraries that could be turned into packages. I don't really want 90+ copies of that script!

As I did mention originally, Jenkins does recommend that the build script is placed into source control, so I started looking at doing that. I wanted to have a single version that was capable of handling different configurations that some projects have and that would receive any required parameters directly from the Jenkins job.

Fortunately this is both possible and easy to do as you can add custom properties to a Jenkins job which the Groovy scripts can then access. This article will detail how I took my original script, and adapted it to handle 19 (and counting!) package compile and publish jobs.

Defining parameters

An example of a parameterised build

Parameters are switched off and hidden by default, but it's easy enough to enable them. In the General properties for your job, find and tick the option marked This project is parameterised.

This will then show a button marked Add Parameter which, when clicked, will show a drop-down of the different parameter types available. For my script, I'm going to use single line string, multi-line string and boolean parameters.

The parameter name is used as environment variables in batch jobs, therefore you should try and avoid common parameter names such as PATH and also ensure that the name doesn't include special characters such as spaces.

By the time I'd added 19 pipeline projects (including converting the four I'd created earlier) into parameterised builds running from the same source script, I'd ended up with the following parameters

TypeNameExample Value
StringLIBNAMECyotek.Core
StringTESTLIBNAMECyotek.Core.Tests
StringLIBFOLDERNAMEsrc
StringTESTLIBFOLDERNAMEtests
Multi-lineEXTRACHECKOUTREMOTE/source/Libraries/Cyotek.Win32
Multi-lineEXTRACHECKOUTLOCAL.\source\Libraries\Cyotek.Win32
BooleanSIGNONLYfalse

More parameters than I really wanted, but it covers the different scenarios I need. Note that with the exception of LIBNAME, all other parameters are optional and the build should still run even if they aren't actually defined.

Accessing parameters

There are at least 3 ways that I know of accessing the parameters from your script

  • env.<ParameterName> - returns the string parameter from environment variables. (You can also use env. to get other environment variables, for example env.ProgramFiles)
  • params.<ParameterName> - returns the strongly typed parameter
  • "${<ParameterName>}" - returns the value via interpolation

Of the three types above, the first two return null if you request a parameter which doesn't exist - very helpful for when you decide to add a new parameter later and don't want to update all the existing projects!

The third however, will crash the build. It'll be easy to diagnose if this happens as the output log for the build will contain lines similar to the following

groovy.lang.MissingPropertyException: No such property: LIBFOLDERNAME for class: groovy.lang.Binding
  at groovy.lang.Binding.getVariable(Binding.java:63)
  at org.jenkinsci.plugins.scriptsecurity.sandbox.groovy.SandboxInterceptor.onGetProperty(SandboxInterceptor.java:224)
  at org.kohsuke.groovy.sandbox.impl.Checker$4.call(Checker.java:241)
  at org.kohsuke.groovy.sandbox.impl.Checker.checkedGetProperty(Checker.java:238)
  at org.kohsuke.groovy.sandbox.impl.Checker.checkedGetProperty(Checker.java:221)
  at org.kohsuke.groovy.sandbox.impl.Checker.checkedGetProperty(Checker.java:221)
  at com.cloudbees.groovy.cps.sandbox.SandboxInvoker.getProperty(SandboxInvoker.java:28)
  at com.cloudbees.groovy.cps.impl.PropertyAccessBlock.rawGet(PropertyAccessBlock.java:20)
  at WorkflowScript.run(WorkflowScript:84)
  ... at much more!

So my advice is to only use the interpolation versions when you can guarantee the parameters will exist.

Adapting the previous script

In my first attempt at creating the pipeline job, I had a block of variables defined at the top of the script so I could easily edit them when creating the next pipeline. I'm now going to adapt that block to use parameters.

def libName     = params.LIBNAME
def testLibName = params.TESTLIBNAME

def sourceRoot  = 'source\\Libraries\\'

def slnPath     = "${WORKSPACE}\\${sourceRoot}${libName}\\"
def slnName     = "${slnPath}${libName}.sln"
def projPath    = combinePath(slnPath, params.LIBFOLDERNAME)
def projName    = "${projPath}${libName}.csproj"
def testsPath   = combinePath(slnPath, params.TESTLIBFOLDERNAME)

def hasTests    = testLibName != null && testLibName.length() > 0

I'm using params to access the parameters to avoid any interpolation crashes. As it's possible the path parameters could be missing or empty, I'm also using a combinePath helper function. This is a very naive implementation and should probably be made a little more robust. Although Java has a File object which we could use, it is blocked by default as Jenkins runs scripts in a sandbox. As I don't think turning off security features is particularly beneficial, this simple implementation will serve the requirements of my build jobs easily enough.

def combinePath(path1, path2)
{
  def result;

  // This is a somewhat naive implementation, but it's sandbox safe

  if(path2 == null || path2.length() == 0)
  {
    result = path1
  }
  else
  {
    result = path1 + path2
  }

  if(result.charAt(result.length() - 1) != '\\')
  {
    result += '\\'
  }

  return result
}

Note: The helper function must be placed outsidenode statements

Using multi-line string parameters

The multi-line string parameter is exactly the same as a normal string parameter, the difference simply seems to be the type of editor they use. So if you want to treat them as an array of values, you will need to build this yourself using the split function.

if(additionalCheckoutRemote != null && additionalCheckoutRemote.length() > 0)
{
  def additionalCheckoutRemotes = additionalCheckoutRemote.split("\\r?\\n")

  // do stuff with the string array created above
}

Performing multiple checkouts

Some of my projects are slightly naughty and pull code files from outside their respective library folders. The previous version of the script had these extra checkout locations hard-coded, but that clearly will no longer suffice. Instead, by leveraging the multi-line string parameters, I have let each job define zero or more locations and check them out that way.

I chose to use two parameters, one for the remote source and one for the local destination even though this complicates things slightly - but I felt it was better than trying to munge both values into a single line

if(additionalCheckoutRemote != null && additionalCheckoutRemote.length() > 0)
{
  def additionalCheckoutRemotes = additionalCheckoutRemote.split("\\r?\\n")
  def additionalCheckoutLocals  = params.EXTRACHECKOUTLOCAL.split("\\r?\\n")

  for (int i = 0; i < additionalCheckoutRemotes.size(); i++)
  {
    checkout(changelog: false, poll: false, scm:
      [
        $class: 'SubversionSCM',
        additionalCredentials: [],
        excludedCommitMessages: '',
        excludedRegions: '',
        excludedRevprop: '',
        excludedUsers: '',
        filterChangelog: false,
        ignoreDirPropChanges: true,
        includedRegions: '',
        locations: [[credentialsId: '<SVNCREDENTIALSID>', depthOption: 'infinity', ignoreExternalsOption: true, local: additionalCheckoutLocals[i], remote: svnRoot + additionalCheckoutRemotes[i]]],
        workspaceUpdater: [$class: 'UpdateWithCleanUpdater']
      ]
    )
  }
}

I simply parse the two parameters, and issue a checkout command for each pair. It would possibly make more sense to do only a single checkout command with multiple locations, but this way got the command up and running with minimum fuss.

Running the tests

As not all my libraries have dedicated tests yet, I had defined a hasTests variable at the top of the script which will be true if the TESTLIBNAME parameter has a value. I could then use this to exclude the NUnit execution and publish steps from my earlier script, but that would still mean a Test stage would be present. Somewhat to my surprise, I found wrapping the stage statement in an if block works absolutely fine, although it has a bit of an odour. It does mean that empty test stages won't be display though.

if(hasTests)
{
  stage('Test')
  {
    try
    {
      // call nunit2
      // can't use version 3 as the results plugin doesn't support the v3 output XML format
      bat("${nunitRunner} \"${testsPath}bin/${config}/${testLibName}.dll\" /xml=\"./testresults/${testLibName}.xml\" /nologo /nodots /framework:net-4.5")
    }
    finally
    {
      // as no subsequent stage will be ran if the tests fail, make sure we publish the results regardless of outcome
      // http://stackoverflow.com/a/40609116/148962
      step([$class: 'NUnitPublisher', testResultsPattern:'testresults/*.xml', debug: false, keepJUnitReports: true, skipJUnitArchiver: false, failIfNoResults: true])
    }
  }
}

Those were pretty much the only modifications I made to the existing script to convert it from something bound to a specific project to something I could use in multiple projects.

Archiving the artefacts

Build artefacts published to Jenkins

In my original article, I briefly mentioned one of the things I wanted the script to do was to archive the build artefacts but then never mentioned it again. That was simply because I couldn't get the command to work and I forgot to state that in the post. As it happens, I realised what was wrong while working on the improved version - I'd made all the paths in the script absolute, but this command requires them to be relative to the workspace.

The following command will archive the contents of the libraries output folder along with the generated Nuget package.

archiveArtifacts artifacts: "${sourceRoot}${libName}\\${LIBFOLDERNAME}\\bin\\${config}\\*,nuget\\*.nupkg", caseSensitive: false, onlyIfSuccessful: true

Updating the pipeline to use a "Jenkinsfile"

Now that I've got a (for the moment!) final version of the script, it's time to add it to SVN and then tell Jenkins where to find it. This way, all pipeline jobs can use the one script and automatically inherit any changes to it.

The steps below will configure an existing pipeline job to use a script file taken from SVN.

  • In the Pipeline section of your jobs properties, set the Definition field to be Pipeline script from SCM
  • Select Subversion from the SCM field
  • Set the Repository URL to the location where the script is located
  • Specify credentials as appropriate
  • Click Advanced to show advanced settings
  • Check the Ignore Property Changes on directories option
  • Enter .* in the Excluded Regions field
  • Set the Script Path field to match the filename of your groovy script
  • Click Save to save the job details

Now instead of using an in-line script, the pipeline will pull the script right out of version control.

There are a couple of things to note however

  • This repository becomes part of the polling of the job (if polling is configured). Changing the Ignore Property Changes on directories and Excluded Regions settings will prevent changes to the script for triggering unnecessary rebuilds
  • The specified repository is checked out into a sub-folder of the job data named workspace@script. In other-words, it is checked out directly into your Jenkins installation. Originally I located the script in my \build folder along with all other build files, until I noted all the files were being checked out into multiple server paths, not the temporary work spaces. My advice therefore is to stick the script by itself in a folder so that it is the only file that is checked out, and perhaps change the Repository depth field to files.

It is worth reiterating the point, the contents of this folder will be checked out onto the server where you have installed Jenkins, not slave work-spaces

Cloning the pipeline

As it got a little tiresome creating the jobs manually over and over again, I ended up creating a dummy pipeline for testing. I created a new pipeline project, defined all the variables and then populated these based on the requirements of one of my libraries. Then I'd try and build the project.

If (or once) the build was successful I'd clone that template project as the "official" pipeline, then update the template pipeline for the next project. Rinse and repeat!

To create a new pipeline based on an existing job

  • From the Jenkins dashboard choose New Item from Jenkins
  • Enter a unique name
  • Scroll to the bottom of the page, and in Copy from field, start typing the name of your template job - when the autocomplete lists your job, click it or press Tab
  • Click OK to create the template

Using this approach saved me a ton of work setting up quite a few pipeline jobs.

Are we done yet?

My Jenkins dashboard showing 19 parameterised pipeline jobs running from one script

Of course, as I was finalising the draft of this this post it occurred to me that with a bit more work I could actually get rid of virtually all the parameters I'd just added

  • All my pipeline projects are named after the library, so I could discard the LIBNAME parameter in favour of the built in JOB_BASE_NAME parameter
  • Given the relevant test projects are all named <ProjectName>.Tests, I could auto generate that value and use the fileExists command to detect if a test project was present
  • The LIBFOLDERNAME and TESTLIBFOLDERNAME parameters are required because not all my libraries are consistent with their paths - some are directly in /src, some are in /src/<ProjectName> and so on. Spending a little time reworking the file system to be consistent means I could drop another two parameters

Happily thanks to having all the builds running from one script, this means when I get around to making these improvements there's only one script to update (excluding deleting the obsolete parameters of course).

And this concludes my second articles on Jenkins pipelines, as always comments welcome.

Downloads

All content Copyright (c) by Cyotek Ltd or its respective writers. Permission to reproduce news and web log entries and other RSS feed content in unmodified form without notice is granted provided they are not used to endorse or promote any products or opinions (other than what was expressed by the author) and without taking them out of context. Written permission from the copyright owner must be obtained for everything else.
Original URL of this content is https://www.cyotek.com/blog/using-parameters-with-jenkins-pipeline-builds?source=rss.

Integrating NDepend with Jenkins

$
0
0

Apparently it's National Jenkins Month here at Cyotek as we seem to be writing about it quite a lot recently. Previously I explained how I got fed up of manually building and publishing Nuget package projects, and got our Jenkins CI server to build and publish them for me.

This got me thinking - some time ago I received a license for NDepend and even wrote a post briefly covering some of its features.

Unfortunately while NDepend is a powerful tool, I have serious issues with it's UI, both in terms of accessibility (it's very keyboard unfriendly) and the way the UI operates (such as huge floating tool"tips"). Add to that having to manually run the tool meant a simple outcome - the tool was never used.

Note: The version I have is 6.3 which is currently 9 months out of date - while I was writing this post I discovered a new 2017 version is now available which I hope may have addressed some of the issues I previously raised

Despite the fact I wasn't hugely enamoured with NDepend, a static analysis tool of some sort is a good thing to have in your tool-belt for detecting issues you might miss or not be aware of. And as I've been spending so much time with Jenkins automation recently, I wondered how much of NDepend I could automate away.

Pipeline vs Freestyle

I'm going to be adding the NDepend integration to the Jenkins pipeline script that I covered in two articles available here and here, but if you're not using pipelines you can still do this with Freestyle jobs.

Tinkering the script

Once again I'm going to declare some variables at the top of my script so I can easily adjust them if need be. To avoid adding any more parameters, I'm going to infer the existence of a NDepend project *.ndproj by assuming it is named after the project being compiled, and located in the same directory as the solution.

def nDependProjectName  = "${libName}.ndproj"
def nDependProject      = slnPath + nDependProjectName
def nDependRunner       = "\"${WORKSPACE}\\tools\\ndepend\\NDepend.Console.exe\""

I have NDepend checked into version control in a tools directory so it is available on build agents without needing a dedicated installation. You'll need to adjust the path above to where the executable is located (or define a Jenkins tool reference to use)

Calling NDepend

As with test execution, I'm going to have a separate stage for code analysis that will only appear and execute if a NDepend project is detected. To perform the auto-detection I can make use of the built-in fileExists command

if(fileExists(slnPathRel + nDependProjectName))
{
  stage('Analyse')
  {
    bat("${nDependRunner} \"${nDependProject}\"")
  }
}

The path specified in fileExists must be relative to the current directory. Conversely, NDepend.Console.exe requires the project filename to be fully qualified.

I decided to place this new stage between the Build and Tests stages in my pipeline script, as there isn't much point running tests if an analysis finds critical errors.

Using absolute or relative paths in a NDepend project

By default, all paths and filenames inside the NDepend project are absolute. As Jenkins builds in temporary workspaces that could be different for each build agent it's usually preferable to use relative paths.

There are two ways we can work around this - the first is to use command line switches to override the paths in the project, and the second is to make them relative.

Overriding the absolute paths

The InDirs and OutDir arguments can be used to specify override paths - you'll need to specify both of these, as InDirs controls where all the source files to analyse are located, and OutDir specifies where the report will be written. Note that InDirs allows you to specify multiple paths if required.

bat("${nDependRunner} \"${nDependProject}\" /InDirs ${WORKSPACE}\\${binPath} /OutDir \"${slnPath}NDependOut\"")

Normally I always quote paths so that file names with spaces don't cause parsing errors. In this case the InDirs parameter is not quoted due to the path ending in a \ character. If I leave it quoted, NDepend seems to be treating as an escape for the quote, thus causing a different set of parsing errors

Configuring NDepend to use relative paths

These instructions apply to the stand alone tool, but should also work from the Visual Studio extension.

  • Open the Project Properties editor
  • Select the Paths Referenced tab
  • In the path list, select each path you want to make relative
  • Right click and select Set as Path Relative (to the NDepend Project File Location)
  • Save your changes

As I don't really want absolute paths in these files, I'm going to go with this option, although it would be better if I could configure the default behaviour of NDepend in regards to paths. As I already have some NDepend projects, I'm going to leave InDirs and OutDir arguments in the script until I have time to correct these existing projects with absolute paths.

To fail or not to fail, that is the question

Jenkins normally fails the build when a bat statement returns a non-zero exit code, which is usually the expected behaviour. If NDepend runs successfully and doesn't find any critical violations then it will return the expected zero. However, even if it has otherwise ran successfully, it will return non-zero in the event of critical violations.

It's possibly a good idea to leave this behaviour alone, but for the time being I don't want NDepend to be capable of failing my builds. Firstly because I'm attaching these projects to code that often has been in use for years and I need time to go through any violations, and secondly because I know from previous experience that NDepend reports false positives.

The bat command has an optional returnStatus argument. Set this to true and Jenkins will return the exit code for your script to check, but won't fail the build if it's non-zero.

bat(returnStatus: true, script: "${nDependRunner} \"${nDependProject}\" /InDirs ${WORKSPACE}\\${binPath} /OutDir \"${slnPath}NDependOut\"")

Publishing the HTML

Once NDepend has created the report, we need to get this into Jenkins. Unsurprisingly, Jenkins has a HTML Publisher plugin for just this purpose - we only have to specify the location of the report files, the default filename and the report name.

The location is whatever we set the OutDir argument to when we executed NDepend. The default filename will always be NDependReport.html, and we can call it whatever we want!

Adding the following publishHTML command to the anaylse stage will do the job nicely

publishHTML([allowMissing: false, alwaysLinkToLastBuild: false, keepAll: false, reportDir: slnPathRel + 'NDependOut', reportFiles: 'NDependReport.html', reportName: 'NDepend'])

Security Breach!

Once the HTML has been published, it will appear in the sidebar menu for the job. On trying to view the report you might be in for a surprise though.

If you're using Blue Ocean, then the first part of the statement above is incorrect - the Blue Ocean UI doesn't show the HTML reports at all, to view the reports you need to use the Classic interface

That's... a lot of errors

Jenkins wraps the report in a frame so that you can get back to the original job page. The request that loads the document into the frame has the Content-Security-Policy:, X-Content-Security-Policy and X-WebKit-CSP headers set, which effectively lock the page down to external resources and script execution.

The NDepend report makes use of script and in-line CSS and so the policy headers completely break it, unless you're using an older version of Internet Explorer that doesn't process those headers.

As I'm much happier pretending that IE doesn't exist clearly that's not a solution for me. I did test it just to check though, and setting IE to an emulated mode worked after a fashion - the page was very unresponsive and several times stopped painting. Go IE!

Reconfiguring the Jenkins Content Security Policy

Update 03Feb2017. The instructions below only temporarily change the CSP and will be reverted when Jenkins is restarted. This follow-up post describes how to permanently change the CSP.

I don't want to be disabling security features without good cause and so although the Jenkins documentation does state how to disable the CSP (along with a warning of why you shouldn't!), I'm going to try adjusting it instead.

After some testing, the following policy would allow the report to work correctly

sandbox allow-scripts; default-src 'self'; style-src 'self' 'unsafe-inline';

I'm not a security expert. I tinkered the CSP policy enough to allow it to work without turning it off fully, but that doesn't mean the settings I have chosen are either optimal or safe (for example, I didn't try using file hashes).

To change the CSP, open the Script Console in Jenkins administration section, and run the following command

System.setProperty("hudson.model.DirectoryBrowserSupport.CSP", "sandbox allow-scripts; default-src 'self'; style-src 'self' 'unsafe-inline';")

With this policy in place, refreshing the report (after clearing the browser cache) would display a fully functional report. I still have some errors regarding fonts the CSS is referencing, but as they don't even exist it seemed a little pointless adding a rule for them.

Much better, a functional report

Another alternative to changing the CSP

One other possible alternative to avoid changing the CSP would be to replace the NDepend report - it's actually a feature of NDepend that you can specify a custom XSLT file used to generate the report. Assuming this is straight forward enough to do, that would actually be a pretty cool feature of NDepend and would mean a static report could be generated that would comply with a default CSP, not to mention trimming the report down a bit to just essentials.

Creating a rules file

Another NDepend default is to save all the rules in the project file. However, just like this Jenkins pipeline script I keep adapting, I don't want to keep dozens of copies of stock rules.

And NDepend delivers here too - it allows rules to be stored in external files, and so I used the NDepend GUI to create a rules file before deleting all the rules embedded in the project.

As none of my previous NDepend projects use rule files, I didn't add any overrides in the NDepend.Console.exe call above, but you can use the /RuleFiles and /KeepProjectRuleFiles parameters for overriding them if required.

Comparing previous results, a work in progress

One interesting feature of NDepend is that can automatically compare the current analysis with previous ones, allowing to you judge if code quality is improving (or not).

Of course, that will only work if the previous report data exist - which it won't if it's only stored in a temporary workspace. I also don't want that data in version control. I tried adding a public share on our server, but when ran via Jenkins, both NDepend and the HTML Publish claimed the directory didn't exist. I tried pasting the command line from the Jenkins log into a new console window which executed perfectly, so it's more than likely a permissions issue for the service the Jenkins agent runs under.

As the HTML Publisher plugin doesn't support exclusions, and as we probably don't want all that historical data being uploaded into Jenkins either, that would also mean copying the bits of the report we wanted to publish to another folder for the plugin to process.

All in all, for the time being I'll just stick with the current analysis report - at least it is a starting point for investigating my code.

Done, for now

And with this new addition my little script has become that much more powerful. While I still have to do a little more tinkering to the script by removing some of the parameters I've added and making more use of auto detection, I think the script is finished for the time being (at least until I revisit historical NDepend analyses, or find something else to plug into it!)

Downloads

All content Copyright (c) by Cyotek Ltd or its respective writers. Permission to reproduce news and web log entries and other RSS feed content in unmodified form without notice is granted provided they are not used to endorse or promote any products or opinions (other than what was expressed by the author) and without taking them out of context. Written permission from the copyright owner must be obtained for everything else.
Original URL of this content is https://www.cyotek.com/blog/integrating-ndepend-with-jenkins?source=rss.


Adjusting the Jenkins Content Security Policy

$
0
0

One of the security features of Jenkins is to send Content Security Policy (CSP) headers which describes how certain resources can behave. The default policy blocks pretty much everything - no JavaScript, inline CSS, or even CSS from external websites. This can cause problems with content added to Jenkins via build processes, typically using the HTML Publisher Plugin.

While turning this policy off completely is not recommended it can be beneficial to adjust the policy to be less restrictive, allowing the user of external reports without compromising security.

Although I described modifying the CSP in an earlier post, I didn't realise at the time of publishing that the method I mentioned was only temporarily, and as soon as Jenkins was restarted, the defaults were reapplied. This post both covers that original method, and how to do it permanently, serving as a stand-alone reference.

The hudson.model.DirectoryBrowserSupport.CSP setting

The contents of the CSP headers are defined by the hudson.model.DirectoryBrowserSupport.CSP setting and supports a wide range of values - the CSP specification is very flexible and allows you to control how pretty much any type of resource is loaded, or what JavaScript features are permitted.

The specific configuration values are beyond the scope of this post, but you can learn more about CSP settings at a reference site.

In my own Jenkins instance, in order to get published NDepend analysis reports working, I ended up using the following policy which may be a good starting point for similar reports - it allows the use of JavaScript and line CSS, but leaves everything else blocked unless referenced directly from the Jenkins origin.

sandbox allow-scripts; default-src 'self'; style-src 'self' 'unsafe-inline';

Temporarily reconfiguring the Content Security Policy

To change the CSP, open the Script Console in Jenkins administration section, and run the following command

System.setProperty("hudson.model.DirectoryBrowserSupport.CSP", "sandbox allow-scripts; default-src 'self'; style-src 'self' 'unsafe-inline';")

Important! Changing the policy via the Script Console is not permanent and will revert back to the default values when Jenkins is restarted

Permanently changing the Content Security Policy when running Jenkins via the command line

If you run Jenkins via the command line, e.g. by calling java.exe, you can add an extra argument to set the value of the CSP setting.

The Java documentation states you can use the -D argument to set a "system property value", allowing us to add the following to the command line

-Dhudson.model.DirectoryBrowserSupport.CSP="sandbox allow-scripts; default-src 'self'; style-src 'self' 'unsafe-inline';"

Remember to add double quotes around the CSP value, otherwise it will not be parsed correctly

A note on order of arguments

There's one important caveat though - the ordering of the parameters is important. I run Jenkins as a Windows service (more on that in the next section) and the command line I use looks similar to the following

-Xrs -Xmx256m -Dfile.encoding=UTF8 -Dhudson.lifecycle=hudson.lifecycle.WindowsServiceLifecycle -jar "%BASE%\jenkins.war" --httpPort=<PORTNUM> --webroot="%BASE%\war"

Initially I added the new argument to the end of that string, but this never had any effect - each time Jenkins started the value was missing. When checking the System Information view I noted the parameter wasn't listed in the main System Properties table but was instead appended to the value of another property - sun.java.command. That was the point I realized ordering mattered and moved the argument to before the --http argument. After that, the property setting was correctly applied.

Permanently changing the Content Security Policy when Jenkins is running as a Windows Service

If you run Jenkins as a Windows Service, the command parameters are read from jenkins.xml, which is located in your main Jenkins installation. If you open this file in the text editor of your choice, you should see XML similar to the following

<service><id>jenkins</id><name>Jenkins</name><description>This service runs Jenkins continuous integration system.</description><env name="JENKINS_HOME" value="%BASE%"/><executable>%BASE%\jre\bin\java</executable><arguments>-Xrs -Xmx256m -Dfile.encoding=UTF8 -Dhudson.lifecycle=hudson.lifecycle.WindowsServiceLifecycle -jar "%BASE%\jenkins.war" --httpPort=<PORTNUM> --webroot="%BASE%\war"</arguments><logmode>rotate</logmode><onfailure action="restart" /></service>

Simply add your new argument to the arguments element (with the same caveat that parameter ordering is important), save the file and restart Jenkins.

Note: The contents of the arguments element must be a single line, if line breaks are present the service will terminate on startup

Checking the value of the Content Security Policy setting

An easy way to check the CSP policy (regardless of if you set it via the command line or the Script Console) is to use Jenkins' System Information view. This view includes a System Properties table, if a custom CSP is in use, this will be displayed in the table.

Verifying that the CSP settings have been correctly recognised by Jenkins

All content Copyright (c) by Cyotek Ltd or its respective writers. Permission to reproduce news and web log entries and other RSS feed content in unmodified form without notice is granted provided they are not used to endorse or promote any products or opinions (other than what was expressed by the author) and without taking them out of context. Written permission from the copyright owner must be obtained for everything else.
Original URL of this content is https://www.cyotek.com/blog/adjusting-the-jenkins-content-security-policy?source=rss.

Integrating NDepend with Jenkins Freestyle Jobs

$
0
0

Previously, I've described on this blog how to do a basic integration of NDepend with Jenkins pipeline jobs. The disadvantages of the previous post was it was essentially part of a series tailored to our build process and so not easy to view as a stand-alone article and it only covered pipelines.

As I result, I've added this complementary post to cover how to perform the same level of integration with a freestyle project. I don't normally like duplicating content on this blog but I think this version is easier to read, not to mention the post I did have planned for this week is delayed due to stubborn mathematical issues.

Prerequisites and notes

  • This guide is written on the assumption you are familiar with Jenkins and configuring freestyle projects
  • In order to publish reports for viewing within Jenkins, you need to have installed the HTML Publisher plugin
  • The NDepend GUI has been used to create a NDepend project file for later analysis
  • An existing freestyle project is available which already successfully checks out and compiles the assemblies the NDepend project will process
  • NDepend must be installed on any computers used as a Jenkins build agent. I have tested versions 6 and 7 without issue
  • The default Jenkins content security policy prevents embedded NDepend reports from being viewed correctly. This guide contains instructions on reconfiguring the policy

Calling NDepend

At present, there isn't a dedicated Jenkins plugin available for NDepend, so we're slightly limited in how much integration we can do.

The first step is to call NDepend. We can do this by adding a Execute Windows batch command step to our project and then set the Command field to call NDepend.Console.exe passing in the filename of our project.

NDepend.Console.exe "%WORKSPACE%\cyotek\source\Applications\WebCopy\WebCopy.ndproj"

NDepend.Console.exe requires the project filename to be fully qualified. You can use the %WORKSPACE% environment variable to get the fully qualified path of the agent workspace and append your project filename to that

I have NDepend and other similar tools used by builds checked into SVN so that they automatically get checked out into a build agents workspace, so in my case I can use a relative path pointing to NDepend.Console.exe. Alternatively, if the location of NDepend's binaries are part of the OS path, you can omit the path completely.

An example of a command for executing NDepend via Jenkins

Using absolute or relative paths in a NDepend project

By default, all paths and filenames inside the NDepend project are absolute. Jenkins builds take place in a temporary workspace, the location of which could be different for each agent. In such scenarios, the use of absolute paths could result in either absolute failure, or out-dated / unexpected results.

There are two ways we can work around this - the first is to use command line switches to override the paths in the project, and the second is to make them relative.

Overriding the absolute paths

The InDirs and OutDir arguments can be used to specify override paths. InDirs controls where all the source files to analyse are located and OutDir specifies where the report will be written. Note that InDirs allows you to specify multiple paths if required.

NDepend.Console.exe "%WORKSPACE%\cyotek\source\Applications\WebCopy\WebCopy.ndproj" /InDirs "%WORKSPACE%\cyotek\source\Applications\WebCopy" /OutDir "%WORKSPACE%\cyotek\source\Applications\WebCopy\NDependOut"

Configuring NDepend to use relative paths

These instructions apply to the stand alone tool, but should also work from the Visual Studio extension.

  • Open the Project Properties editor
  • Select the Paths Referenced tab
  • In the path list, select each path you want to make relative
  • Right click and select Set as Path Relative (to the NDepend Project File Location)
  • Save your changes

Personally, I don't like absolute paths being stored in documents, so I reconfigure my NDepend projects to use relative paths.

Failing the build

If the Execute Windows batch command returns non-zero, by default Jenkins will fail the build. When NDepend runs successfully and doesn't find any critical violations then it will return the expected zero. However, even if it has otherwise ran successfully, it will return non-zero in the event of critical violations.

Depending on your needs, you might want to disable this behaviour. For example, if you are using NDepend with an existing code base, then potentially you're going to have genuine violations to investigate, or false positives.

We can handle this either by marking the build as unstable or suppressing the error.

Marking the build as unstable

The Execute Windows batch command has an additional parameter (hidden behind the Advanced button) named ERRORLEVEL to set build unstable. By setting the value of this field to 1 (the exit code NDepend will return when critical violations are encountered), then the build result will be Unstable, but it will continue executing.

Suppressing the error

As the name of the step, Execute Windows batch command, suggests, this isn't the execution of a single command. Jenkins will create a batch file based on the contents of the Command field which it then executes. Therefore, to suppress the error we simply need to exit the batch file ourselves, allowing us to supply our own exit code.

To do this, just add exit /b 0 as a new line in the Command field and any existing error code will be ignored.

If you do this and NDepend fails to run for any other reason, you won't know about it unless you check the log files. I'd probably just go with marking the build as unstable, but you could also change the command to start checking ERRORLEVEL values manually and acting accordingly.

Publishing the HTML

After the NDepend analysis has completed, a HTML report will be generated. While this report doesn't offer the level of functionality that viewing the results in NDepend's GUI does, it provides a lot of useful data.

To embed this into Jenkins, we need to add a Publish HTML reports post-build step.

  • Set the HTML directory to archive field to point to the location where the NDepend report has been saved - by default this is a folder named NDependOut located in the same folder as the NDepend project.
  • Set the Index page[s] field to be the name of the report, which is always NDependReport.html
  • Finally, set the Report title field to be whatever you want - this will be used to label the navigation links in Jenkins

An example of a command for publishing the NDepend report into Jenkins

Viewing the report

As I mentioned at the start of this article, Jenkins has a security policy that restricts embedded resources. This policy cripples the NDepend report, and so you will need to loosen the restrictions slightly as per my previous post.

Once your Jenkins job has been ran and completed successfully new navigation options for viewing the reports should appear in the sidebar for the job, and the status overview providing access to the NDepend report.

Jenkins dashboard showing links to the published NDepend report, along with an unstable build due to rule violations

Using external resource files to avoid duplication

Another NDepend default is to save all the rules in the project file. These stock rules substantially increase the size of the NDepend project and if you don't modify them it doesn't really make sense to have them duplicated over and over again.

Fortunately, NDepend allows rules to be stored in external files, and so I used the NDepend GUI to create a rules file. Now each project has had all the built in rules deleted and just references the external file. Handy!

If your projects are using absolute paths, you can just the /RuleFiles and /KeepProjectRuleFiles parameters with NDepend.Console.exe for overriding the absolute versions if required.

Similarly, NDepend version 7 introduces new settings for project debt, but also provides the ability to store these in an external file. Regretfully there doesn't seem to be override switches available in NDepend.Console.exe, but as I've yet to test the technical debt features yet I don't know if this will be an issue or not.

All content Copyright (c) by Cyotek Ltd or its respective writers. Permission to reproduce news and web log entries and other RSS feed content in unmodified form without notice is granted provided they are not used to endorse or promote any products or opinions (other than what was expressed by the author) and without taking them out of context. Written permission from the copyright owner must be obtained for everything else.
Original URL of this content is https://www.cyotek.com/blog/integrating-ndepend-with-jenkins-freestyle-jobs?source=rss.

Loading Microsoft RIFF Palette (pal) files with C#

$
0
0

At the start of 2014, I published an article describing how to read colour palettes from BBM/LBM files. At the end of that article I noted that Microsoft palette files used a similar format, but I didn't investigate that at the time. Since then I followed up with articles on reading and writing Adobe's Color Swatch and Color Exchange format files and I also posted code for working with JASC, Gimp and a couple of other palette formats.

Now, finally, I decided to complete the collection and present an article on reading Microsoft's palette files. These files are RIFF forms containing colour data, similar to a BBM palette being an IIF form.

Example program that can read the contents of a RIFF palette

The RIFF File Format

The Resource Interchange File Format (RIFF), a tagged file structure, is a general specification upon which many file formats can be defined. The main advantage of RIFF is its extensibility; file formats based on RIFF can be future-proofed, as format changes can be ignored by existing applications.

The above paragraph is taken verbatim from the Multimedia Programming Interface and Data Specifications 1.0 document co-produced by Microsoft and IBM around the time of Windows 3.0.

The RIFF format shares allows different file types to use the same underlying structure. For example, as well as the palettes we'll cover in this article, Wave audio (.wav) files are RIFF forms as are some MIDI (.mid) and device independent bitmap (.dib) files.

A RIFF form is comprised of chunks of data tagged with an ID and a size. Some chunk types are globally defined and can apply to all resource types, while others are resource specific. Global tags include the ability to specify meta data, such as artist information or to specify language options such as a character set.

The screenshot below shows the structure of a Wave file containing fmt and data chunks and then a list of meta tags. Notice how the meta tags are in upper-case but the fmt and data tags are in lower-case. By convention, RIFF suggests that global tags used by more than one form type are in upper-case, whilst those specific to a single form type are in lower-case. An ISFT tag in a Wave file means exactly the same thing as an ISFT tag in a palette file, but the Wave's data tag does not correspond with a palettes data tag.

Viewing the chunks in a Waveform audio file.

Chunks are word-aligned, so if the size of a chunk is odd, an extra padding byte must be added at the end of the chunk. Note that the chunk size does not include this alignment byte, so you must manually check if the size is odd and handle this accordingly.

The nature of the chunk format means a program can scan a file, process the chunks it recognises, and ignore those it doesn't with relative ease.

Most of the binary formats I've previously covered use big-endian ordering (including the original EA IFF 85 Standard for Interchange Format Files that RIFF is derived from), however RIFF is a noticeable exception as it uses little-endian (which the spec refers to as Intel byte-ordering. There is a counterpart format, RIFX that uses big-endian (referred to as Motorola byte-ordering). I don't think I've ever come across this variant, so I won't be covering it in this article.

A more advanced version of RIFF exists which makes use of compound elements and content tables, but that is also far out of the scope of this article.

Obtaining the specification

Unless you happen to have a hard-copy of the book lying around, you can get an electronic version from Nicholas J Humfrey's WAVE Meta Tools page.

About the RIFF Palette

There are actually two variants of RIFF palettes, simple and extended. As I've only come across simple palettes in the wild, this article will concentrate only on the former.

If anyone does have extended versions, please let me know, would be interesting to test these.

The simple format is an array of RGB colours, easily earning the simple moniker.

The extended variant includes extra header data describing how the palette should be used, and can include either the basic RGB palette, or palettes using YUV or XYZ colour data.

The following form-specific chunk types are supported

SignatureDescriptionType
plthPalette headerExtended
dataRGB paletteBasic or Extended
yuvpYUV paletteExtended
xyzpXYZ paletteExtended

The screenshot below shows a basic palette file loaded into a chunk viewer. Unlike the Wave screenshot above, only a single format-specific tag is present.

Viewing the chunks in a simple palette file. Can you spot a bug?

Reading a RIFF file

Reading the form type

The header of a RIFF file is 12 bytes comprised of the following information

  • Four bytes containing the signature RIFF
  • 32-bit unsigned integer which contains the size of the document
  • Four bytes containing the form type, for example WAVE or MIDI

The form type for a palette is PAL. As this is less than four characters, it is padded with trailing spaces to make up the difference.

We can test to see if a file is a valid RIFF form using code similar to

stream.Read(buffer, 0, 12);
if (buffer[0] != 'R' || buffer[1] != 'I' || buffer[2] != 'F' || buffer[3] != 'F')
{
  throw new InvalidDataException("Source stream is not a RIFF document.");
}

if (buffer[8] != 'P' || buffer[9] != 'A' || buffer[10] != 'L' || buffer[11] != ' ')
{
  throw new InvalidDataException("Source stream is not a palette.");
}

In the above example, I'm ignoring the size read from the header. If you wanted to perform some extra validation, you could always check the read value against the size of the file you are processing - the read value should match the file size, minus 8 bytes to account for the RIFF signature.

I'm also comparing each byte to a character as that is more readable, but you could always treat the 12 bytes as 3 unsigned 32-bit integers and compare the numbers - 1179011410 for RIFF and and 541868368 for PAL (don't forget the trailing space!).

if (buffer.ToInt(0) != 1179011410)
{
  throw new InvalidDataException("Source stream is not a RIFF document.");
}

if (buffer.ToInt(8) != 541868368)
{
  throw new InvalidDataException("Source stream is not a palette.");
}

Not quite as readable and so I'll just stick with looking at the individual characters.

Reading the chunks

Although most palettes probably only contain the data chunk, additional chunks (such as meta data) could be present, and I have seen some RIFF files where custom chunks were present before the main data. For this reason, I'm not going to blindly assume that the palette is the first chunk and will iterate over each one searching for palette data.

In a RIFF file, a chunk is identified by a four byte character code, followed by a 32-bit unsigned integer describing the size of the data. This means we can read the 8 byte header, decide if we support the chunk or not, and if we don't we can simply skip over the number of bytes identified by the size.

while (!eof)
{
  if (stream.Read(buffer, 0, 8) == 8)
  {
    chunkSize = buffer.ToInt(4);

    // see if we have the palette data
    if (buffer[0] == 'd' && buffer[1] == 'a' && buffer[2] == 't' && buffer[3] == 'a')
    {
      // we have a RGB palette, process the data and break

      if (stream.Read(buffer, 0, chunkSize) != chunkSize)
      {
        throw new InvalidDataException("Failed to read enough data to match chunk size.");
      }

      // TODO: Extract palette from the buffer

      eof = true;
    }
    else
    {
      // not the palette data? advance the stream to the next chunk

      // advance the reader by a byte if the size is an odd number
      if (chunkSize % 2 != 0)
      {
        chunkSize++;
      }

      stream.Position += chunkSize;
    }
  }
  else
  {
    // nothing to read, abort
    eof = true;
  }
};

Reading the palette

Once you have the chunk data, this needs converting into something usable. For an RGB palette, the data is actually a LOGPALETTE structure containing an array of PALETTEENTRY values. While this probably means there's a cool way of converting that byte data directly into a LOGPALETTE, we'll construct a Color[] array manually.

typedef struct tagLOGPALETTE {
  WORD         palVersion;
  WORD         palNumEntries;
  PALETTEENTRY palPalEntry[1];
} LOGPALETTE;

typedef struct tagPALETTEENTRY {
  BYTE peRed;
  BYTE peGreen;
  BYTE peBlue;
  BYTE peFlags;
} PALETTEENTRY;

If you want more information on Windows data types, you can find it on MSDN, but suffice to say WORD is a 16-bit unsigned integer, BYTE is as named, and DWORD is an unsigned 32-bit integer.

Reading the palette is therefore as easy as pulling out the number of colours and processing the bytes for each colour.

Color[] palette;
ushort count;

count = buffer.ToInt16(2);
palette = new Color[count];

for (int i = 0; i < count; i++)
{
  byte r;
  byte g;
  byte b;
  int offset;

  offset = (i * 4) + 4;
  r = buffer[offset];
  g = buffer[offset + 1];
  b = buffer[offset + 2];

  palette[i] = Color.FromArgb(r, g, b);
}

Although I included the PALETTEENTRY structure definition above, I thought it was worth pointing out - each palette entry is comprised of four bytes, but the fourth byte is not an alpha channel, it is a set of flags describing how Windows should process the palette.

And that's pretty much all you need to handle reading a RIFF palette file, although as usual I've included a sample application for download.

Downloads

All content Copyright (c) by Cyotek Ltd or its respective writers. Permission to reproduce news and web log entries and other RSS feed content in unmodified form without notice is granted provided they are not used to endorse or promote any products or opinions (other than what was expressed by the author) and without taking them out of context. Written permission from the copyright owner must be obtained for everything else.
Original URL of this content is https://www.cyotek.com/blog/loading-microsoft-riff-palette-pal-files-with-csharp?source=rss.

Writing Microsoft RIFF Palette (pal) files with C#

$
0
0

A short follow up and sample program which demonstrates how to write a RIFF palette with ease.

Example program that generates a random palette and saves it into a RIFF form

About RIFF Palettes

I covered the basics of the RIFF specification and how to read palettes in my previous article.

Performance Considerations

When I first started this journey and wrote how to read and write palette files in different formats, the code I provided generally read and wrote bytes one at a time. At the start of January (2016, time has a habit of getting away from me!) I wrote an article which described how to read and write farbfeld images.

While updating the source for this project, I created a series of benchmarks testing the serialisation code and proved the obvious fact that reading and writing a byte a time was really inefficient.

As a result of this, I'm now a little more careful when reading and writing files. The previous article on reading RIFF palettes tried to be efficient both in terms of IO (reading blocks of information at a time) and in terms of allocations (by using the same buffer object as much as possible), so hopefully that code is quite efficient.

Similarly, when writing the file as per the code below, I create a buffer large enough to hold the entire RIFF form - palettes generally aren't huge objects so this is fine. I then populate the buffer with the form and write it all at once.

There aren't any guards around this code though to ensure that buffers are reasonably sized and so if this code was being adapted (for example to read WAVE audio or AVI videos) then additional precautions would be required.

Writing int and ushort values into byte arrays

As we're going to construct the entire RIFF form in a byte array, we can't use classes such as StreamWriter to write values. I'm going to use a pair of helper methods that will break down an int into four bytes or a ushort into a pair of bytes which I will then place into the array at appropriate offsets.

Remember that RIFF uses little-endian ordering

public static void PutInt32(int value, byte[] buffer, int offset)
{
  buffer[offset + 3] = (byte)((value & 0xFF000000) >> 24);
  buffer[offset + 2] = (byte)((value & 0x00FF0000) >> 16);
  buffer[offset + 1] = (byte)((value & 0x0000FF00) >> 8);
  buffer[offset] = (byte)((value & 0x000000FF) >> 0);
}

public static void PutInt16(ushort value, byte[] buffer, int offset)
{
  buffer[offset + 1] = (byte)((value & 0x0000FF00) >> 8);
  buffer[offset] = (byte)((value & 0x000000FF) >> 0);
}

You could use the BitConverter class to break down the values, but that means extra allocations for the byte array returned by the GetBytes method.

Writing a RIFF palette

First we need to calculate the size of our data chunk for the palette, which is 4 + number_of_colors * 4. Each colour is comprised of 4 bytes, which accounts for the bulk of the chunk, but there's also 4 bytes for the palVersion and palNumEntries fields of the LOGPALETTE structure.

Once we have that size, we calculate the size of the complete RIFF form and create a byte array that will hold the entire form.

byte[] buffer;
int length;
ushort count;
ushort chunkSize;

count = (ushort)_palette.Length;
chunkSize = (ushort)(4 + count * 4);

// 4 bytes for RIFF
// 4 bytes for document size
// 4 bytes for PAL
// 4 bytes for data
// 4 bytes for chunk size
// 2 bytes for the version
// 2 bytes for the count
// (4*n) for the colors
length = 4 + 4 + 4 + 4 + 4 + 2 + 2 + count * 4;
buffer = new byte[length];

Next, we write the RIFF header. Remember that the document size is the size of the entire form minus 8 bytes representing the RIFF header.

// the riff header
buffer[0] = (byte)'R';
buffer[1] = (byte)'I';
buffer[2] = (byte)'F';
buffer[3] = (byte)'F';
WordHelpers.PutInt32(length - 8, buffer, 4); // document size

We then follow this with the form type

// the form type
buffer[8] = (byte)'P';
buffer[9] = (byte)'A';
buffer[10] = (byte)'L';
buffer[11] = (byte)' ';

So far so good. We won't be writing any meta data, only the data chunk with our basic RGB palette. First we'll write the chunk header, and then we'll write the first two fields describing the palette.

// data chunk header
buffer[12] = (byte)'d';
buffer[13] = (byte)'a';
buffer[14] = (byte)'t';
buffer[15] = (byte)'a';
WordHelpers.PutInt32(chunkSize, buffer, 16); // chunk size

// logpalette
buffer[20] = 0;
buffer[21] = 3; // os version (always 03)
WordHelpers.PutInt16(count, buffer, 22); // colour count

Now it's just a case of filling in the colour information

for (int i = 0; i < count; i++)
{
  Color color;
  int offset;

  color = _palette[i];

  offset = 24 + i * 4;

  buffer[offset] = color.R;
  buffer[offset + 1] = color.G;
  buffer[offset + 2] = color.B;

  // TODO: use buffer[offset + 3] for flags
}

And finally, we can write our buffer to the destination stream. Easy!

stream.Write(buffer, 0, length);

Downloads

All content Copyright (c) by Cyotek Ltd or its respective writers. Permission to reproduce news and web log entries and other RSS feed content in unmodified form without notice is granted provided they are not used to endorse or promote any products or opinions (other than what was expressed by the author) and without taking them out of context. Written permission from the copyright owner must be obtained for everything else.
Original URL of this content is https://www.cyotek.com/blog/writing-microsoft-riff-palette-pal-files-with-csharp?source=rss.

Using custom type converters with C# and YamlDotNet, part 1

$
0
0

One of our internal tools eschews XML or JSON configuration files in favour of something more human readable - YAML using YamlDotNet. For the most part the serialisation and deserialisation of YAML documents in .NET objects is as straight forward as using libraries such as JSON.net but when I was working on some basic serialisation there were a few issues.

A demonstration program showing the basics of YAML serialisation

Setting the scene

For this demonstration project, I'm going to use a pair of basic classes.

internal sealed class ContentCategoryCollection : Collection<ContentCategory>
{
  private ContentCategory _parent;

  public ContentCategory Parent
  {
    get { return _parent; }
    set
    {
      _parent = value;

      foreach (ContentCategory item in this)
      {
        item.Parent = value;
      }
    }
  }

  protected override void InsertItem(int index, ContentCategory item)
  {
    item.Parent = _parent;

    base.InsertItem(index, item);
  }
}

internal sealed class ContentCategory
{
  private ContentCategoryCollection _categories;

  private StringCollection _topics;

  [Browsable(false)]
  public ContentCategoryCollection Categories
  {
    get { return _categories ?? (_categories = new ContentCategoryCollection { Parent = this }); }
    set { _categories = value; }
  }

  [Browsable(false)]
  [DesignerSerializationVisibility(DesignerSerializationVisibility.Hidden)]
  [DefaultValue(false)]
  public bool HasCategories
  {
    get { return _categories != null && _categories.Count != 0; }
  }

  [Browsable(false)]
  [DesignerSerializationVisibility(DesignerSerializationVisibility.Hidden)]
  [DefaultValue(false)]
  public bool HasTopics
  {
    get { return _topics != null && _topics.Count != 0; }
  }

  public string Name { get; set; }

  [Browsable(false)]
  public ContentCategory Parent { get; set; }

  public string Title { get; set; }

  [Browsable(false)]
  public StringCollection Topics
  {
    get { return _topics ?? (_topics = new StringCollection()); }
    set { _topics = value; }
  }
}

The classes are fairly simple, but they do offer some small challenges for serialisation

  • Read-only properties
  • Parent references
  • Special values - child collections that are only initialised when they are accessed and should be ignored if null or empty

Basic serialisation

Using YamlDotNet, you can serialise an object graph quite simply enough

Serializer serializer;
string yaml;

serializer = new SerializerBuilder().Build();

yaml = serializer.Serialize(_categories);

Basic deserialisation

Deserialising a YAML document into a .NET object is also quite straightforward

Deserializer deserializer;

deserializer = new DeserializerBuilder().Build();

using (Stream stream = File.OpenRead(fileName))
{
  using (TextReader reader = new StreamReader(stream))
  {
    _categories = deserializer.Deserialize<ContentCategoryCollection>(reader);
  }
}

Serialisation shortcomings

The following is an example of the YAML produced by the above classes with default serialisation

- Categories: []
  HasTopics: true
  Name: intro
  Title: Introducing  {{ applicationname }}
  Topics:
  - whatis.md
  - licenseagreement.md
- &o0
  Categories:
  - Categories: []
    Name: userinterface
    Parent: *o0
    Title: User Interface
    Topics: []
  HasCategories: true
  Name: gettingstarted
  Title: Getting Started
  Topics: []
- Categories: []
  Name: blank
  Title: Blank
  Topics: []

For a format that is "human friendly" this is quite verbose with a lot of extra clutter as the serialisation has included the read-only properties (which will then cause a crash on deserialisation), and our create-on-demand collections are being created and serialised as empty values. It is also slightly alien when you consider the alias references. While those are undeniably cool (especially as YamlDotNet will recreate the references), the nested nature of the properties implicitly indicate the relationships and are therefore superfluous in this case

It's also worth pointing out that the order of the serialised values matches the ordering in code file - I always format my code files to order members alphabetically, so the properties are also serialised alphabetically.

You can also see that, for the most part, the HasCategories and HasTopics properties were not serialised - although YamlDotNet is ignoring the BrowsableAttribute, it is processing the DefaultValueAttribute and skipping values which are considered default, which is another nice feature.

Resolving some issues

Similar to Json.NET, you can decorate your classes with attributes to help control serialisation, and so we'll investigate these first to see if they can resolve our problems simply and easily.

Excluding read-only properties

The YamlIgnoreAttribute class can be used to force certain properties to be skipped, so applying this attribute to properties with only getters is a good idea.

[YamlIgnore]
public bool HasCategories
{
  get { return _categories != null && _categories.Count != 0; }
}

Changing serialisation order

We can control the order in which YamlDotNet serialises using the YamlMemberAttribute. This attribute has various options, but for the time being I'm just looking at ordering - I'll revisit this attribute in the next post.

[YamlMember(Order = 1)]
public string Name { get; set; }

If you specify this attribute on one property to set an order you'll most likely need to set it on all.

Processing the collection properties

Unfortunately, while I could make use of the YamlIgnore and YamlMember attributes to control some of the serialisation, it wouldn't stop the empty collection nodes from being created and then serialised, which I didn't want. I suppose I could finally work out how to make DefaultValue apply to collection classes effectively, but then there wouldn't be much point in this article!

Due to this requirement, I'm going to need to write some custom serialisation code - enter the IYamlTypeConveter interface.

Creating a custom converter

To create a custom converter for use with YamlDotNet, we start by creating a new class and implementing IYamlTypeConverter.

internal sealed class ContentCategoryYamlTypeConverter : IYamlTypeConverter
{
  public bool Accepts(Type type)
  {
  }

  public object ReadYaml(IParser parser, Type type)
  {
  }

  public void WriteYaml(IEmitter emitter, object value, Type type)
  {
  }
}

First thing is to specify what types our class can handle via the Accepts method.

private static readonly Type _contentCategoryNodeType = typeof(ContentCategory);

public bool Accepts(Type type)
{
  return type == _contentCategoryNodeType;
}

In this case, we only care about our ContentCategory class so I return true for this type and false for anything else.

Next, it's time to write the YAML content via the WriteYaml method.

The documentation for YamlDotNet is a little lacking and I didn't find the serialisation support to be particularly intuitive, so the code I'm presenting below is what worked for me, but there may be better ways of doing it.

First we need to get the value to serialise - this is via the value and type parameters. In my example, I can ignore type though as I'm only supporting the one type.

public void WriteYaml(IEmitter emitter, object value, Type type)
{
  ContentCategory node;

  node = (ContentCategory)value;
}

The IEmitter interface (accessed via the emitter parameter) is similar in principle to JSON.net's JsonTextWriter class except it is less developer friendly. Rather than having a number of Write* methods or overloads similar to BCL serialisation classes, it has a single Emit method which takes in a variety of objects.

Writing property value maps

To create our dictionary map, we start by emitting a MappingStart object. Of course, if you have a start you need an end so we'll close by emitting MappingEnd.

emitter.Emit(new MappingStart(null, null, false, MappingStyle.Block));

// reset of serialisation code

emitter.Emit(new MappingEnd());

YAML supports block and flow styles. Block is essentially one value per line, while flow is a more condensed comma separated style. Block is much more readable for complex objects, but flow is probably more valuable for short lists of simple values.

Next we need to write our key value pairs, which we do by emitting pairs of Scalar objects.

if (node.Name != null)
{
  emitter.Emit(new Scalar(null, "Name"));
  emitter.Emit(new Scalar(null, node.Name));
}

if (node.Title != null)
{
  emitter.Emit(new Scalar(null, "Title"));
  emitter.Emit(new Scalar(null, node.Title));
}

Although the YAML specification allows for null values, attempting to emit a Scalar with a null value seems to destabilise the emitter and it will promptly crash on subsequent calls to Emit. For this reason, in the code above I wrap each pair in a null check. (Not to mention if it is a null value there is probably no need to serialise anything anyway).

Writing lists

With the basic properties serialised, we can now turn to our child collections.

This time, after writing a single Scalar with the property name instead of writing another Scalar we use the SequenceStart and SequenceEnd classes to tell YamlDotNet we're going to serialise a list of values.

For our Topics property, the values are simple strings so we can just emit a Scalar for each entry in the list.

if (node.HasTopics)
{
  this.WriteTopics(emitter, node);
}

private void WriteTopics(IEmitter emitter, ContentCategory node)
{
  emitter.Emit(new Scalar(null, "Topics"));
  emitter.Emit(new SequenceStart(null, null, false, SequenceStyle.Block));

  foreach (string child in node.Topics)
  {
    emitter.Emit(new Scalar(null, child));
  }

  emitter.Emit(new SequenceEnd());
}

As the Categories property returns a collection of ContentCategory objects, we can simply start a new list as we did for topics and then recursively call WriteYaml to write each child category object in the list.

if (node.HasCategories)
{
  this.WriteChildren(emitter, node);
}

private void WriteChildren(IEmitter emitter, ContentCategory node)
{
  emitter.Emit(new Scalar(null, "Categories"));
  emitter.Emit(new SequenceStart(null, null, false, SequenceStyle.Block));

  foreach (ContentCategory child in node.Categories)
  {
    this.WriteYaml(emitter, child, _contentCategoryNodeType);
  }

  emitter.Emit(new SequenceEnd());
}

Deserialisation

In this article, I'm only covering custom serialisation. However, the beauty of this code is that it doesn't generate different YAML from default serialisation, it only excludes values that it knows are defaults or that can't be read back, and provides custom ordering of values. This means you can use the basic deserialisation code presented at the start of this article and it will just work, as demonstrated by the sample program accompanying this post.

For this reason, for the time being I change the ReadYaml method of our custom type converter to throw an exception instead of actually doing anything.

public object ReadYaml(IParser parser, Type type)
{
  throw new NotImplementedException();
}

Using the custom type converter

Now we have a functioning type converter, we need to tell YamlDotNet about it. I'm going to demonstrate one approach here, and then show another in my next post when I implemented the missing ReadYaml method from the previous section.

At the start of the article, I showed how you create a SerializerBuilder object and call its Build method to get a configured Serializer class. All we need to do is tell the builder about our converter using the WithTypeConveter method.

Serializer serializer;
string yaml;

serializer = new SerializerBuilder()
                 .WithTypeConverter(new ContentCategoryYamlTypeConverter())
                 .Build();

yaml = serializer.Serialize(_categories);

See the attached demonstration program for a fully working sample.

Downloads

All content Copyright (c) by Cyotek Ltd or its respective writers. Permission to reproduce news and web log entries and other RSS feed content in unmodified form without notice is granted provided they are not used to endorse or promote any products or opinions (other than what was expressed by the author) and without taking them out of context. Written permission from the copyright owner must be obtained for everything else.
Original URL of this content is https://www.cyotek.com/blog/using-custom-type-converters-with-csharp-and-yamldotnet-part-1?source=rss.

Viewing all 559 articles
Browse latest View live