Quantcast
Channel: cyotek.com Blog Summary Feed
Viewing all 559 articles
Browse latest View live

An introduction to dithering images

$
0
0

When you reduce the number of colours in an image, it's often hard to get a 1:1 match, and so typically you can expect to see banding in an image - areas of unbroken solid colours where once multiple similar colours were present. Such banding can often ruin the look of the image, however by using dithering algorithms you can reduce such banding and greatly improve the appearance of the reduced image.

The sample image our demonstration program will be using, a picture of the Tower of London

Here we see a nice view of the Tower of London (Image Credit: Vera Kratochvil). Lets say we wanted to reduce the number of colours in this image to 256 using the web safe colour palette.

If we simply reduce the colour depth by matching the nearest colour in the old palette to one in the new, then we'll get something similar to the image below. As is quite evident, the skyline has been badly effected by banding.

Not exactly the best representation of the original image.

However, by applying a technique known as dithering, we can still reduce the colour depth using exactly the same palette, and get something comparable to the original and more aesthetically pleasing.

That looks a lot better!

Types of dithering

There are several different types of dithering, mostly falling into Ordered or Unordered categories.

Ordered dithering uses a patterned matrix in order to dither the image. An example of this is the very distinctive (and nostalgic!) Bayer algorithm.

Unordered, or error diffusion, dithering calculates an error value for each pixel and then propagates this to the neighbouring pixels, often with very good results. The most well known of these is Floyd–Steinberg, although there are several more such as Burkes, and Sierra.

You could potentially use dithering for applications other than images. An image is simply a block of pixel data, i.e. colours. Colours are just numbers, and so is a great deal of other data. So in theory you can dither a lot more than "just" images.

Dithering via Error Diffusion

For at least the first part of this series, I will be concentrating on error diffusion. For this algorithm, you scan the image from left to right, top to bottom and visit each pixel. Then, for each pixel, you calculate a value known as the "error".

After calculating the error it is then applied to one or more neighbouring values that haven't yet been processed. Generally, this would mean adjusting at least 3 neighbouring cells, but depending on the algorithm this could be quite a few more. I'll go into this in more detail when I describe individual dithering algorithms in subsequent posts.

So how do you determine the error? Well, hopefully is clear that you don't dither an image as a single process. There has to be another piece in the puzzle, a process to transform a value. The error therefore is the difference between the original and new values. When it comes to images, typically this is going to a form of colour reduction, for example 32bit (16 million colours) to 8bit (256 colours).

The diagram below tries to show what I mean - the grey boxes are pixels that have been processed. The blue box is the pixel that is currently being transformed, with the green therefore being unprocessed pixels and candidates for the error diffusion. The arrows simply highlight that the candidates are always forward of the current pixel, and not behind it.

A small illustration to try and demonstrate how the error diffusion works

It's worth repeating that the error is not applied to any previously transformed value. If you do modify an already processed value, then you would need to have some way of reprocessing it (as the combined value+error may not be valid for your reduction method), which could get messy fast.

Next Steps

Hopefully this article serves as at least a basic and high level overview of dithering - additional posts will deal with the actual implementation of dithering.

All content Copyright © by Cyotek Ltd or its respective writers. Permission to reproduce news and web log entries and other RSS feed content in unmodified form without notice is granted provided they are not used to endorse or promote any products or opinions (other than what was expressed by the author) and without taking them out of context. Written permission from the copyright owner must be obtained for everything else.
Original URL of this content is http://www.cyotek.com/blog/an-introduction-to-dithering-images?source=rss


Dithering an image using the Floyd‑Steinberg algorithm in C#

$
0
0

In my previous introductory post, I briefly described the concept of dithering an image. In this article, I will describe how to dither an image in C# using the Floyd–Steinberg algorithm.

The Demo Application

For this series of articles, I'll be using the same demo application, the source of which can be found on GitHib. There's a few things about the demo I wish to cover before I get onto the actual topic of dithering.

Algorithms can be a tricky thing to learn about, and so I don't want the demo to be horribly complicated by including a additional complex code unrelated to dithering. At the same time, bitmap operations are expensive, so there is already some advanced code present.

As I mentioned in my introduction, dithering is part of a process. For this demo, the process will be converting a 32bit image into a 1bit image as this is the simplest conversion I can stick in a demo. This does not mean that the dithering techniques can only be used to convert an image to black and white, it is simply to make the demo easier to understand.

I have however broken this rule when it comes to the actual image processing. The .NET Bitmap object offers SetPixel and GetPixel methods. You should try and avoid using these as they will utterly destroy the performance of whatever it is you are trying to do. The best way of accessing pixel data is to access it directly using Bitmap.LockBits, pointer manipulation, then Bitmap.UnlockBits. In this demo, I use this approach to create a custom array of colours, and while it is very fast, if you want better performance it is probably better to manipulate individual bytes via pointers. However, this requires much more complex code to account for different colour depths and is well beyond the scope of this demo.

I did a version of the demo program using SetPixel and GetPixel. Saying it was slow was an understatement. Just pretend these methods don't exist!

Converting a colour to black or white

In order to convert the image to 2 colours, I scan each pixel and convert it to grayscale. If the grayscale value is around 50% (127 in .NET's 0 - 255 range), then the transformed pixel will be black, otherwise it will be white.

byte gray;

gray = (byte)(0.299 * pixel.R + 0.587 * pixel.G + 0.114 * pixel.B);return gray < 128 ? new ArgbColor(pixel.A, 0, 0, 0) : new ArgbColor(pixel.A, 255, 255, 255);

This actually creates quite a nice result from our demonstration image, but results will vary depending on the image.

An example of 1bit conversion via a threshold

Floyd‑Steinberg dithering

The Floyd‑Steinberg algorithm is an error diffusion algorithm, meaning for each pixel an "error" is generated and then distributed to four pixels around the surrounding the current pixel. Each of the four offset pixels has a different weight - the error is multiplied by the weight, divided by 16 and then added to the existing value of the offset pixel.

As a picture is definitely worth a thousand words, the diagram below shows the weights.

How the error of the current pixel is diffused to its neighbours

  • 7 for the pixel to the right of the current pixel
  • 3 for the pixel below and to the left
  • 5 for the pixel below
  • 1 for the pixel below and to the right

Calculating the error

The error calculation in our demonstration program is simple, although in actuality it's 3 errors, one for the red, green and blue channels. All we are doing is taking the difference between the channels transformed value from the original value.

redError = originalPixel.R - transformedPixel.R;
blueError = originalPixel.G - transformedPixel.G;
greenError = originalPixel.B - transformedPixel.B;

Applying the error

Once we have our error, it's just a case of getting each neighbouring pixels to adjust, and applying each error the appropriate channel. The ToByte extension method in the snippet below simply converts the calculated integer to a byte, while ensuring it is in the 0-255 range.

offsetPixel.R = (offsetPixel.R + ((redError * 7) >> 4)).ToByte();
offsetPixel.G = (offsetPixel.G + ((greenError * 7) >> 4)).ToByte();
offsetPixel.B = (offsetPixel.B + ((blueError * 7) >> 4)).ToByte();

Bit shifting for division

As 16 is a power of two, it means we can use bit shifting to do the division. While this may be slightly less readable if you aren't hugely familiar with it, it ought to be faster. I did a quick benchmark test using a sample of 1 million, 10 million and then 100 million random numbers. Using bit shifting to divide each sample by 16 took roughly two thirds of the time it took to do the same sets with integer division. This is probably a useful thing to know when performing thousands of operations processing an image.

Dithering a single pixel

Here's the code used by the demonstration program to dither a single source pixel - the ArbColor data representing each pixel is stored in a one-dimensional array using row-major order.

ArgbColor offsetPixel;int redError;int blueError;int greenError;int offsetIndex;int index;

index = y * width + x;
redError = originalPixel.R - transformedPixel.R;
blueError = originalPixel.G - transformedPixel.G;
greenError = originalPixel.B - transformedPixel.B;

if (x + 1 < width)
{// right
  offsetIndex = index + 1;
  offsetPixel = original[offsetIndex];
  offsetPixel.R = (offsetPixel.R + ((redError * 7) >> 4)).ToByte();
  offsetPixel.G = (offsetPixel.G + ((greenError * 7) >> 4)).ToByte();
  offsetPixel.B = (offsetPixel.B + ((blueError * 7) >> 4)).ToByte();
  original[offsetIndex] = offsetPixel;
}if (y + 1 < height)
{if (x - 1 > 0)
  {// left and down
    offsetIndex = index + width - 1;
    offsetPixel = original[offsetIndex];
    offsetPixel.R = (offsetPixel.R + ((redError * 3) >> 4)).ToByte();
    offsetPixel.G = (offsetPixel.G + ((greenError * 3) >> 4)).ToByte();
    offsetPixel.B = (offsetPixel.B + ((blueError * 3) >> 4)).ToByte();
    original[offsetIndex] = offsetPixel;
  }// down
  offsetIndex = index + width;
  offsetPixel = original[offsetIndex];
  offsetPixel.R = (offsetPixel.R + ((redError * 5) >> 4)).ToByte();
  offsetPixel.G = (offsetPixel.G + ((greenError * 5) >> 4)).ToByte();
  offsetPixel.B = (offsetPixel.B + ((blueError * 5) >> 4)).ToByte();
  original[offsetIndex] = offsetPixel;if (x + 1 < width)
  {// right and down
    offsetIndex = index + width + 1;
    offsetPixel = original[offsetIndex];
    offsetPixel.R = (offsetPixel.R + ((redError * 1) >> 4)).ToByte();
    offsetPixel.G = (offsetPixel.G + ((greenError * 1) >> 4)).ToByte();
    offsetPixel.B = (offsetPixel.B + ((blueError * 1) >> 4)).ToByte();
    original[offsetIndex] = offsetPixel;
  }
}

Much of the code is duplicated, with a different co-efficient for the multiplication, and (importantly!) guards to skip pixels when the current pixel is either the first or last pixel in the row, or is within the final row.

And the result?

The image below shows our sample image dithered using the Floyd–Steinberg algorithm. It doesn't look too bad!

The final result - a bitmap transformed with Floyd–Steinberg dithering

By changing the threshold at which colours are converted to black or white, we can affect the output of the dithering even if the conversion is to solid black.

A slightly more extreme black and white conversion still dithers fairly well

(Note: The thumbnail hasn't resized well, the actual size version looks better)

Source Code

The latest source code for this demonstration (which will be extended over time to include additional algorithms) can be found at our GitHib page.

The source code from the time this article was created is available from the link below, however may not be fully up to date.

Downloads

All content Copyright © by Cyotek Ltd or its respective writers. Permission to reproduce news and web log entries and other RSS feed content in unmodified form without notice is granted provided they are not used to endorse or promote any products or opinions (other than what was expressed by the author) and without taking them out of context. Written permission from the copyright owner must be obtained for everything else.
Original URL of this content is http://www.cyotek.com/blog/dithering-an-image-using-the-floyd-steinberg-algorithm-in-csharp?source=rss

Dithering an image using the Burkes algorithm in C#

$
0
0

In my previous post, I described how to dither an image in C# using the Floyd‑Steinberg algorithm. Continuing this theme, this post will cover the Burkes algorithm.

An example of 1bit conversion via a threshold

I will be using the same demonstration application as from the previous post, so I won't go over how this works again.

Burkes dithering

As with Floyd‑Steinberg, the Burkes algorithm is an error diffusion algorithm, which is to say for each pixel an "error" is generated and then distributed to pixels around the source. Unlike Floyd‑Steinberg however (which modifies 4 surrounding pixels), Burkes modifies 7 pixels.

Burkes is actually a modified version of the Stucki algorithm, which in turn is an evolution of the Jarvis algorithms.

The diagram below shows the distribution of the error coefficients.

How the error of the current pixel is diffused to its neighbours

  • 8 for the pixel to the right of the current pixel
  • 4 for the second pixel to the right
  • 2 for the pixel below and two to the left
  • 4 for the pixel below and to the left
  • 8 for the pixel below
  • 4 for the pixel below and to the right
  • 2 for the pixel below and two to the right

Unlike Floyd‑Steinberg, the error result in this algorithm is divided by 32. But as that's still a power of two, once again we can use bit shifting to perform the division.

Due to the additional calculations I would assume that this algorithm will be slightly slower than Floyd‑Steinberg, but as of yet I haven't ran any form of benchmarks to test this.

Applying the algorithm

In my Floyd‑Steinberg example, I replicated the calculations four times for each pixel. As there are now seven sets of calculations with Burkes, I decided to store the coefficients in a 2D array mimicing the diagram above, then iterating this. I'm not entirely convinced this is the best approach, but it does seem to be working.

privatestaticreadonlybyte[,] _matrix =
{
  {
    0, 0, 0, 8, 4
  },
  {
    2, 4, 8, 4, 2
  }
};privateconstint _matrixHeight = 2;privateconstint _matrixStartX = 2;privateconstint _matrixWidth = 5;

This sets up the matrix as a static that is only created once. I've also added some constants to control the offsets as I can't create an array with a non-zero lower bound. This does smell a bit so I'll be revisiting this!

Below is the code to dither a single pixel. Remember that the demonstration program uses a 1D array of ArgbColor structs to make it easy to read and understand, but you could equally use direct pointer manipulation on a bitmap's bits, with lots of extra code to handle different colour depths.

int redError;int blueError;int greenError;

redError = originalPixel.R - transformedPixel.R;
blueError = originalPixel.G - transformedPixel.G;
greenError = originalPixel.B - transformedPixel.B;

for (int row = 0; row < _matrixHeight; row++)
{int offsetY;

  offsetY = y + row;

  for (int col = 0; col < _matrixWidth; col++)
  {int coefficient;int offsetX;

    coefficient = _matrix[row, col];
    offsetX = x + (col - _matrixStartX);

    if (coefficient != 0 && offsetX > 0 && offsetX < width && offsetY > 0 && offsetY < height)
    {
      ArgbColor offsetPixel;int offsetIndex;

      offsetIndex = offsetY * width + offsetX;
      offsetPixel = original[offsetIndex];
      offsetPixel.R = (offsetPixel.R + ((redError * coefficient) >> 5)).ToByte();
      offsetPixel.G = (offsetPixel.G + ((greenError * coefficient) >> 5)).ToByte();
      offsetPixel.B = (offsetPixel.B + ((blueError * coefficient) >> 5)).ToByte();
      original[offsetIndex] = offsetPixel;
    }
  }
}

Due to the loop this code is now shorter than the Floyd‑Steinberg version. It's also less readable due the coefficients being stored in a 2D matrix. Of course, the algorithm is fixed and won't change so perhaps that's not an issue, but if performance really was a concern you can unroll the loop and duplicate all that code. I'll stick with the loop!

Final Output

The image below shows our sample image dithered using the Burkes algorithm. It's very similar to the output created via Floyd–Steinberg, albeit darker.

The final result - a bitmap transformed with Burkes dithering

Again, by changing the threshold at which colours are converted to black or white, we can affect the output of the dithering even if the conversion is to solid black.

The non-dithered version of this image is solid black

Source Code

The latest source code for this demonstration (which will be extended over time to include additional algorithms) can be found at our GitHib page.

The source code from the time this article was created is available from the link below, however may not be fully up to date.

Downloads

All content Copyright © by Cyotek Ltd or its respective writers. Permission to reproduce news and web log entries and other RSS feed content in unmodified form without notice is granted provided they are not used to endorse or promote any products or opinions (other than what was expressed by the author) and without taking them out of context. Written permission from the copyright owner must be obtained for everything else.
Original URL of this content is http://www.cyotek.com/blog/dithering-an-image-using-the-burkes-algorithm-in-csharp?source=rss

Even more algorithms for dithering images using C#

$
0
0

Although I should really be working on adding the dithering algorithms into Gif Animator, I thought it would be useful to expand the repertoire of algorithms available for use with it and the other projects I'm working on.

Adding a general purpose base class

I decided to re-factor the class I created for the Burkes algorithm to make it suitable for adding other error diffusion filters with a minimal amount of code.

First, I added a new abstract class, ErrorDiffusionDithering. The constructor of this class requires you to pass in the matrix used to disperse the error to neighbouring pixels, the divisor, and whether or not to use bit shifting. The reason for the last parameter is the Floyd-Steinberg and Burkes algorithms covered in my earlier posts had divisors that were powers of two, and so could therefore be bit shifted for faster division. Not all algorithms use a power of two divisor though and so we need to be flexible.

The constructor then stores the matrix, and pre-calculates a couple of other values to avoid repeating these each time the Diffuse method is called.

protected ErrorDiffusionDithering(byte[,] matrix, byte divisor, bool useShifting)
{if (matrix == null)
  {thrownew ArgumentNullException("matrix");
  }if (matrix.Length == 0)
  {thrownew ArgumentException("Matrix is empty.", "matrix");
  }

  _matrix = matrix;
  _matrixWidth = (byte)(matrix.GetUpperBound(1) + 1);
  _matrixHeight = (byte)(matrix.GetUpperBound(0) + 1);
  _divisor = divisor;
  _useShifting = useShifting;for (int i = 0; i < _matrixWidth; i++)
  {if (matrix[0, i] != 0)
    {
      _startingOffset = (byte)(i - 1);break;
    }
  }
}

The actual dithering implementation is unchanged from original matrix handling code, with the exception of supporting bit shifting or integer division, and not having to work out the current pixel in the matrix, width or height.

void IErrorDiffusion.Diffuse(ArgbColor[] data, ArgbColor original, ArgbColor transformed, int x, int y, int width, int height)
{int redError;int blueError;int greenError;

  redError = original.R - transformed.R;
  blueError = original.G - transformed.G;
  greenError = original.B - transformed.B;

  for (int row = 0; row < _matrixHeight; row++)
  {int offsetY;

    offsetY = y + row;

    for (int col = 0; col < _matrixWidth; col++)
    {int coefficient;int offsetX;

      coefficient = _matrix[row, col];
      offsetX = x + (col - _startingOffset);

      if (coefficient != 0 && offsetX > 0 && offsetX < width && offsetY > 0 && offsetY < height)
      {
        ArgbColor offsetPixel;int offsetIndex;int newR;int newG;int newB;

        offsetIndex = offsetY * width + offsetX;
        offsetPixel = data[offsetIndex];

        // if the UseShifting property is set, then bit shift the values by the specified// divisor as this is faster than integer division. Otherwise, use integer divisionif (_useShifting)
        {
          newR = (redError * coefficient) >> _divisor;
          newG = (greenError * coefficient) >> _divisor;
          newB = (blueError * coefficient) >> _divisor;
        }else
        {
          newR = (redError * coefficient) / _divisor;
          newG = (greenError * coefficient) / _divisor;
          newB = (blueError * coefficient) / _divisor;
        }

        offsetPixel.R = (offsetPixel.R + newR).ToByte();
        offsetPixel.G = (offsetPixel.G + newG).ToByte();
        offsetPixel.B = (offsetPixel.B + newB).ToByte();

        data[offsetIndex] = offsetPixel;
      }
    }
  }
}

Burkes Dithering, redux

The BurkesDithering class now looks like this

publicsealedclass BurksDithering : ErrorDiffusionDithering
{public BurksDithering()
    : base(newbyte[,]
            {
              {
                0, 0, 0, 8, 4
              },
              {
                2, 4, 8, 4, 2
              }
            }, 5, true)
  { }
}

No code, just the matrix and the bit shifted divisor of 5, which will divide each result by 32. Nice!

More Algorithms

As well as opening the door to allowing a user to define a custom dither matrix, it also makes it trivial to implement a number of other common error diffusion matrixes. The GitHub Repository now offers the following algorithms

  • Atkinson
  • Burkes
  • Floyd-Steinberg
  • Jarvis, Judice & Ninke
  • Sierra
  • Two Row Sierra
  • Sierra Light
  • Stucki

Which is a fairly nice array.

An example of Atkinson dithering

publicsealedclass AtkinsonDithering : ErrorDiffusionDithering
{public AtkinsonDithering()
    : base(newbyte[,]
            {
              {
                0, 0, 1, 1
              },
              {
                1, 1, 1, 0
              },
              {
                0, 1, 0, 0
              }
            }, 3, true)
  { }
}

Random Dithering

There's a rather old (in internet terms anyway!) text file floating around named DHALF.TXT (based in turn on an even older document named DITHER.TXT) that has a ton of useful information on dithering, and with the exception of the Altkinson algorithm (I took that from here) is where I have pulled all the error weights and divisors from.

One of the sections in this document dealt with random dithering. Although I didn't think I would ever use it myself, I thought I'd add an implementation of it anyway to see what it's like.

Unlike the error diffusion methods, random dithering affects only a single pixel at a time, and does not consider or modify its neighbours. You also have a modicum of control over it too, if you can control the initial seed of the random number generator.

The DHALF.TXT text sums it up succinctly: For each dot in our grayscale image, we generate a random number in the range 0 - 255: if the random number is greater than the image value at that dot, the display device plots the dot white; otherwise, it plots it black. That's it.

And here's our implementation (ignoring the fact that it isn't error diffusion and all of a sudden our IErrorDiffusion interface is named wrong!)

void IErrorDiffusion.Diffuse(ArgbColor[] data, ArgbColor original, ArgbColor transformed, int x, int y, int width, int height)
{byte gray;

  gray = (byte)(0.299 * original.R + 0.587 * original.G + 0.114 * original.B);if (gray > _random.Next(0, 255))
  {
    data[y * width + x] = _white;
  }else
  {
    data[y * width + x] = _black;
  }
}

(Although I reversed black and white from the original description as otherwise it looked completely wrong)

Random dithering - it doesn't actually look too bad

Another example of random dithering, this time using colour

I was surprised to see it actually doesn't look that bad.

Continuation

I've almost got a full house of useful dithering algorithms now. About the only thing left for me to do is to implement a ordered Bayer dithering as I really like the look of this type, and reminds me of games and computers of yesteryear. So there's still at least one more article to follow in this series!

The updated source code with all these algorithms is available from the GitHub repository.

All content Copyright © by Cyotek Ltd or its respective writers. Permission to reproduce news and web log entries and other RSS feed content in unmodified form without notice is granted provided they are not used to endorse or promote any products or opinions (other than what was expressed by the author) and without taking them out of context. Written permission from the copyright owner must be obtained for everything else.
Original URL of this content is http://www.cyotek.com/blog/even-more-algorithms-for-dithering-images-using-csharp?source=rss

A brief look at code analysis with NDepend

$
0
0

If you're a developer, you're probably familiar with various tenets of your craft, such as "naming things is hard" and "every non trivial program has at least one bug". The latter example is one of the reasons why there are ever increasing amounts of tools designed to reduce the number of bugs in an application, from testing, to performance profiling, to code analysis.

In this article, I'm going to briefly take a look NDepend, a code analysis tool for Visual Studio. This is the point where I'd like to quote the summary of the product from the NDepend website, but there's no simple description - which sums up NDepend pretty well actually. This is a complicated product offering a lot of features.

So when I say "a brief look", that's exactly what I mean. When I've had a chance to explore the functionality fully I hope I'll have enough knowledge and material to expand upon this initial post.

Disclaimer: I received a professional license for NDepend on the condition I would write about my experiences.

What is NDepend and what can it do for me?

Simply put, NDepend will analyse your code and spit out a report full of metrics, and violations against a large database of rules. These might be the mundane (a method has too many lines) to the more serious (your method is so complicated you will never remember how it works in 6 months time).

This really doesn't even begin to cover it though, as it can do so much more, from dependency graphs to trend analysis. One of the interesting things about NDepend is it saves the results of each analysis you do, allowing you to see if metrics such as test coverage are improving (good) or critical violations increased (not so good!).

A sample project

For this article, I'm going to be using the Dithering project I created in previous blog posts to test some of the functionality of NDepend. I choose this because the project was fresh in my mind as I've been heavily working on it the last few weeks, and because it was small enough that I assumed NDepend wouldn't find much amiss. Here's another tenet - assumptions are the mother of all <censored>.

You can use NDepend one of two ways, either via a stand alone application, or via a Visual Studio extension. For this article, I'm going to be using Visual Studio, but you should be able to do everything in the stand alone tool as well. There's also a CLI tool which I assume is for build integration but I haven't looked at it yet.

That first analysis

If this is the first time using NDepend, you need to attach an NDepend project to your solution.

  • Open the NDepend menu and select the Attach New NDepend Project to Current VS Solution menu item
  • The dialog that is displayed will list all the projects in your solution, if there any you don't want to include in the analysis, just right click them and choose the appropriate option
  • Click the Analyze button to generate the project
  • Once the project has been created, a welcome dialog will be displayed. Click the View NDepend Dashboard button to continue

This will open the dashboard, looking something similar to the below.

A HTML report will also be generated and opened in your default browser, providing a helpful synopsis of the analysis.

The initial dashboard for the Dithering project

At this point, all the charts you can see are going to be non-existent as you have to rerun the analysis at future times in order to get additional data points for plotting.

The main information I'm interested in right now is contained in the Code Rules block. And it doesn't make me happy to read it:

  • 4 Critical Rules Violated for a total of 9 Critical Violations
  • 37 Rules Violated for a total of 215 Violations

Wow, that's a lot of violations for such a small project! Lets take a look at these in detail.

Viewing Rules

Clicking the blue hyper-links in the Dashboard will automatically open a new view to drill down into the details of the analysis. On clicking the Critical Rules Violated link, I'm presented with the following

Viewing rule violations

Clicking one of the rules in the list displays the code of the rule and the execution results.

Viewing the results of a violated rule

Here we can see the the violation is triggered if any method has more than eight parameters. In the dithering example project, there is a class I that I used to generate the diagrams used on the blog posts, and the DrawString method of this helper class has 10 parameters, thus falling foul of the rule. Great start!

The next rule on the list is a bit more complicated, but essentially it's trying to detect dead code. In a non-library project, this should be fairly straight forward and true to form it has detected that the ArticleDiagrams class and its methods are dead code.

A more complicated rule with a lot of conditions

This is actually a very useful rule if your coding standards insist that all dead code is removed. How useful depends on your code coverage, if you also have a 100% rule then you should already found and removed such code.

So far so good. Lets look at the final critical rule failure.

When rules go wrong

The last critical rule violation is Don't call your method Dispose. I imagine this makes a lot of sense, if your class doesn't implement IDisposable, then having a method named Dispose is going to be confusing at best.

I'm either mad, or this is a false positive

Interesting. So it somehow thinks that the MainForm and AboutDialog classes - both of which inherit from Form - shouldn't have methods named Dispose. Well, somewhere in its inheritance chain Form does implement IDisposable so this violation is completely wrong.

As a test, I added IDisposable to the signature of AboutDialog and re-ran the NDepend analysis. It promptly decided that the Dispose method in that class was now fine. Of course, now Resharper is complaining Base interface 'IDisposable' is redundant because Cyotek.DitheringTest.AboutDialog inherits 'Form'. Sorry NDepend, you're definitely wrong in this instance.

At this point, I excluded the ArticleDiagrams class from the solution and reran the analysis, removing some the violations that were valid, but not really appropriate as it was dead code.

More violations

So far, I've looked at 4 failed rules. 3 I'm happy to accept, and if this were production code I'd be getting rid of the dead code and resolving all three. The fourth violation is flat out wrong and I'm ignoring it for now.

However, there were lots of other (non-critical) violations, so I'll have a look at those now. The Queries and Rules Explorer window opened earlier has a drop down list which I can use to filter the results, so now I choose 31 Rules Violated to look at the other warnings.

A bunch of important, but not critical, rule violations

There's plenty of other violations listed. I'll outline a tiny handful of them below.

Override equals and operator equals on value types / Structures should be immutable

This pair of failures is caused by the custom ArgbColor struct and is the simplest structure to handle a 32bit colour. Actually, this struct is being called out for a few rules all of which I agree with. If this were production code, I'd be following a lot of the recommendations it makes (in fact, in the "real" version of this class in my production libraries I do follow most of them - a key exception being my structs are still mutable).

Static fields should be prefixed with a 's_' / Instance fields should be prefixed with a 'm_'

These rules vie between I disagree with them, and NDepend shouldn't be picking them up. In the first place, I disagree with the rule - I simply use an underscore prefix and leave it at that.

However, NDepend is also picking up all of the control names in my forms. I seriously doubt any developer is going to use m_ in front of their control names and so I don't think NDepend should be looking at these - I consider them "designer" code of sorts and should be excluded. There's a few more rules being triggered by controls, and I think it's looking messier than it should.

I can edit the rule to use my own conversion of the plain underscore, but I can't do much about NDepend picking up WinForm control names.

Non-static classes should be instantiated or turned to static

This is an interesting one. It's basically being triggered by the LineDesigner class, a designer for the Line control to allow only horizontal resizing. Control designers can't be static and so this rule doesn't apply. It is referenced by the Designer attribute of the Line class so we probably just need to edit the rule to support it.

And more

There's quite a few rule violations so I won't cover them all. It's an interesting mix of rules I would find useful, and rules subject to interpretation (an example is if I have an internal class I still mark its members as public, NDepend think this is incorrect).

But, NDepend doesn't force you to accept it's view. You can simply turn off any rule that you don't want influencing the analysis and it will be fully disabled, including the dashboard updating itself in real-time.

Assuming you have analysed the project multiple times, you can turn on recent violations only, thus hiding any previous violations. You may find this very useful if you are working from a legacy code base!

Editing Rules

With that said, there are other options if a rule doesn't quite fit the bill. NDepend uses LINQ with a set of custom extensions (Code Query over LINQ (CQLinq)) as the base of its rules. So you can put your programmer hat on and modify these rules to suit your needs.

As a concrete example, I'm going to look at the Instances size shouldn't be too big rule. This has flagged the Line control as being too big, something I found curious as the control is a simple affair that just draws a 3D line. When I look at the details for the violation it mentions 6 fields. But the control only has 3. Or does it?

Why does this rule think a class with 3 fields really has 6?

The query results don't include the names of the fields, so I'm going to adjust the code of the rule to include them. This is a really nice aspect of NDepend - as I type in the code pane, it continually tries to compile and run the rule, including syntax highlighting of errors, and intellisense.

I added the , names = ... condition to the code as follows, which allowed me to influence the output to include an extra column

warnif count > 0 from t in JustMyCode.Types where
  t.SizeOfInst > 64 orderby t.SizeOfInst descendingselectnew { t, t.SizeOfInst, t.InstanceFields, names = string.Join(", ", t.InstanceFields.Select(f => f.Name)) }

Apparently because an event is a field!

The results of the modified rule show that there are 3 variables which are backing fields for properties, and then 3 events. Is an event a field? I don't think so, an event is an event. But NDepend thinks it is a field. Regardless though, by editing the rule I was easily able to add additional output from the rule, and although not demonstrated here I've also used some of the built in filtering options to exclude results from being returned.

The ability to write your own rules could potentially be very useful with many possibilities.

Interpretation is king

In a way, I'm glad that NDepend doesn't have the ability to automatically fix violations the way some other tools do. I ran NDepend on my CircularBuffer library, and one of the suggestions was to change the visibility of the class from public to internal. Making the single class of a library project inaccessible to consumers isn't the best of ideas!

I think what I'm leading to here, is use common sense with the violations, do not just blindly accept anything it says as gospel.

Viewing Dependencies

Any application is going to have dependencies, and depending on how tight your coupling is, this could be an evil nightmare. You can display a visual hierarchy of the dependencies of your project via a handy Dependency Diagram - below is the one for the dithering project. Quite small as there are few references, The thicker the arrow, the more dependencies from the destination assembly you're using.

Easy dependency viewing

In the case where the diagram is so big as to become meaningless, you can also view a Dependency Matrix - this lets you plot assemblies against each other and see the usages.

Viewing code dependencies via a matrix

Clicking one of the nodes in the matrix will then open a simplified Dependency Graph, making it a little easier to browse than a huge spaghetti diagram.

Code Metrics

Many years ago, I used a small tool that displayed the size of the different directories on my computer in a treemap to see which folders took up the most space. I haven't used that tool for years (I don't need a colour graph to know my Steam directory is huge!) but I do find that sort of display to be oddly compelling.

NDepend makes use of a tree map to display code metrics - the size of the squares defaults to the code size (useful for seeing huge methods, although again, as the screenshot below indicates, I really wish NDepend would exclude designer code). You can also control the colour of the square via another metric - the default being complexity, so the greener the square the easier the code should be to maintain.

An easy way to gauge the health of your code

I couldn't see how to access this from Visual Studio, but the HTML report also includes an Abstractness versus Instability diagram which "helps to detect which assemblies are potentially painful to maintain (i.e concrete and stable) and which assemblies are potentially useless (i.e abstract and instable)". Meaning you should probably take note if anything appears in the red zone!

NDepend doesn't think WebCopy's code is unstable. Well, at least that's one thing that isn't

Updating the analysis

You can trigger a manual refresh of the analysis at any time, but also by default NDepend will perform one after each build, meaning you can always be up to date on the metrics of your project.

Show me a big project

So far I have looked at only a small demonstration project. However, as the ultimate test of my review, I decided to scan WebCopy. I was very curious to see how NDepend would handle that solution. NDepend scanned the code base quite nicely (despite an old version of one of my libraries getting detected and playing havoc)

As an indication of the size of the project, it reports that WebCopy has 60 thousand lines of code (translating to half a million IL instructions), 24 thousand lines of comments, and nearly 1800 types spread over 44 assemblies. A fair amount!

I had a quick look through the violations list, and noticed a few oddities - there are lots of Forms in these projects, yet the Don't call your method Dispose violation that so annoyed me earlier was only recorded 4 times. One of these was actually valid (a manager class who's children were disposable), while the others weren't. Still, there's a curious disparity in the way NDepend is running these rules it seems.

I did find some violations indicating genuine problems (or potential problems) in the code through so at some point (sigh - there's a lot of them) I will have to take a closer look and go through them all in detail.

Just before I sign off, I shall show you the dependency diagram (maybe I need to try and make my code simpler!) and the complexity diagram.

You are looking at a window into Code Hell. Fear it.

A bit too much red here for my liking

That's all, folks

For a "brief" overview, this has been quite a long article - NDepend is such a big product, one article cannot possibly cover it all. Just take a look at their feature list!

Ideally I will try to cover more of NDepend in future articles, as I'm still exploring the feature set, so stay tuned.

All content Copyright © by Cyotek Ltd or its respective writers. Permission to reproduce news and web log entries and other RSS feed content in unmodified form without notice is granted provided they are not used to endorse or promote any products or opinions (other than what was expressed by the author) and without taking them out of context. Written permission from the copyright owner must be obtained for everything else.
Original URL of this content is http://www.cyotek.com/blog/a-brief-look-at-code-analysis-with-ndepend?source=rss

Sending SMS messages with Twilio

$
0
0

Last week I attended the NEBytes technology user group for the first time. Despite the fact I didn't actually say more than two words (speaking to a real live human is only marginally easier than flying without wings) I did enjoy the two talks that were given.

The first of these was for Twilio, a platform for text messaging and Voice over IP (VoIP). This platform provides you with the ability to send and receive SMS messages, or even create convoluted telephone call services where you can prompt the user with options, capture input, record messages, redirect to other phones... and all fairly painlessly. I can see all sorts of interesting uses for the services they offer. Oh, and the prices seem reasonable as well.

All of this is achieved using a simple REST API which is pretty impressive.

My immediate use case for this is for alert notifications as, like any technology, sometimes emails fail or are not accessible. I also added two factor authentication to cyotek.com in under 5 minutes which I thought was neat (although in fairness, with the Identity Framework all I had to do was fill in the blanks for the Smsservice and uncomment some boilerplate code).

In this article, I'll show you just how incredibly easy it is to send text messages.

Getting an account

The first thing you need is a Twilio account - so go sign up. You don't need to shell out any money at this stage, the example program I will present below will work perfectly well with their trial account and not cost a penny.

Once you've signed up you'll need to validate a real phone number of your own for security purposes, and then you'll need to buy a phone number that you will use for your SMS services.

You get one phone number for free with your trial account. When you are ready to upgrade to a unrestricted account, each phone number you buy costs $1 a month (yes, that's one dollar), then $0.0075 to receive a SMS message or $0.04 to send one. (Prices correct at time of writing). For high volume businesses, short codes are also available, but these are very expensive.

You'll need to get your API credentials too - this is slightly hidden, but if you go to your Twilio account portal and look in the upper right section of the page there is a link titled Show API Credentials - click this to get your Account SID and Auth Token.

Creating a simple application

Twilio offers client libraries for a raft of languages, and support for .NET is no exception by using the twilio-csharp client, which of course has a NuGet package. Lots of packages actually, but we just need the core.

PM> Install-Package Twilio

Now you're set!

To send a message, you create an instance of the TwilioRestClient using your Account SID and Auth Token and call SendSmsMessage with your Twilio phone number, the number of the phone to send the message to, and of course the message itself. And that's pretty much it.

staticvoid Main(string[] args)
{
  SendSms("077xxxxxxxx", "Sending messages couldn't be simpler!");
}privatestaticvoid SendSms(string to, string message)
{
  TwilioRestClient client;string accountSid;string authToken;string fromNumber;

  accountSid = "DF8A228F5D66403E973E714324D5816D"; // no, these are not real
  authToken = "942CA384E3CC4107A10BA58177ACF88B";
  fromNumber = "+44191xxxxxxx";

  client = new TwilioRestClient(accountSid, authToken);

  client.SendSmsMessage(fromNumber, to, message);
}

The SendSmsMessage method returns a SMSMessage object which has various attributes relating to the sent message - such as the cost of sending it.

Apologies for the less-than-perfect photo, but the image below shows my Lumia 630 with the received message.

Not the best photo in the world, but here is a sample message

Sharp eyes will note that the message is prefixed with Sent from your Twilio trial account - this prefix is only for trial accounts, and there will be no adjustment of your messages once you've upgraded.

Simple API's aren't so simple

There's one fairly awkward caveat with this library however - exception handling. I did a test using invalid credentials, and to my surprise nothing happened when I ran the sample program. I didn't receive a SMS message of course, but neither did the sample program crash.

This is because for whatever reason, the client doesn't raise an exception if the call fails. Instead, it is essentially returned as a result code. I mentioned above that the SendSmsMessage return a SMSMessage object. This object has a property named RestException. If the value of this property is null, everything is fine, if not, then your request wasn't successful.

I really don't like this behaviour, as it means now I'm responsible for checking the response every time I send a message, instead of the client throwing an exception and forcing me to deal with issues.

The other thing that irks me with this library is that the RestException class has Status and Code properties, which are the HTTP status code and Twilio status code respectively. But for some curious reason, these numeric properties are defined as strings, and so if you want to process them you'll have to both convert them to integers and make sure that the underlying value is a number in the first place.

privatestaticvoid SendSms(string to, string message)
{
  ... <snip> ...
  SMSMessage result;

  ... <snip> ...

  result = client.SendSmsMessage(fromNumber, to, message);

  if (result.RestException != null)
  {thrownew ApplicationException(result.RestException.Message);
  }
}

Although I don't recommend you use ApplicationException! Something like this may be more appropriate:

if (result.RestException != null)
{int httpStatus;if (!int.TryParse(result.RestException.Status, out httpStatus))
  {
    httpStatus = 500;
  }thrownew HttpException(httpStatus, result.RestException.Message);
}

There's also a Status property on the underlying SMSMessage class which can be failed. Hopefully the RestException property is always set for failed statuses otherwise that's something else you'd have to remember to check.

However you choose to do it, you probably should ensure that you do check for a failed / exception response, especially if the messages are important (for example two-factor authentication codes).

Long Codes vs Short Codes

By default, Twilio uses long codes (also known as "normal" phone numbers). According to their docs, these are rate limited to 1 message per second. I did a sample test where I spammed 10 messages one after another. I received the first 5 right away, and the next five about a minute later. So if you have a high volume service, it's possible that your messages may be slightly delayed. One the plus side, it does seem to be fire and forget, you don't need to manually queue messages yourself and they don't get lost.

Twilio also supports short codes (e.g. send STOP to 123456 to opt out of this list you never opted into in the first place), which are suitable for high traffic - 30 messages a second apparently. However, these are very expensive and have to be leased from the mobile operators, a process which takes several weeks.

Advanced Scenarios

As I mentioned in my intro, there's a lot more to Twilio than just sending SMS messages, although for me personally that's going to be a big part of it. But you can also read and process messages, in other words when someone sends a SMS to your Twilio phone number, it will call a custom HTTP endpoint in your application code, where you can then read the message and process it. This too is something I will find value in, and I'll cover that in another post.

And then there's some pretty impressive options for working with real phone calls (along with the worst robot sounding voice in history). Not entirely sure I will cover this as it's not immediately something I'd make use of.

Take a look at their documentation to see how to use their API's to build SMS/VoIP functionality into your services.

All content Copyright © by Cyotek Ltd or its respective writers. Permission to reproduce news and web log entries and other RSS feed content in unmodified form without notice is granted provided they are not used to endorse or promote any products or opinions (other than what was expressed by the author) and without taking them out of context. Written permission from the copyright owner must be obtained for everything else.
Original URL of this content is http://www.cyotek.com/blog/sending-sms-messages-with-twilio?source=rss

Working around System.ArgumentException: Only TrueType fonts are supported. This is not a TrueType font

$
0
0

One of the exceptions I see with a reasonable frequency (usually in Gif Animator) is Only TrueType fonts are supported. This is not a TrueType font.

System.ArgumentException: Only TrueType fonts are supported. This is not a TrueType font.
  at System.Drawing.Font.FromLogFont(Object lf, IntPtr hdc)
  at System.Windows.Forms.FontDialog.UpdateFont(LOGFONT lf)
  at System.Windows.Forms.FontDialog.RunDialog(IntPtr hWndOwner)
  at System.Windows.Forms.CommonDialog.ShowDialog(IWin32Window owner)

This exception is thrown when using the System.Windows.Forms.FontDialog component and you select an invalid font. And you can't do a thing about it*, as this exception is buried in a private method of the FontDialog that isn't handled.

As the bug has been there for years without being fixed, and given that fact that Windows Forms isn't exactly high on the list of priorities for Microsoft, I suspect it will never be fixed. This is one wheel I'd prefer not to reinvent, but... here it is anyway.

The Cyotek.Windows.Forms.FontDialog component is a drop in replacement for the original System.Windows.Forms.FontDialog, but without the crash that occurs when selecting a non-True Type font.

This version uses the native Win32 dialog via ChooseFont - the hook procedure to handle the Apply event and hiding the colour combobox has been taken directly from the original component. As I'm inheriting from the same base component and have replicated the API completely, you should simply be able to replace System.Windows.Forms.FontDialog with Cyotek.Windows.Forms.FontDialog and it will work.

There's also a fully managed solution buried in one of the branches of the repository. It is incomplete, mainly because I wasn't able to determine which fonts are hidden by settings, and how to combine families with non standard styles such as Light. It's still interesting in its own right, showing how to use EnumFontFamiliesEx and other interop calls, but for now it is on hold as a work in progress.

Have you experianced this crash?

I haven't actually managed to find a font that causes this type of crash, although I have quite a few automated error reports from users who experience it. If you know of such a font that is (legally!) available for download, please let me know so that I can test this myself. I assume my version fixes the problem but at this point I don't actually know for sure.

Getting the source

The source is available from GitHub.

NuGet Package

A NuGet package is available.

PM> Install-Package Cyotek.Windows.Forms.FontDialog

License

The FontDialog component is licensed under the MIT License. See LICENSE.txt for the full text.


* You might be able to catch it in Application.ThreadException or AppDomain.CurrentDomain.UnhandledException (or even by just wrapping the call to ShowDialog in a try ... catch block), but as I haven't been able to reproduce this crash I have no way of knowing for sure. Plus I have no idea if it will leave the Win32 dialog open or destabilize it in some way

All content Copyright © by Cyotek Ltd or its respective writers. Permission to reproduce news and web log entries and other RSS feed content in unmodified form without notice is granted provided they are not used to endorse or promote any products or opinions (other than what was expressed by the author) and without taking them out of context. Written permission from the copyright owner must be obtained for everything else.
Original URL of this content is http://www.cyotek.com/blog/working-around-system-argumentexception-only-truetype-fonts-are-supported-this-is-not-a-truetype-font?source=rss

Targeting multiple versions of the .NET Framework from the same project

$
0
0

The new exception management library I've been working on was originally targeted for .NET 4.6, changing to .NET 4.5.2 when I found that Azure websites don't support 4.6 yet. Regardless of 4.5 or 4.6, this meant trouble when I tried to integrate it with WebCopy - this product uses a mix of 3.5 and 4.0 targeted assemblies, meaning it couldn't actually reference the new library due the higher framework version.

Rather than creating several different project files with the same source but different configuration settings, I decided that I would modify the library to target multiple framework versions from the same source project.

Bits you need to change

In order to get multi targeting working properly, you'll need to tinker a few things

  • The output path - no good having all your libraries compiling to the same location otherwise one compile will overwrite the previous
  • Reference paths - you may need to reference different versions of third party assemblies
  • Compile constants - in case you need to conditionally include or exclude lines of code
  • Custom files - if the changes are so great you might as well have separate files (or bridging files providing functionality that doesn't exist in your target platform)

Possibly there's other things too, but this is all I have needed to do so far in order to produce multiple versions of the library.

I wrote this article against Visual Studio 2015 / MSBuild 14.0, but it should work in at least some earlier versions as well

Conditions, Conditions, Conditions

The magic that makes multi-targeting work (at least how I'm doing it, there might be better ways) is by using conditions. Remember that your solution and project files are really just MSBuild files - so (probably) anything you can do with MSBuild, you can do in these files.

Conditions are fairly basic, but they have enough functionality to get the job done. In a nutshell, you add a Condition attribute containing an expression to a supported element. If the expression evaluates to true, then the element will be fully processed by the build.

As conditions are XML attribute values, this means you have to encode non-conformant characters such as < and > (use &lt; and &gt; respectively). If you don't, then Visual Studio will issue an error and refuse to load the project.

Getting Started

You can either edit your project files directly in Visual Studio, or with an external editor such as Notepad++. While the former approach makes it easier to detect errors (your XML will be validated against the relevant schema) and provides intellisense, I personally think that Visual Studio makes it unnecessarily difficult to directly edit project files as you have to unload the project, before opening it for editing. In order to reload the project, you have to close the editing window. I find it much more convenient to edit them in an external application, then allow Visual Studio to reload the project when it detects the changes.

Also, you probably want to settle on a "default" target version for when using the raw project. Generally this would either be the highest or lowest framework version you support. I choose to do the lowest, that way I can reference the same source library in WebCopy and other projects that are either .NET 4.0 or 4.5.2. (Of course, it would be better to use a NuGet package with the multi-targeted binaries, but that's the next step!)

Conditional Constants

To set up my multi-targeting, I'm going to define a dedicated PropertyGroup for each target, with a condition stating that the TargetFrameworkVersion value must match the version I'm targeting.

I'm doing this for two reasons - firstly to define a numerical value for the version (e.g. 3.5 instead of v3.5), which I'll cover in a subsequent section. The second reason is to define a new constant for the project, so that I can use conditional compilation if required.

<!-- 3.5 Specific --><PropertyGroupCondition="'$(TargetFrameworkVersion)' == 'v3.5' "><DefineConstants>$(DefineConstants);NET35</DefineConstants><TargetFrameworkVersionNumber>3.5</TargetFrameworkVersionNumber></PropertyGroup>

In the above XML block, we can see the condition expression '$(TargetFrameworkVersion)' == 'v3.5'. This means that the PropertyGroup will only be processed if the target framework version is 3.5. Well, that's not quite true but it will suffice for now.

Next, I change the constants for the project to include a new NET35 constant. Note however, that I'm also embedding the existing constants into the new value - if I didn't do this, then my new value would overwrite all existing properties (such as DEBUG or TRACE). You probably don't want that to happen!

Constants are separated with a semi-colon

The third line creates a new configuration value named TargetFrameworkVersionNumber with our numeric framework version.

If you are editing the project through Visual Studio, it will highlight the TargetFrameworkVersionNumber element as being invalid as it isn't part of the schema. This is a harmless error which you can ignore.

Conditional Compilation

With the inclusion of new constants from the previous section, it's quite easy to conditionally include or exclude code. If you are targeting an older version of the .NET Framework, it's possible that it doesn't have the functionality you require. For example, .NET 4.0 and above have Is64BitOperatingSystem and IsIs64BitProcess properties available on the Environment object, while previous versions do not.

bool is64BitOperatingSystem;bool is64BitProcess;#if NET20 || NET35
  is64BitOperatingSystem = NativeMethods.Is64BitOperatingSystem,
  is64BitProcess = NativeMethods.Is64BitProcess,#else
  is64BitOperatingSystem = Environment.Is64BitOperatingSystem,
  is64BitProcess = Environment.Is64BitProcess,#endif

The appropriate code will then be used by the compile process.

Including or Excluding Entire Source Files

Sometimes the code might be too complex to make good use of conditional compilation, or perhaps you need to include extra code to support the feature in one version that you don't in another such as bridging or interop classes. You can use condition attributes to conditionally include these too.

<ItemGroup><CompileInclude="NativeMethods.cs"Condition="'$(TargetFrameworkVersionNumber)' &lt;= '3.5' "/></ItemGroup>

One of the limitations of MSBuild conditions is that the >, >=, < and <= operators only work on numbers, not strings. And it is much easier to say "greater than 3.5" than it is to say "is 4.0 or is 4.5 or is 4.5.1 or is 4.5.2" or "not 2.0 and not 3.5" and so on. By creating that TargetFrameworkVersionNumber property, we make it much easier to use greater / less than expressions in conditions.

Even if the source file is excluded by a specific configuration, it will still appear in the IDE, but unless the condition is met, it will not be compiled into your project, nor prevent compilation if it has syntax errors.

External References

If your library depends on any external references (or even some of the default ones), then you'll possibly need to exclude the reference outright, or include a different version of it. In my case, I'm using Newtonsoft's Json.NET library, which very helpfully comes in different versions for each platform - I just need to make sure I include the right one.

<ItemGroupCondition="'$(TargetFrameworkVersionNumber)' == '3.5' "><ReferenceInclude="Newtonsoft.Json, Version=7.0.0.0, Culture=neutral, PublicKeyToken=30ad4fe6b2a6aeed, processorArchitecture=MSIL"><HintPath>..\..\packages\Newtonsoft.Json.7.0.1\lib\net35\Newtonsoft.Json.dll</HintPath><Private>True</Private></Reference></ItemGroup>

Here we can see an ItemGroup element which describes a single reference along with a now familiar Condition attribute to target a specific .NET version. By changing the HintPath element to point to the net35 folder of the Json package, I can be sure that I'm pulling out the right reference.

Even though these references are "excluded", Visual Studio will still display them, along with a warning that you cannot suppress. However, just like with the code file of the previous section, the duplication / warnings are completely ignored.

The non-suppressible warnings are actually really annoying - fortunately I aim to consume this library via a NuGet package eventually so it will become a moot point.

Core References

In most cases, if your project references .NET Framework assemblies such as System.Xml, you don't need to worry about them; they will automatically use the appropriate version without you lifting a finger. However, there are some special references such as System.Core or Microsoft.CSharp which aren't available in earlier versions and should be excluded. (Or removed if you aren't using them at all)

As Microsoft.CSharp is not supported by .NET 3.5, I change the Reference element for Microsoft.CSharp to include a condition to exclude it for anything below 4.0.

<ReferenceCondition="'$(TargetFrameworkVersionNumber)' &gt;= '4.0' "Include="Microsoft.CSharp"/>

If I was targeting 2.0 then I would exclude System.Core in a similar fashion.

Output Paths

One last task to change in our project - the output paths. Fortunately we can again utilize MSBuild's property system to avoid having to create different platform configurations.

All we need to do is find the OutputPath element(s) and change their values to include the $(TargetFrameworkVersion) variable - this will then ensure our binaries are created in sub-folders named after the .NET version.

<OutputPath>bin\Release\$(TargetFrameworkVersion)\</OutputPath>

Generally, there will be at least two OutputPath elements in a project. If you have defined additional platforms (such as explicit targeting of x86 or x64 then there may be even more). You will need to update all of these, or at least the ones targeting Release builds.

Building the libraries

The final part of our multi-targeting puzzle is to compile the different versions of our project. Although I expect you could trigger MSBuild using the AfterBuild target, I decided not to do this as when I'm developing and testing in the IDE I only need one version. I'll save the fancy stuff for dedicated release builds, which I always do externally of Visual Studio using batch files.

Below is a sample batch file which will take a solution (SolutionFile.sln) and compile 3.5, 4.0 and 4.5.2 versions of a single project (AwesomeLibary).

@ECHO OFF

CALL :build 3.5
CALL :build 4.0
CALL :build 4.5.2

GOTO :eof

:build
ECHO Building .NET %1 client:
MSBUILD "SolutionFile.sln" /p:Configuration="Release" /p:TargetFrameworkVersion="v%1" /t:"AwesomeLibary:Clean","AwesomeLibary:Rebuild" /v:m /nologo
ECHO.

The /p:name=value arguments are used to override properties in the soltuion file, so I use /p:TargetFrameworkVersion to change the .NET version of the output library, and as I always want these to be release builds, I also use the /p:Configuration argument to force the Release configuration.

The /t argument specifies a comma separated list of targets. Generally, I just use Clean,Rebuild to do a full clean of the solution following by a build. However, by including a project name, I can skip everything but that one project, which avoids having to have a separate slimmed down solution file to avoid fully compiling a massive solution.

Note that you shouldn't include the project extension in the target, and if your project name includes any other periods, then you must change these into underscores instead. For example, Cyotek.Windows.Forms.csproj would be referenced as Cyotek_Windows_Forms. I also believe that if you have sited your project within a solution folder, you need to include the folder hierarchy too

A fuller example

This is a more-or-less complete C# project file that demonstrates multi targeting, and may help in a sort of "big picture way".

<?xmlversion="1.0"encoding="utf-8"?><ProjectToolsVersion="14.0"DefaultTargets="Build"xmlns="http://schemas.microsoft.com/developer/msbuild/2003"><ImportProject="$(MSBuildExtensionsPath)\$(MSBuildToolsVersion)\Microsoft.Common.props"Condition="Exists('$(MSBuildExtensionsPath)\$(MSBuildToolsVersion)\Microsoft.Common.props')"/><PropertyGroup><ConfigurationCondition="'$(Configuration)' == '' ">Debug</Configuration><PlatformCondition="'$(Platform)' == '' ">AnyCPU</Platform><ProjectGuid>{DA5D3442-D7E1-4436-9364-776732BD3FF5}</ProjectGuid><OutputType>Library</OutputType><AppDesignerFolder>Properties</AppDesignerFolder><RootNamespace>Cyotek.ErrorHandler.Client</RootNamespace><AssemblyName>Cyotek.ErrorHandler.Client</AssemblyName><TargetFrameworkVersion>v3.5</TargetFrameworkVersion><FileAlignment>512</FileAlignment><TargetFrameworkProfile/></PropertyGroup><PropertyGroupCondition="'$(Configuration)|$(Platform)' == 'Debug|AnyCPU' "><DebugSymbols>true</DebugSymbols><DebugType>full</DebugType><Optimize>false</Optimize><OutputPath>bin\Debug\$(TargetFrameworkVersion)\</OutputPath><DefineConstants>DEBUG;TRACE</DefineConstants><ErrorReport>prompt</ErrorReport><WarningLevel>4</WarningLevel></PropertyGroup><PropertyGroupCondition="'$(Configuration)|$(Platform)' == 'Release|AnyCPU' "><DebugType>pdbonly</DebugType><Optimize>true</Optimize><OutputPath>bin\Release\$(TargetFrameworkVersion)\</OutputPath><DefineConstants>TRACE</DefineConstants><ErrorReport>prompt</ErrorReport><WarningLevel>4</WarningLevel></PropertyGroup><!-- 3.5 Specific --><PropertyGroupCondition="'$(TargetFrameworkVersion)' == 'v3.5' "><DefineConstants>$(DefineConstants);NET35</DefineConstants><TargetFrameworkVersionNumber>3.5</TargetFrameworkVersionNumber></PropertyGroup><ItemGroupCondition="'$(TargetFrameworkVersionNumber)' == '3.5' "><ReferenceInclude="Newtonsoft.Json, Version=7.0.0.0, Culture=neutral, PublicKeyToken=30ad4fe6b2a6aeed, processorArchitecture=MSIL"><HintPath>..\..\packages\Newtonsoft.Json.7.0.1\lib\net35\Newtonsoft.Json.dll</HintPath><Private>True</Private></Reference></ItemGroup><ItemGroup><CompileInclude="NativeMethods.cs"Condition="'$(TargetFrameworkVersionNumber)' &lt;= '3.5' "/></ItemGroup><!-- 4.0 Specific --><PropertyGroupCondition="'$(TargetFrameworkVersion)' == 'v4.0' "><DefineConstants>$(DefineConstants);NET40</DefineConstants><TargetFrameworkVersionNumber>4.0</TargetFrameworkVersionNumber></PropertyGroup><ItemGroupCondition="'$(TargetFrameworkVersionNumber)' == '4.0' "><ReferenceInclude="Newtonsoft.Json, Version=7.0.0.0, Culture=neutral, PublicKeyToken=30ad4fe6b2a6aeed, processorArchitecture=MSIL"><HintPath>..\..\packages\Newtonsoft.Json.7.0.1\lib\net40\Newtonsoft.Json.dll</HintPath><Private>True</Private></Reference></ItemGroup><!-- 4.5 Specific --><PropertyGroupCondition="'$(TargetFrameworkVersion)' == 'v4.5.2' "><DefineConstants>$(DefineConstants);NET45</DefineConstants><TargetFrameworkVersionNumber>4.0</TargetFrameworkVersionNumber></PropertyGroup><ItemGroupCondition="'$(TargetFrameworkVersionNumber)' &gt;= '4.5' "><ReferenceInclude="Newtonsoft.Json, Version=7.0.0.0, Culture=neutral, PublicKeyToken=30ad4fe6b2a6aeed, processorArchitecture=MSIL"><HintPath>..\..\packages\Newtonsoft.Json.7.0.1\lib\net45\Newtonsoft.Json.dll</HintPath><Private>True</Private></Reference></ItemGroup><ItemGroup><ReferenceInclude="System"/><ReferenceInclude="System.Configuration"/><ReferenceCondition="'$(TargetFrameworkVersionNumber)' &gt; '2.0' "Include="System.Core"/><ReferenceCondition="'$(TargetFrameworkVersionNumber)' &gt; '3.5' "Include="Microsoft.CSharp"/></ItemGroup><ItemGroup><CompileInclude="Client.cs"/><CompileInclude="Utilities.cs"/></ItemGroup><ItemGroup><NoneInclude="packages.config"/></ItemGroup><ImportProject="$(MSBuildToolsPath)\Microsoft.CSharp.targets"/><!-- To modify your build process, add your task inside one of the targets below and uncomment it.
       Other similar extension points exist, see Microsoft.Common.targets.<Target Name="BeforeBuild"></Target><Target Name="AfterBuild"></Target>
  --></Project>

Final Notes and Caveats

Unfortunately, Visual Studio doesn't really seem to support these conditions very gracefully - firstly you can't suppress reference warnings (that I know of), and secondly you have zero visibility of the conditions in the IDE.

Each time Visual Studio saves your project file, it will reformat the XML, removing any white space. It might also decide to insert elements between the elements you have created. For this reason, you might want to use XML comments to identify your custom condition blocks.

Visual Studio seems reasonably competent when you change your project, for example by adding new code files or references so that it doesn't break any of your conditional stuff. However, if you use the IDE to directly manipulate something that you have bound to a condition (for example the Json.NET references) then I imagine it will be less forgiving and may need to be manually resolved. I haven't tried this yet, I'll probably find out when I need to install an update to the Json.NET NuGet package!

This principle seems sound and not to difficult, at least for smaller libraries and I suspect I'll make more use of this for any independent libraries that I create in the future. It is a manual process to set up and maintain, and slightly unfriendly to Visual Studio though, so I would wait until a library was complete before doing this, and I probably would not do it to product assemblies (for example to make WebCopy work on Windows XP again) although it is feasible.

All content Copyright © by Cyotek Ltd or its respective writers. Permission to reproduce news and web log entries and other RSS feed content in unmodified form without notice is granted provided they are not used to endorse or promote any products or opinions (other than what was expressed by the author) and without taking them out of context. Written permission from the copyright owner must be obtained for everything else.
Original URL of this content is http://www.cyotek.com/blog/targeting-multiple-versions-of-the-net-framework-from-the-same-project?source=rss


Working around "Cannot use JSX unless the '--jsx' flag is provided." using the TypeScript 1.6 beta

$
0
0

I've been using the utterly awesome ReactJS for a few weeks now. At the same time I started using React, I also switched to using TypeScript to work with JavaScript, due to it's type safety and less verbose syntax when creating modules and classes.

While I loved both products, one problem was they didn't gel together nicely. However, this is no longer the cause with the new TypeScript 1.6 Beta!

As soon as I got it installed, I created a new tsx file, dropped in an example component, then saved the file. A standard js file was generated containing the "normal" JavaScript version of the React component. Awesome!

Then I tried to debug the project, and was greeted with this error:

Build: Cannot use JSX unless the '--jsx' flag is provided.

In the Text Editor \ TypeScript \ Project \ General section of Visual Studio's Options dialog, I found an option for configuring the JSX emit mode, but this didn't seem to have any effect for the tsx file in my project.

Next, I started poking around the %ProgramFiles(x86)%\MSBuild\Microsoft\VisualStudio\v14.0\TypeScript folder. Inside Microsoft.TypeScript.targets, I found the following declaration

<TypeScriptBuildConfigurationsCondition="'$(TypeScriptJSXEmit)' != '' and '$(TypeScriptJSXEmit)' != 'none'">$(TypeScriptBuildConfigurations) --jsx $(TypeScriptJSXEmit)</TypeScriptBuildConfigurations>

Armed with that information I opened my csproj file in trusty Notepad++, and added the following

<PropertyGroup><TypeScriptJSXEmit>react</TypeScriptJSXEmit></PropertyGroup>

On reloading the project in Visual Studio, I found the build now completed without raising an error, and it was correctly generating the vanilla js and js.map files.

Fantastic news, now I just need to convert my jsx files to tsx files and be happy!

All content Copyright © by Cyotek Ltd or its respective writers. Permission to reproduce news and web log entries and other RSS feed content in unmodified form without notice is granted provided they are not used to endorse or promote any products or opinions (other than what was expressed by the author) and without taking them out of context. Written permission from the copyright owner must be obtained for everything else.
Original URL of this content is http://www.cyotek.com/blog/working-around-cannot-use-jsx-unless-the-jsx-flag-is-provided-using-the-typescript-1-6-beta?source=rss
Reading Adobe Swatch Exchange (ase) files using C#

$
0
0

Previously I wrote how to read and write files using the Photoshop Color Swatch file format. In this article mini-series, I'm now going to take a belated look at Adobe's Swatch Exchange file format and show how to read and write these files using C#. This first article covers reading an existing ase file.

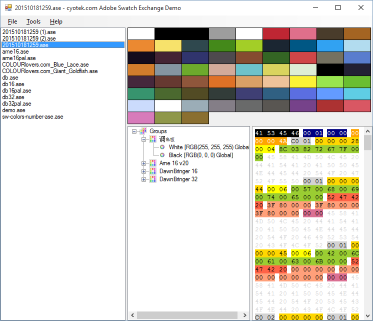
An example of an ASE file with a single group containing 5 RGB colours

Caveat Emptor

Unlike some of Adobe's other specifications, they don't seem to have published an official specification for the ase format themselves. For the purposes of this article, I've been using unofficial details available from Olivier Berten and HxD to poke around in sample files I have downloaded.

And, as with my previous articles, the code I'm about to present doesn't handle CMYK or Lab colour spaces. It's also received a very limited amount of testing.

Structure of a Adobe Swatch Exchange file

ase files support the notion of groups, so you can have multiple groups containing colours. Judging from the files I have tested, you can also just have a bunch of colours without a group at all. I'm uncertain if groups can be nested, so I have assumed they cannot be.

With that said, the structure is relatively straight forward, and helpfully includes data that means I can skip the bits that I have no idea at all what they are. The format comprises of a basic version header, then a number of blocks. Each block includes a type, data length, the block name, and then additional data specific to the block type, and optionally custom data specific to that particular block.

Blocks can either be a colour, the start of a group, or the end of a group.

Colour blocks include the colour space, 1-4 floating point values that describe the colour (3 for RGB and LAB, 4 for CMYK and 1 for grayscale), and a type.

Finally, all blocks can carry custom data. I have no idea what this data is, but it doesn't seem to be essential nor are you required to know what it is for in order to pull out the colour information. Fortunately, as you know how large each block is, you can skip the remaining bytes from the block and move onto the next one. As there seems to be little difference between the purposes of aco and ase files (the obvious one being that the former is just a list of colours while the latter supports grouping) I assume this data is meta data from the application that created the ase file, but it is all supposition.

The following table attempts to describe the layout, although I actually found the highlighted hex grid displayed at selapa.net to potentially be easier to read.

LengthDescription
4Signature
2Major Version
2Minor Version
4Number of blocks
variable

Block data

LengthDescription
2Type
4Block length
2Name length
(name length)Name

Colour blocks only

LengthDescription
4Colour space
12 (RGB, LAB), 16 (CMYK), 4 (Grayscale)Colour data. Every four bytes represents one floating point value
2Colour type

All blocks

LengthDescription
variable (Block length - previously read data)Unknown

As with aco files, all the data in an ase file is stored in big-endian format and therefore needs to be reversed on Windows systems. Unlike the aco files where four values are present for each colour even if not required by the appropriate colour space, the ase format uses between one and four values, making it slightly more compact that aso.

Colour Spaces

I mentioned above that each colour has a description of what colour space it belongs to. There appear to be four supported colour spaces. Note that space names are 4 characters long in an ase file, shorter names are therefore padded with spaces.

  • RGB
  • LAB
  • CMYK
  • Gray

In my experiments, RGB was easy enough - just multiply the value read from the file by 255 to get the right value to use with .NET's Color structure. I have no idea on the other 3 types however - I need more samples!

Big-endian conversion

I covered the basics of reading shorts, ints, and strings in big-endian format in my previous article on aco files so I won't cover that here.

However, this time around I do need to read floats from the files too. While the BitConverter class has a ToSingle method that will convert a 4-byte array to a float, of course it is for little-endian.

I looked at the reference source for this method and saw it does a really neat trick - it converts the four bytes into an integer, then creates a float from that integer via pointers.

So, I used the same approach - read an int in big-endian, then convert it to a float. The only caveat is that you are using pointers, meaning unsafe code. By default you can't use the unsafe keyword without enabling a special option in project properties. I use unsafe code quite frequently for working with image data and generally don't have a problem, if you are unwilling to enable this option then you can always take the four bytes, reverse them, and then call BitConverter.ToSingle with the reversed array.

publicstaticfloat ReadSingleBigEndian(this Stream stream)
{unsafe
  {int value;

    value = stream.ReadUInt32BigEndian();

    return *(float*)&value;
  }
}

Another slight difference between aco and ase files is that in ase files, strings are null terminated, and the name length includes that terminator. Of course, when reading the strings back out, we really don't want that terminator to be included. So I added another helper method to deal with that.

publicstaticstring ReadStringBigEndian(this Stream stream)
{int length;string value;// string is null terminated, value saved in file includes the terminator

  length = stream.ReadUInt16BigEndian() - 1;
  value = stream.ReadStringBigEndian(length);
  stream.ReadUInt16BigEndian(); // read and discard the terminatorreturn value;
}

Storage classes

In my previous examples on reading colour data from files, I've kept it simple and returned arrays of colours, discarding incidental details such as names. This time, I've created a small set of helper classes, to preserve this information and to make it easier to serialize it.

internalabstractclass Block
{publicbyte[] ExtraData { get; set; }publicstring Name { get; set; }
}internalclass ColorEntry : Block
{publicint B { get; set; }publicint G { get; set; }publicint R { get; set; }public ColorType Type { get; set; }public Color ToColor()
  {return Color.FromArgb(this.R, this.G, this.B);
  }
}internalclass ColorEntryCollection : Collection<ColorEntry>
{ }internalclass ColorGroup : Block, IEnumerable<ColorEntry>
{public ColorGroup()
  {this.Colors = new ColorEntryCollection();
  }public ColorEntryCollection Colors { get; set; }public IEnumerator<ColorEntry> GetEnumerator()
  {returnthis.Colors.GetEnumerator();
  }

  IEnumerator IEnumerable.GetEnumerator()
  {
    returnthis.GetEnumerator();
  }
}internalclass ColorGroupCollection : Collection<ColorGroup>
{ }internalclass SwatchExchangeData
{public SwatchExchangeData()
  {this.Groups = new ColorGroupCollection();this.Colors = new ColorEntryCollection();
  }public ColorEntryCollection Colors { get; set; }public ColorGroupCollection Groups { get; set; }
}

That should be all we need, time to load some files!

Reading the file

To start with, we create a new ColorEntryCollection that will be used for global colours (i.e. colour blocks that don't appear within a group). To make things simple, I'm also creating a Stack<ColorEntryCollection> to which I push this global collection. Later on, when I encounter a start group block, I'll Push a new ColorEntryCollection to this stack, and when I encounter an end group block, I'll Pop the value at the top of the stack. This way, when I encounter a colour block, I can easily add it to the right collection without needing to explicitly keep track of the active group or lack thereof.

publicvoid Load(string fileName)
{
  Stack<ColorEntryCollection> colors;
  ColorGroupCollection groups;
  ColorEntryCollection globalColors;

  groups = new ColorGroupCollection();
  globalColors = new ColorEntryCollection();
  colors = new Stack<ColorEntryCollection>();// add the global collection to the bottom of the stack to handle color blocks outside of a group
  colors.Push(globalColors);using (Stream stream = File.OpenRead(fileName))
  {int blockCount;this.ReadAndValidateVersion(stream);

    blockCount = stream.ReadUInt32BigEndian();

    for (int i = 0; i < blockCount; i++)
    {this.ReadBlock(stream, groups, colors);
    }
  }this.Groups = groups;this.Colors = globalColors;
}

After opening a Stream containing our file data, we need to check that the stream contains both ase data, and that the data is a version we can read. This is done by reading 8 bytes from the start of the data. The first four are ASCII characters which should match the string ASEF, the next two are the major version and the final two the minor version.

privatevoid ReadAndValidateVersion(Stream stream)
{string signature;int majorVersion;int minorVersion;// get the signature (4 ascii characters)
  signature = stream.ReadAsciiString(4);if (signature != "ASEF")
  {thrownew InvalidDataException("Invalid file format.");
  }// read the version
  majorVersion = stream.ReadUInt16BigEndian();
  minorVersion = stream.ReadUInt16BigEndian();if (majorVersion != 1 && minorVersion != 0)
  {thrownew InvalidDataException("Invalid version information.");
  }
}

Assuming the data is valid, we read the number of blocks in the file, and enter a loop to process each block. For each block, first we read the type of the block, and then the length of the block's data.

How we continue reading from the stream depends on the block type (more on that later), after which we work out how much data is left in the block, read it, and store it as raw bytes on the off-chance the consuming application can do something with it, or for saving back into the file.

This technique assumes that the source stream is seekable. If this is not the case, you'll need to manually keep track of how many bytes you have read from the block to calculate the remaining custom data left to read.

privatevoid ReadBlock(Stream stream, ColorGroupCollection groups, Stack<ColorEntryCollection> colorStack)
{
  BlockType blockType;int blockLength;int offset;int dataLength;
  Block block;

  blockType = (BlockType)stream.ReadUInt16BigEndian();
  blockLength = stream.ReadUInt32BigEndian();

  // store the current position of the stream, so we can calculate the offset// from bytes read to the block length in order to skip the bits we can't use
  offset = (int)stream.Position;// process the actual blockswitch (blockType)
  {case BlockType.Color:
      block = this.ReadColorBlock(stream, colorStack);break;case BlockType.GroupStart:
      block = this.ReadGroupBlock(stream, groups, colorStack);break;case BlockType.GroupEnd:
      block = null;
      colorStack.Pop();break;default:thrownew InvalidDataException($"Unsupported block type '{blockType}'.");
  }// load in any custom data and attach it to the// current block (if available) as raw byte data
  dataLength = blockLength - (int)(stream.Position - offset);if (dataLength > 0)
  {byte[] extraData;

    extraData = newbyte[dataLength];
    stream.Read(extraData, 0, dataLength);if (block != null)
    {
      block.ExtraData = extraData;
    }
  }
}

Processing groups

If we have found a "start group" block, then we create a new ColorGroup object and read the group name. We also push the group's ColorEntryCollection to the stack I mentioned earlier.

private Block ReadGroupBlock(Stream stream, ColorGroupCollection groups, Stack<ColorEntryCollection> colorStack)
{
  ColorGroup block;string name;// read the name of the group
  name = stream.ReadStringBigEndian();// create the group and add it to the results set
  block = new ColorGroup
  {
    Name = name
  };

  groups.Add(block);

  // add the group color collection to the stack, so when subsequent colour blocks// are read, they will be added to the correct collection
  colorStack.Push(block.Colors);return block;
}

For "end group" blocks, we don't do any custom processing as I do not think there is any data associated with these. Instead, we just pop the last value from our colour stack. (Of course, that means if there is a malformed ase file containing a group end without a group start, this procedure is going to crash sooner or later!

Processing colours

When we hit a colour block, we read the colour's name and the colour mode.

Then, depending on the mode, we read between 1 and 4 float values which describe the colour. As anything other than RGB processing is beyond the scope of this article, I'm throwing an exception for the LAB, CMYK and Gray colour spaces.

For RGB colours, I take each value and multiple it by 255 to get a value suitable for use with the .NET Color struct.

After reading the colour data, there's one official value left to read, which is the colour type. This can either be Global (0), Spot (1) or Normal (2).

Finally, I construct a new ColorEntry object containing the colour information and add it to whatever ColorEntryCollection is on the top of the stack.

private Block ReadColorBlock(Stream stream, Stack<ColorEntryCollection> colorStack)
{
  ColorEntry block;string colorMode;int r;int g;int b;
  ColorType colorType;string name;
  ColorEntryCollection colors;// get the name of the color// this is stored as a null terminated string// with the length of the byte data stored before// the string data in a 16bit int
  name = stream.ReadStringBigEndian();// get the mode of the color, which is stored// as four ASCII characters
  colorMode = stream.ReadAsciiString(4);// read the color data// how much data we need to read depends on the// color mode we previously readswitch (colorMode)
  {case"RGB ":// RGB is comprised of three floating point values ranging from 0-1.0float value1;float value2;float value3;
      value1 = stream.ReadSingleBigEndian();
      value2 = stream.ReadSingleBigEndian();
      value3 = stream.ReadSingleBigEndian();
      r = Convert.ToInt32(value1 * 255);
      g = Convert.ToInt32(value2 * 255);
      b = Convert.ToInt32(value3 * 255);break;case"CMYK":// CMYK is comprised of four floating point valuesthrownew InvalidDataException($"Unsupported color mode '{colorMode}'.");case"LAB ":// LAB is comprised of three floating point valuesthrownew InvalidDataException($"Unsupported color mode '{colorMode}'.");case"Gray":// Grayscale is comprised of a single floating point valuethrownew InvalidDataException($"Unsupported color mode '{colorMode}'.");default:thrownew InvalidDataException($"Unsupported color mode '{colorMode}'.");
  }// the final "official" piece of data is a color type
  colorType = (ColorType)stream.ReadUInt16BigEndian();

  block = new ColorEntry
  {
    R = r,
    G = g,
    B = b,
    Name = name,
    Type = colorType
  };

  colors = colorStack.Peek();
  colors.Add(block);

  return block;
}

And done

An example of a group-less ASE file

The ase format is pretty simple to process, although the fact there is still data in these files with an unknown purpose could be a potential issue. Unfortunately, I don't have a recent version of PhotoShop to actually generate some of these files to investigate further (and to test if groups can be nested so I can adapt this code accordingly).

However, I have tested this code on a number of files downloaded from the internet and have been able to pull out all the colour information, so I suspect the Color Palette Editor and Color Picker Controls will be getting ase support fairly soon!

Downloads

All content Copyright © by Cyotek Ltd or its respective writers. Permission to reproduce news and web log entries and other RSS feed content in unmodified form without notice is granted provided they are not used to endorse or promote any products or opinions (other than what was expressed by the author) and without taking them out of context. Written permission from the copyright owner must be obtained for everything else.
Original URL of this content is http://www.cyotek.com/blog/reading-adobe-swatch-exchange-ase-files-using-csharp?source=rss

Writing Adobe Swatch Exchange (ase) files using C#

$
0
0

In my last post, I described how to read Adobe Swatch Exchange files using C#. Now I'm going to update that sample program to save ase files as well as load them.

An example of a multi-group ASE file created by the sample application

Writing big endian values

I covered the basics of writing big-endian values in my original post on writing Photoshop aco files, so I'll not cover that again but only mention the new bits.

Firstly, we now need to store float values. I mentioned the trick that BitConverter.ToSingle does where it converts a int to a pointer, and then the pointer to a float. I'm going to do exactly the reverse in order to write the float to a stream - convert the float to a pointer, then convert it to an int, then write the bytes of the int.

publicstaticvoid WriteBigEndian(this Stream stream, float value)
{unsafe
  {
    stream.WriteBigEndian(*(int*)&value);
  }
}

We also need to store unsigned 2-byte integers, so we have another extension for that.

publicstaticvoid WriteBigEndian(this Stream stream, ushort value)
{
  stream.WriteByte((byte)(value >> 8));
  stream.WriteByte((byte)(value >> 0));
}

Finally, lets not forget our length prefixed strings!

publicstaticvoid WriteBigEndian(this Stream stream, string value)
{byte[] data;

  data = Encoding.BigEndianUnicode.GetBytes(value);

  stream.WriteBigEndian(value.Length);
  stream.Write(data, 0, data.Length);
}

Saving the file

I covered the format of an ase file in the previous post, so I won't cover that again either. In summary, you have a version header, a block count, then a number of blocks - of which a block can either be a group (start or end) or a colour.

Saving the version header is rudimentry

privatevoid WriteVersionHeader(Stream stream)
{
  stream.Write("ASEF");
  stream.WriteBigEndian((ushort)1);
  stream.WriteBigEndian((ushort)0);
}

After this, we write the number of blocks, then cycle each group and colour in our document.

privatevoid WriteBlocks(Stream stream)
{int blockCount;

  blockCount = (this.Groups.Count * 2) + this.Colors.Count + this.Groups.Sum(group => group.Colors.Count);

  stream.WriteBigEndian(blockCount);

  // write the global colors first// not sure if global colors + groups is a supported combination howeverforeach (ColorEntry color inthis.Colors)
  {this.WriteBlock(stream, color);
  }// now write the groupsforeach (ColorGroup groupinthis.Groups)
  {this.WriteBlock(stream, group);
  }
}

Writing a block is slightly complicated as you need to know - up front - the final size of all of the data belonging to that block. Originally I wrote the block to a temporary MemoryStream, then copied the length and the data into the real stream but that isn't a very efficient approach, so now I just calculate the block size.

Writing Groups

If you recall from the previous article, a group is comprised of at least two blocks - one that starts the group (and includes the name), and one that finishes the group. There can also be any number of colour blocks in between. Potentially you can have nested groups, but I haven't coded for this - I need to grab myself a Creative Cloud subscription and experiment with ase files, at which point I'll update these samples if need be.

privateint GetBlockLength(Block block)
{int blockLength;// name data (2 bytes per character + null terminator, plus 2 bytes to describe that first number )
  blockLength = 2 + (((block.Name ?? string.Empty).Length + 1) * 2);if (block.ExtraData != null)
  {
    blockLength += block.ExtraData.Length; // data we can't process but keep anyway
  }return blockLength;
}privatevoid WriteBlock(Stream stream, ColorGroup block)
{int blockLength;

  blockLength = this.GetBlockLength(block);// write the start group block
  stream.WriteBigEndian((ushort)BlockType.GroupStart);
  stream.WriteBigEndian(blockLength);this.WriteNullTerminatedString(stream, block.Name);this.WriteExtraData(stream, block.ExtraData);// write the colors in the groupforeach (ColorEntry color in block.Colors)
  {this.WriteBlock(stream, color);
  }// and write the end group block
  stream.WriteBigEndian((ushort)BlockType.GroupEnd);
  stream.WriteBigEndian(0); // there isn't any data, but we still need to specify that
}

Writing Colours

Writing a colour block is fairly painless, at least for RGB colours. As with loading an ase file, I'm completely ignoring the existence of Lab, CMYK and Gray scale colours.

privateint GetBlockLength(ColorEntry block)
{int blockLength;

  blockLength = this.GetBlockLength((Block)block);

  blockLength += 6; // 4 bytes for the color space and 2 bytes for the color type// TODO: Include support for other color spaces

  blockLength += 12; // length of RGB data (3 * 4 bytes)return blockLength;
}privatevoid WriteBlock(Stream stream, ColorEntry block)
{int blockLength;

  blockLength = this.GetBlockLength(block);

  stream.WriteBigEndian((ushort)BlockType.Color);
  stream.WriteBigEndian(blockLength);this.WriteNullTerminatedString(stream, block.Name);

  stream.Write("RGB ");

  stream.WriteBigEndian((float)(block.R / 255.0));
  stream.WriteBigEndian((float)(block.G / 255.0));
  stream.WriteBigEndian((float)(block.B / 255.0));

  stream.WriteBigEndian((ushort)block.Type);this.WriteExtraData(stream, block.ExtraData);
}

Caveats, or why this took longer than it should have done

When I originally tested this code, I added a simple compare function which compared the bytes of a source ase file with a version written by the new code. For two of the three samples I was using, this was fine, but for the third the files didn't match. As this didn't help me in any way diagnose the issue, I ended up writing a very basic (and inefficient!) hex viewer, artfully highlighted using the same colours as the ase format description on sepla.net.

Comparing a third party ASE file with the version created by the sample application

This allowed me to easily view the files side by side and be able to break the files down into their sections and see what was wrong. The example screenshot above shows an identical comparison.

Another compare of a third party ASE file with the version created by the sample application, showing the colour data is the same, but the raw file differs

With that third sample file, it was more complicated. In the first case, the file sizes were different - the hex viewer very clearly showed that the sample file has 3 extra null bytes at the end of the file, which my version doesn't bother writing. I'm not entirely sure what these bytes are for, but I can't imagine they are official as it's an odd number.

The second issue was potentially more problematic. In the screenshot above, you can see all the orange values which are the float point representations of the RGB colours, and the last byte of each of these values does not match. However, the translated RGB values do match, so I guess it is a rounding / precision issue.

When I turn this into something more production ready, I will probably store the original floating point values and write them back, rather than loosing precision by converting them to integers (well, bytes really as the range is 0-255) and back again.

On with the show

The updated demonstration application is available for download below, including new sample files generated directly by the program.

Downloads

All content Copyright © by Cyotek Ltd or its respective writers. Permission to reproduce news and web log entries and other RSS feed content in unmodified form without notice is granted provided they are not used to endorse or promote any products or opinions (other than what was expressed by the author) and without taking them out of context. Written permission from the copyright owner must be obtained for everything else.
Original URL of this content is http://www.cyotek.com/blog/writing-adobe-swatch-exchange-ase-files-using-csharp?source=rss

Rotating an array using C#

$
0
0

I've recently been working on a number of small test programs for the different sections which make up a game I'm planning on writing. One of these test systems involved a series of polyominoes which I needed to rotate. Internally, the data for these shapes are stored as a simple boolean array, which I access as though it were two dimensions.

One of the requirements was that the player needs to be able to rotate these shapes at 90° intervals, and so there were two ways I could have solved this

  • Define pre-rotated versions of all shapes
  • Rotate the shapes on the fly

Clearly, I went with option two otherwise there would be no need for this article! I choose not to go with the pre-rotated approach, as firstly I'm using a lot of shapes and creating up to 4 versions of each of these is not really worthwhile, and secondly I don't want to store them either, or have to care which orientation is currently in use.

This article describes how to rotate a 2D array in fixed 90° intervals, and also how to rotate 1D arrays that masquerade as 2D arrays.

Note: The code in this article will only work with rectangle arrays. I don't usually use jagged arrays, so this code has no special provisions to work with them.

A demonstration program rotating arrays representing tetrominoes

Creating a simple sample

First up, we need an array to rotate. For the purposes of our demo, we'll use the following array - note that the width and the height of the array don't match.

bool[,] src;

src = newbool[2, 3];

src[0, 0] = true;
src[0, 1] = true;
src[0, 2] = true;
src[1, 2] = true;

We can visualize the contents of the array but dumping it in a friendly fashion to the console

privatestaticvoid PrintArray(bool[,] src)
{int width;int height;

  width = src.GetUpperBound(0);
  height = src.GetUpperBound(1);

  for (int row = 0; row < height + 1; row++)
  {for (int col = 0; col < width + 1; col++)
    {char c;

      c = src[col, row] ? '#' : '.';

      Console.Write(c);
    }

    Console.WriteLine();
  }

  Console.WriteLine();
}

PrintArray(src);

All of which provides the following stunning output

#.
#.
##

Rotating the array clockwise

The original program used to test rotating an array

This function will rotate an array 90° clockwise

privatestaticbool[,] RotateArrayClockwise(bool[,] src)
{int width;int height;bool[,] dst;

  width = src.GetUpperBound(0) + 1;
  height = src.GetUpperBound(1) + 1;
  dst = newbool[height, width];for (int row = 0; row < height; row++)
  {for (int col = 0; col < width; col++)
    {int newRow;int newCol;

        newRow = col;
        newCol = height - (row + 1);

        dst[newCol, newRow] = src[col, row];
    }
  }

  return dst;
}

How does it work? First we get the width and height of the array using the GetUpperBound method of the Array class. As arrays are zero based, we add 1 to each of these results, otherwise the new array will be too small to hold the data.

Next, we create a new array - with the width and height ready previously swapped, allowing us to correctly handle non-square arrays.

Finally, we loop through each row and each column. For each entry, we calculate the new row and column, then assign the value from the source array to the transposed location in the destination array

  • To calculate the new row, we simply set the row to the existing column value
  • To calculate the new column, we take the current row, add one to it, then subtract that value from the original array's height

If we now call RotateArrayClockwise using our source array, we'll get the following output

###
#..

Perfect!

Rotating the array anti-clockwise

Rotating the array anti-clockwise (or counter clockwise depending on your terminology) uses most of the same code as previous, but the calculation for the new row and column is slightly different

newRow = width - (col + 1);
newCol = row;
  • To calculate the new row we take the current column, add one to it, then subtract that value from the original array's width
  • The new column is the current row

Using our trusty source array, this is what we get

..#
###

Rotating 1D arrays

Rotating a 1D array follows the same principles outlined above, with the following differences

  • As the array has only a single dimension, you cannot get the width and the height automatically - you must know these in advance
  • When calculating the new index position using row-major order remember that as the width and the height have been swapped, the calculation will be something similar to newIndex = newRow * height + newCol

The following functions show how I rotate a 1D boolean array.

public Polyomino RotateAntiClockwise()
{returnthis.Rotate(false);
}public Polyomino RotateClockwise()
{returnthis.Rotate(true);
}private Polyomino Rotate(bool clockwise)
{byte width;byte height;bool[] result;bool[] matrix;

  matrix = this.Matrix;
  width = this.Width;
  height = this.Height;
  result = newbool[matrix.Length];for (int row = 0; row < height; row++)
  {for (int col = 0; col < width; col++)
    {int index;

      index = row * width + col;

      if (matrix[index])
      {int newRow;int newCol;int newIndex;if (clockwise)
        {
          newRow = col;
          newCol = height - (row + 1);
        }else
        {
          newRow = width - (col + 1);
          newCol = row;
        }

        newIndex = newRow * height + newCol;

        result[newIndex] = true;
      }
    }
  }returnnew Polyomino(result, height, width);
}

Downloads

All content Copyright © by Cyotek Ltd or its respective writers. Permission to reproduce news and web log entries and other RSS feed content in unmodified form without notice is granted provided they are not used to endorse or promote any products or opinions (other than what was expressed by the author) and without taking them out of context. Written permission from the copyright owner must be obtained for everything else.
Original URL of this content is http://www.cyotek.com/blog/rotating-an-array-using-csharp?source=rss

Tools we use - 2015 edition

$
0
0

Happy New Year! It's almost becoming a tradition now to list all of the development tools and bits that I've been using over the past year, to see how things are changing. 2015 wasn't the best of years at a personal level, but despite it all I've been learning new things and looking into new tools and ways of working.

Operating Systems

  • Windows Home Server 2011 - file server, SVN repository, backup host, CI server
  • Windows 10 Professional - development machine
  • Windows XP (virtualized) - testing
  • Windows Vista (virtualized) - testing

Development Tools

  • New!Postman is a absolutely brilliant client for testing REST services.
  • Visual Studio 2015 Premium - not much to say
  • .NET Reflector - controversy over free vs paid aside, this is still worth the modest cost for digging behind the scenes when you want to know how the BCL works.
  • New!DotPeek - a decent replacement to .NET Reflector that can view things that Reflector can't, making it a worthwhile replacement despite some bugs and being chronically slow to start
  • New!Gulp - I use this to minify and combine JavaScript and CSS files
  • New!TypeScript - makes writing JavaScript just that much nicer, and the new React support is just icing on the cake

Visual Studio Extensions

  • Cyotek Add Projects - a simple extension I created that I use pretty much any time I create a new solution to add references to my standard source code libraries. Saves me time and key presses, which is good enough for me!
  • OzCocde - this is one of the tools you wonder why isn't in Visual Studio by default
  • .NET Demon - yet another wonderful tool that helps speed up your development, this time by not slowing you down waiting for compiles. Unfortunately it's no longer supported by RedGate as apparently VS2015 will do this. VS2015 doesn't do all of this, and I really miss build on save.
  • VSCommands 2013 (not updated for VS2015)
  • New!EditorConfig - useful for OSS projects to avoid space-vs-tab wars
  • New!File Nesting - allows you to easily nest files, great for TypeScript
  • New!Open Command Line - easily open command prompts, PowerShell prompts, or other tools to your project / solution directories
  • New!VSColorOutput - I use this to colour my output window, means I don't miss VSCommands at all!
  • Indent Guides
  • Resharper - originally as a replacement for Regionerate, this swiftly became a firm favourite every time it told me I was doing something stupid.
  • NCrunch for Visual Studio - (version 2!) automated parallel continuous testing tool. Works with NUnit, MSTest and a variety of other test systems. Great for TDD and picking up how a simple change you made to one part of your project completely destroys another part. We've all been there!

Analytics

  • Innovasys Lumitix - we've been using this for years now in an effort to gain some understanding in how our products are used by end users. I keep meaning to write a blog post on this, maybe I'll get around to that in 201456!

Profiling

  • ANTS Performance Profiler - the best profiler I've ever used. The bottlenecks and performance issues this has helped resolve with utter ease is insane. It. Just. Works.

Documentation Tools

  • Innovasys Document! X - Currently we use this to produce the user manuals for our applications.
  • SubMain GhostDoc Pro - Does a slightly better job of auto generating XML comment documentation thatn doing it fully from scratch. Actually, barley use this now, the way it litters my code folders with XML files when I don't use any functionality bar auto-document is starting to more than annoy me.
  • New!Atomineer Pro Documentation - having finally gotten fed up of GhostDoc's bloat and annoying config files, I replaced it with Atomineer, finding this tool to be much better for my needs
  • MarkdownPad Pro - fairly decent Markdown editor that is currently better than our own so I use it instead! Doesn't work properly with Windows 10, doesn't seem to be getting supported or updated
  • New!MarkdownEdit - a no frills minimalist markdown editor that I have been using
  • Notepad++ - because Notepad hasn't changed in 20 years (moving menu items around doesn't count!)

Graphics Tools

  • Paint.NET - brilliant bitmap editor with extensive plugins
  • Axialis IconWorkshop - very nice icon editor, been using this for untold years now since Microangelo decided to become the Windows Paint of icon editing
  • Cyotek Spriter - sprite / image map generation software
  • Cyotek Gif Animator - gif animation creator that is shaping up nicely, although I'm obviously biased.

Virtualization

  • Oracle VM VirtualBox - for creating guest OS's for testing purposes. Cyotek software is informally smoke tested mainly on Windows XP, but occasionally Windows Vista. Visual Studio 2013 installed Hyper-V, but given as the VirtualBox VM's have been running for years with no problems, this is disabled. Still need to switch back to Hyper-V if I want to be able to do any mobile development. Which I do.

Version Control

File/directory comparison

  • WinMerge - not much to say, it works and works well

File searching

  • WinGrep - previously I just used to use Notepad++'s search in files but... this is a touch simpler all around

Backups

  • Cyotek CopyTools - we use this for offline backups of source code, assets and resources, documents, actually pretty much anything we generate; including backing up the backups!
  • CrashPlan - CrashPlan creates an online backup of the different offline backups that CopyTools does. If you've ever lost a harddisk before with critical data on it that's nowhere else, you'll have backups squirrelled away everywhere too!

All content Copyright © by Cyotek Ltd or its respective writers. Permission to reproduce news and web log entries and other RSS feed content in unmodified form without notice is granted provided they are not used to endorse or promote any products or opinions (other than what was expressed by the author) and without taking them out of context. Written permission from the copyright owner must be obtained for everything else.
Original URL of this content is http://www.cyotek.com/blog/tools-we-use-2015-edition?source=rss

Reading and writing farbfeld images using C#

$
0
0

Normally when I load textures in OpenGL, I have a PNG file which I load into a System.Drawing.Bitmap and from there I pull out the bytes and pass to glTexImage2D. It works, but seems a bit silly having to create the bitmap in the first place. For this reason, I was toying with the idea of creating a very simple image format so I could just read the data directly without requiring intermediate objects.

While mulling this idea over, I spotted an article on Hacker News describing a similar and simple image format named farbfeld. This format by suckless.org is described as "a lossless image format which is easy to parse, pipe and compress".

Not having much else to do on a Friday night, I decided I'd write a C# encoder and decoder for this format, along with a basic GUI app for viewing and converting farbfeld images.

A simple program for viewing and converting farbfeld images.

The format

BytesDescription
8"farbfeld" magic value
432-Bit BE unsigned integer (width)
432-Bit BE unsigned integer (height)
[2222]4x16-Bit BE unsigned integers [RGBA] / pixel, row-aligned

As you can see, it's about as simple as you can get, barring the big-endian encoding I suppose. The main thing we have to worry about is that farbeld stores RGBA values in the range 0-65535, whereas in .NET-land we tend to use 0-255.

Decoding an image

Decoding an image is fairly straight forward. The difficult part is turning those values into a .NET image in a fast manner.

publicbool IsFarbfeldImage(Stream stream)
{byte[] buffer;

  buffer = newbyte[8];

  stream.Read(buffer, 0, buffer.Length);

  return buffer[0] == 'f'&& buffer[1] == 'a'&& buffer[2] == 'r'&& buffer[3] == 'b'&& buffer[4] == 'f'&& buffer[5] == 'e'&& buffer[6] == 'l'&& buffer[7] == 'd';
}public Bitmap Decode(Stream stream)
{int width;int height;int length;
  ArgbColor[] pixels;

  width = stream.ReadUInt32BigEndian();
  height = stream.ReadUInt32BigEndian();
  length = width * height;
  pixels = this.ReadPixelData(stream, length);returnthis.CreateBitmap(width, height, pixels);
}private ArgbColor[] ReadPixelData(Stream stream, int length)
{
  ArgbColor[] pixels;

  pixels = new ArgbColor[length];for (int i = 0; i < length; i++)
  {int r;int g;int b;int a;

    r = stream.ReadUInt16BigEndian() / 256;
    g = stream.ReadUInt16BigEndian() / 256;
    b = stream.ReadUInt16BigEndian() / 256;
    a = stream.ReadUInt16BigEndian() / 256;

    pixels[i] = new ArgbColor(a, r, g, b);
  }return pixels;
}private Bitmap CreateBitmap(int width, int height, IList<ArgbColor> pixels)
{
  Bitmap bitmap;
  BitmapData bitmapData;

  bitmap = new Bitmap(width, height, PixelFormat.Format32bppArgb);

  bitmapData = bitmap.LockBits(new Rectangle(0, 0, width, height), ImageLockMode.ReadWrite, PixelFormat.Format32bppArgb);unsafe
  {
    ArgbColor* pixelPtr;

    pixelPtr = (ArgbColor*)bitmapData.Scan0;

    for (int i = 0; i < width * height; i++)
    {
      *pixelPtr = pixels[i];
      pixelPtr++;
    }
  }

  bitmap.UnlockBits(bitmapData);

  return bitmap;
}

Encoding an image

As with decoding, the difficult of encoding mainly lies in getting the pixel data quickly. In this implementation, only 32bit RGBA images are supported. I will update it at some point to support other colour depths (or at the very least add a hack to convert lesser depths to 32bpp).

publicvoid Encode(Stream stream, Bitmap image)
{int width;int height;
  ArgbColor[] pixels;

  stream.WriteByte((byte)'f');
  stream.WriteByte((byte)'a');
  stream.WriteByte((byte)'r');
  stream.WriteByte((byte)'b');
  stream.WriteByte((byte)'f');
  stream.WriteByte((byte)'e');
  stream.WriteByte((byte)'l');
  stream.WriteByte((byte)'d');

  width = image.Width;
  height = image.Height;

  stream.WriteBigEndian(width);
  stream.WriteBigEndian(height);

  pixels = this.GetPixels(image);foreach (ArgbColor pixel in pixels)
  {ushort r;ushort g;ushort b;ushort a;

    r = (ushort)(pixel.R * 256);
    g = (ushort)(pixel.G * 256);
    b = (ushort)(pixel.B * 256);
    a = (ushort)(pixel.A * 256);

    stream.WriteBigEndian(r);
    stream.WriteBigEndian(g);
    stream.WriteBigEndian(b);
    stream.WriteBigEndian(a);
  }
}

private ArgbColor[] GetPixels(Bitmap bitmap)
{int width;int height;
  BitmapData bitmapData;
  ArgbColor[] results;

  width = bitmap.Width;
  height = bitmap.Height;
  results = new ArgbColor[width * height];
  bitmapData = bitmap.LockBits(new Rectangle(0, 0, width, height), ImageLockMode.WriteOnly, PixelFormat.Format32bppArgb);unsafe
  {
    ArgbColor* pixel;

    pixel = (ArgbColor*)bitmapData.Scan0;

    for (int row = 0; row < height; row++)
    {for (int col = 0; col < width; col++)
      {
        results[row * width + col] = *pixel;

        pixel++;
      }
    }
  }

  bitmap.UnlockBits(bitmapData);

  return results;
}

Nothing complicated

As you can see, it's a remarkably simple format and very easy to process. However, it does mean that images tend to be large - in my testing a standard HD image was 16MB for example. Of course, as you'll probably be using this for some specific process you'll be able to handle compression yourself.

After further reflection, I decided I wouldn't be using this format as it wouldn't quite fit my OpenGL scenario, as OpenGL (or at least the bits I'm familiar with) expect an array of bytes, one per channel, unlike farbfeld which uses two (and the larger value range as mentioned at the start). But I took the source I wrote for farbfeld, refactored it to use single bytes (and little-endian encoding for the other values), and that way I could just do something like this

byte[] pixels;int length;

width = stream.ReadUInt32LittleEndian();
height = stream.ReadUInt32LittleEndian();
length = width * height * 4;
pixels = newbyte[length];
stream.Read(pixels, 0, length);

GL.TexImage2D(TextureTarget.Texture2D, 0, PixelInternalFormat.Rgba, width, height, 0, PixelFormat.Rgba, PixelType.UnsignedByte, pixels);

No System.Drawing.Bitmap, decoder class or complicated decoding required!

The full source

The source presented here is abridged, you can get the full version from the GitHub repository.

All content Copyright © by Cyotek Ltd or its respective writers. Permission to reproduce news and web log entries and other RSS feed content in unmodified form without notice is granted provided they are not used to endorse or promote any products or opinions (other than what was expressed by the author) and without taking them out of context. Written permission from the copyright owner must be obtained for everything else.
Original URL of this content is http://www.cyotek.com/blog/reading-and-writing-farbfeld-images-using-csharp?source=rss

Generating code using T4 templates

$
0
0

Recently I was updating a library that contains two keyed collection classes. These collections aren't the usual run-of-the-mill collections as they need to be able to support duplicate keys. Normally I'd inherit from KeyedCollection but as with most collection implementations, duplicate keys are not permitted in this class.

I'd initially solved the problem by simply creating my own base class to fit my requirements, and this works absolutely fine. However, this wasn't going to suffice as a long term solution as I don't want that base class to be part of a public API, especially a public API that has nothing to do with offering custom base collections to consumers.

Another way I could have solved the problem would be to just duplicate all that boilerplate code, but that was pretty much a last resort. If there's one thing I really don't like doing it's fixing the same bugs over and over again in duplicated code!

Then I remembered about T4 Templates, which has been a feature of Visual Studio for some time I believe. Previously my only interaction with them has been via PetaPoco, a rather marvellous library which generates C# classes based on a database model, provides a micro ORM, and has powered cyotek.com for years. This proved to be a nice solution for my collection issue, and I thought I'd document the process here, firstly as it's been a while since I blogged, and secondly as a reference for "next time".

Creating the template

First, we need to create a template. To do this from Visual Studio, open the Project menu and click Add New Item. The select Text Template from the list of templates, give it a name, and click Add.

This will create a simple file containing something similar to the following

<#@ template debug="false" hostspecific="false" language="C#" #><#@ assembly name="System.Core" #><#@ import namespace="System.Linq" #><#@ import namespace="System.Text" #><#@ import namespace="System.Collections.Generic" #><#@ output extension=".txt" #>

A T4 template is basically the content you want to output, with one or more control blocks for dynamically changing the content. In other words, it's just like a Razor HTML file, WebForms, Classic ASP, PHP... the list is probably endless.

Each block is delimited by <# and #>, the @ symbols above are directives. We can use the = symbol to inject content. For example, if modify the template to include the following lines

<html><head><title><#=DateTime.Now#></title></head></html>

Save the file, then in the Project Explorer, expand the node for the file - by default the auto generated content will be nested beneath your template file, as with any other designer code. Open the generated file and you should see something like this

<html><head><title>03/12/2016 12:41:07</title></head></html>

Changing the file name

The name of the auto-generated file is based on the underlying template, so make sure your template is named appropriately. You can get the desired file extension by including the following directive in the template

<#@ output extension=".txt" #>

If no directive at all is present, then .cs will be used.

Including other files

So far, things are looking positive - we can create a template that will spit out our content, and dynamically manipulate it. But it's still one file, and in my use case I'll need at least two. Enter - the include directive. By including this directive, the contents of another file will be injected, allowing us to have multiple templates generated from one common file.

<#@ include file="CollectionBase.ttinclude" #>

If your include file makes use of variables, they are automatically inherited from the parent template, which is the key piece of magic I need.

Adding conditional logic

So far I've mentioned the <%@ ... %> directives, and the <%= ... %> insertion blocks. But what about if you want to include code for decision making, branching, and so on? For this, you use the <% ... %> syntax without any symbols on the opening delimiter. For example, I use the following code to include a certain using statement if a variable has been set

using System.Collections.Generic;<# if (UsePropertyChanged) { #>using System.ComponentModel;<# } #>

In the above example, the line using System.Collections.Generic; will always be written. On the other hand, the using System.ComponentModel; line will only be written if the UsePropertyChanged variable has been set.

Note: Remember that T4 templates are compiled and executed. So syntax errors in your C# code (such as forgetting to assign (or define) the UsePropertyChanged variable above) will cause the template generation to fail, and any related output files to be only partially generated, if at all.

Debugging templates

I haven't really tested this much, as my own templates were fairly straight forward and didn't have any complicated logic. However, you can stick breakpoints in your .tt or .ttinclude files, and then debug the template generation by context clicking the template file and choosing Debug T4 Template from the menu. For example, this may be useful if you create helper methods in your templates for performing calculations.

Putting it all together

The two collections I want to end up with are ColorEntryCollection and ColorEntryContainerCollection. Both will share a lot of boilerplate code, but also some custom code, so I'll need to include dedicated CS files in addition to the auto-generated ones.

To start with, I create my ColorEntryCollection.cs and ColorEntryContainerCollection.cs files with the following class definitions. Note the use of the partial keyword so I can have the classes built from multiple code files.

publicpartialclass ColorEntryCollection
{
}publicpartialclass ColorEntryContainerCollection
{
}

Next, I created two T4 template files, ColorEntryCollectionBase.tt and ColorEntryContainerCollectionBase.tt. I made sure these had different file names to avoid the auto-generated .cs files from overwriting the custom ones (I didn't test to see if VS handles this, better safe than sorry).

The contents of the ColorEntryCollectionBase.tt file looks like this

<#string ClassName = "ColorEntryCollection";string CollectionItemType = "ColorEntry";bool UsePropertyChanged = true;
#><#@ include file="CollectionBase.ttinclude" #>

The contents of ColorEntryContainerCollectionBase.tt are

<#string ClassName = "ColorEntryContainerCollection";string CollectionItemType = "ColorEntryContainer";bool UsePropertyChanged = false;
#><#@ include file="CollectionBase.ttinclude" #>

As you can see, the templates are very simple - basically just setting it up the key information that is required to generate the template, then including another file - and it is this file that has the true content.

The final piece of the puzzle therefore, was to create my CollectionBase.ttinclude file. I copied into this my original base class, then pretty much did a search and replace to replace hard coded class names to use T4 text blocks. The file is too big to include in-line in this article, so I've just included the first few lines to show how the different blocks fit together.

using System;using System.Collections;using System.Collections.Generic;<# if (UsePropertyChanged) { #>using System.ComponentModel;<# } #>namespace Cyotek.Drawing
{partialclass<#=ClassName#> : IList<<#=CollectionItemType#>>
  {privatereadonly IList<<#=CollectionItemType#>> _items;privatereadonly IDictionary<string, SmallList<<#=CollectionItemType#>>> _nameLookup;public<#=ClassName#>()
    {
      _items = new List<<#=CollectionItemType#>>();
      _nameLookup = new Dictionary<string, SmallList<<#=CollectionItemType#>>>(StringComparer.OrdinalIgnoreCase);
    }

All the <#=ClassName#> blocks get replaced with the ClassName value from the parent .tt file, as do the <#=CollectionItemType#> blocks. You can also see the UsePropertyChanged variable logic I described earlier for inserting a using statement - I used the same functionality in other places to include entire methods or just extra lines where appropriate.

Then it was just a case of right clicking the two .tt files I created earlier and selecting Run Custom Tool from the content menu which caused the contents of my two collections to be fully generated from the template. The only thing left to do was to then add the custom implementation code to the two main class definitions and job done.

I also used the same process to create a bunch of standard tests for those collections rather than having to duplicate those too.

That's all folks

Although normally you probably won't need this sort of functionality, the fact that it is built right into Visual Studio and so easy to use is pretty nice. It has certainly solved my collection issue and I'll probably use it again in the future.

While writing this article, I had a quick look around the MSDN documentation and there's plenty of advanced functionality you can use with template generation which I haven't covered, as just the basics were sufficient for me.

Although I haven't included the usual sample download with this article, I think it's straightforward enough that it doesn't need one. The final code will be available on our GitHub page at some point in the future, once I've finished adding more tests, and refactored a whole bunch of extremely awkwardly named classes.

All content Copyright © by Cyotek Ltd or its respective writers. Permission to reproduce news and web log entries and other RSS feed content in unmodified form without notice is granted provided they are not used to endorse or promote any products or opinions (other than what was expressed by the author) and without taking them out of context. Written permission from the copyright owner must be obtained for everything else.
Original URL of this content is http://www.cyotek.com/blog/generating-code-using-t4-templates?source=rss


SQL Woes - Mismatched parameter types in stored procedures

$
0
0

We had a report of crashes occurring for certain users when accessing a system. From the stack data in the production logs, a timeout was occurring when running a specific stored procedure. This procedure was written around 5 years ago and is in use in many customer databases without issue. Why would the same SQL suddenly start timing out in one particular database?

The stored procedure in question is called for users with certain permissions to highlight outstanding units of work that their access level permits them to do, and is a fairly popular (and useful) feature of the software.

After obtaining session information from the crash logs, it was time to run the procedure on a copy of the live database with session details. The procedure only reads information, but doing this on a copy helps ensure no ... accidents occur.

EXEC [Data].[GetX] @strSiteId = 'XXX', @strUserGroupId = 'XXX', @strUserName = 'XXX'

And it took... 27 seconds to return 13 rows. Not good, not good at all.

An example of a warning and explanation in a query plan

Viewing the query plan showed something interesting though - one of the nodes was flagged with a warning symbol, and when the mouse was hovered over it it stated

Type conversion in expression (CONVERT_IMPLICIT(nvarchar(50),[Pn].[SiteId],0)) may affect "CardinalityEstimate" in query plan choice

Time to check the procedure's SQL as there shouldn't actually be any conversions being done, let alone implicit ones.

I can't publish the full SQL in this blog, so I've chopped out all the table names and field names and used dummy aliases. The important bits for the purposes of this post are present though, although I apologize that it's less than readable now.

CREATEPROCEDURE [Data].[GetX]
  @strSiteId nvarchar (50)
, @strUserGroupId varchar (20)
, @strUserName nvarchar (50)ASBEGINSELECT [Al1].[X]
       , [Al1].[X]
       , [Al1].[X]
       , [Al1].[X]INTO [#Access]FROM [X].[X] [Al1]WHERE [Al1].[X] = @strUserNameAND [Al1].[X] = @strUserGroupIdAND [Al1].[X] = 1AND [Al1].[X] = 1SELECTDISTINCT [Pn].[Id] [X]FROM [Data].[X] [Pn] INNERJOIN [Data].[X] [Al2] ON [Al2].[X]      = [Pn].[Id]AND [Al2].[X]      = 0INNERJOIN [Data].[X] [Al3] ON [Al3].[X]      = [Al2].[Id]AND [Al3].[X]      = 0INNERJOIN [Data].[X] [Al4]ON [Al4].[X]      = [Al3].[Id]AND [Al4].[X]      = 0INNERJOIN [Data].[X] [Al5] ON [Al5].[X]     = [Al4].[Id]AND [Al5].[X]     = 0AND [Al5].[X]     = 1AND [Al5].[X]     = 0INNERJOIN [#Access] ON [#Access].[X] = [Al5].[X]AND [#Access].[X] = [Al2].[X]AND [#Access].[X] = [Al3].[X]AND [#Access].[X] = [Al4].[X]WHEREEXISTS (SELECT [X] FROM [X].[X] [Al6] WHERE [Al5].[X]   = [Al6].[X]AND [Al5].[X]   = [Al6].[X]AND [Al6].[X]   = 1
                         )AND [Pn].[SiteId] = @strSiteId;DROPTABLE [#Access]END;

The SQL is fairly straight forward - we join a bunch of different data tables together based on permissions, data status and where the [SiteId] column matches the lookup value, return return a unique list of core identifiers. With the exception of [SiteId] all those joins on [Id] columns are integers.

Yes, [SiteId] is the primary key in a table. Yes, I know it isn't a good idea using string keys. It was a design decision made over 8 years ago and I'm sure at some point these anomalies will be changed. But it's a side issue to what this post is about.

As the warning from the query plan is quite explicit about the column it's complaining about, it is now time to check the definition of the table containing the [SiteId] column. Again, I'm not at liberty to include anything other than the barest information to show the problem.

CREATETABLE [X].[X]
(
  [SiteId] varchar(50) NOTNULLCONSTRAINT [PK_X] PRIMARYKEY
  ...
);
GO

Can you see the problem? The table defines [SiteId] as varchar(50) - that is, up to 50 ASCII characters. The stored procedure on the other hand defines the @strSiteId parameter (that is used as a WHERE clause for [SiteId]) as nvarchar(50), i.e. up to 50 Unicode characters. And there we go, implicit conversion from Unicode to ASCII that for some (still unknown at this stage) reason destroyed the performance of this particular database.

After changing the stored procedure (remember I'm on a copy of the production database!) to remove that innocuous looking n, I reran the procedure which completed instantly. And the warning has disappeared from the plan.

A plan for the same procedure after deleting a single character

The error probably originally occurred as a simple oversight - almost all character fields in the database are nvarchar's. Those that are varchar are ones that control definition data that cannot be entered, changed or often even viewed by end users. Anything that the end user can input is always nvarchar due to the global nature of the software in question.

Luckily, it's a simple fix, although potentially easy to miss, especially as you might immediately assume the SQL itself is to blame and try to optimize that.

The take away from this story is simple - ensure that the data types for variables you use in SQL match the data types of the fields to avoid implicit conversions that can cause some very unexpected and unwelcome performance issues - even years after you originally wrote the code.

All content Copyright © by Cyotek Ltd or its respective writers. Permission to reproduce news and web log entries and other RSS feed content in unmodified form without notice is granted provided they are not used to endorse or promote any products or opinions (other than what was expressed by the author) and without taking them out of context. Written permission from the copyright owner must be obtained for everything else.
Original URL of this content is http://www.cyotek.com/blog/sql-woes-mismatched-parameter-types-in-stored-procedures?source=rss

Implementing events more efficiently in .NET applications

$
0
0

One of the things that frequently annoys me about third party controls (including those built into the .NET Framework) are properties that either aren't virtual, or don't have corresponding change events / virtual methods. Quite often I find myself wanting to perform an action when a property is changed, and if neither of those are present I end up having to create a custom version of the property, and as a rule, I don't like using the new keyword unless there is no other alternative.

As a result of this, whenever I add properties to my WinForm controls, I tend to ensure they have a change event, and most often they are also virtual as I have a custom code snippet to build the boilerplate. That can mean some controls have an awful lot of events (for example, the ImageBox control has (at the time of writing) 42 custom events on top of those it inherits, some for actions but the majority for properties). Many of these events will be rarely used.

As an example, here is a typical property and backing event

privatebool _allowUnfocusedMouseWheel;

[Category("Behavior"), DefaultValue(false)]publicvirtualbool AllowUnfocusedMouseWheel
{get { return _allowUnfocusedMouseWheel; }set
  {if (_allowUnfocusedMouseWheel != value)
    {
      _allowUnfocusedMouseWheel = value;this.OnAllowUnfocusedMouseWheelChanged(EventArgs.Empty);
    }
  }
}

[Category("Property Changed")]publicevent EventHandler AllowUnfocusedMouseWheelChanged;protectedvirtualvoid OnAllowUnfocusedMouseWheelChanged(EventArgs e)
{
  EventHandler handler;

  handler = this.AllowUnfocusedMouseWheelChanged;

  handler?.Invoke(this, e);
}

Quite straightforward - a backing field, a property definition, a change event, and a protected virtual method to raise the change event the "safe" way. It's an example of an event that will be rarely used, but you never know and so I continue to follow this pattern.

Despite all the years I've been writing C# code, I never actually thought about how the C# compiler implements events, beyond the fact that I knew it created add and remove methods, in a similar fashion to how a property creates get and set methods.

From browsing the .NET Reference Source in the past, I knew the Control class implemented events slightly differently to above, but I never thought about why. I assumed it was something they had done in .NET 1.0 and never changed with Microsoft's mania for backwards compatibility.

I am currently just under halfway through CLR via C# by Jeffrey Richter. It's a nicely written book, and probably would have been of great help many years ago when I first started using C# (and no doubt as I get through the last third of the book I'm going to find some new goodies). As it is, I've been ploughing through it when I hit the chapter on Events. This chapter started off by describing how events are implemented by the CLR and expanding on what I already knew. It then dropped the slight bombshell that this is quite inefficient as it requires more memory, especially for events that are never used. Given I liberally sprinkle my WinForms controls with events and I have lots of other classes with events, mainly custom observable collections and classes implementing INotifyPropertyChanged (many of those!), it's a safe bet that I'm using a goodly chunk of ram for no good reason. And if I can save some memory "for free" as it were... well, every little helps.

The book then continued with a description of how to explicitly implement an event, which is how the base Control class I mentioned earlier does it, and why the reference source code looked different to typical. While the functionality is therefore clearly built into .NET, he also proposes and demonstrates code for a custom approach which is possibly better than the built in version.

In this article, I'm only going to cover what is built into the .NET Framework. Firstly, because I don't believe in taking someone else's written content, deleting the introductions and copyright information and them passing it off as my own work. And secondly, as I'm going to start using this approach with my myriad libraries of WinForm controls, their base implementations already have this built in, so I just need to bolt my bits on top of it.

How big is my class?

Before I made any changes to my code, I decided I wanted to know how much memory the ImageBox control required. (Not that I doubted Jeffrey, but it doesn't hurt to be cautious, especially given the mountain of work this will entail if I start converting all my existing code). There isn't really a simple way of getting the size of an object, but this post on StackOverflow (where else!) has one method.

unsafe
{
  RuntimeTypeHandle th = typeof(ImageBox).TypeHandle;int size = *(*(int**)&th + 1);

  Console.WriteLine(size);
}

When running this code in the current version of the ImageBox, I get a value of 968. It's a fairly meaningless number, but does give me something to compare. However, as I didn't quite trust it I also profiled the demo program with a memory profiler. After profiling, dotMemory also showed the size of the ImageBox control to be 968 bytes. Lucky me.

Explicitly implementing an event

At the start of the article, I showed a typical compiler generated event. Now I'm going to explicitly implement it. This is done by using a proxy class to store the event delegates. So instead of having delegates automatically created for each event, they will only be created when explicitly binding the event. This is where Jeffrey prefers a custom approach, but I'm going to stick with the class provided by the .NET Framework, the EventHandlerList class.

As the proxy class is essentially a dictionary, we need a key to identify the event. As we're trying to save memory, we create a static object which will be used for all occurrences of this event, no matter how many instances of our component are created.

privatestaticreadonlyobject EventAllowUnfocusedMouseWheelChanged = newobject();

Next, we need to implement the add and remove accessors of the event ourselves

publicevent EventHandler AllowUnfocusedMouseWheelChanged
{
  add
  {this.Events.AddHandler(EventAllowUnfocusedMouseWheelChanged, value);
  }
  remove
  {this.Events.RemoveHandler(EventAllowUnfocusedMouseWheelChanged, value);
  }
}

As you can see, the definition is the same, but now we have created add and remove accessors which call either the AddHandler or RemoveHandler methods of a per-instance EventHandlerList component, using the key we defined earlier, and of course the delegate value to add or remove.

In a WinForm's control, this is automatically provided via the protected Events property. If you're explicitly implementing events in a class which doesn't offer this functionality, you'll need to create and manage an instance of the EventHandlerList class yourself

Finally, when it's time to invoke the method, we need to retrieve the delegate from the EventHandlerList, once again with our event key, and if it isn't null, invoke it as normal.

protectedvirtualvoid OnAllowUnfocusedMouseWheelChanged(EventArgs e)
{
  EventHandler handler;

  handler = (EventHandler)this.Events[EventAllowUnfocusedMouseWheelChanged];

  handler?.Invoke(this, e);
}

There are no generic overloads, so you'll need to cast the returned Delegate into the appropriate EventHandler, EventHandler<T> or custom delegate.

Simple enough, and you can easily have a code snippet do all the grunt work. The pain will come from if you decide to convert existing code.

Does this break anything?

No. You're only changing the implementation, not how other components interact with your events. You won't need to make any code changes to any code that interacts with your updated component, and possibly won't even need to recompile the other code (strong naming and binding issues aside!).

In other words, unless you do something daft like change your the visibility of your event, or accidentally rename it, explicitly implementing a previously implicitly defined event is not a breaking change.

How big is my class, redux

I modified the ImageBox control (you can see the changed version on this branch in GitHub) so that all the events were explicitly implemented. After running the new version of the code through the memory profiler / magic unsafe code, the size of the ImageBox is now 632 bytes, knocking nearly a third of the size off. No magic bullet, and isn't a full picture, but I'll take it!

In all honesty, I don't know if this has really saved memory or not. But I do know I have a plethora of controls with varying numbers of events. And I know Jeffrey's CLR book is widely touted as a rather good tome. And I know this is how Microsoft have implemented events in the base Control classes (possibly elsewhere too, I haven't looked). So with all these "I knows", I also know I'm going to have all new events follow this pattern in future, and I'll be retrofitting existing code when I can.

An all-you-can-eat code snippet

I love code snippets and tend to create them whenever I have boilerplate code to implement repeatedly. In fact, most of my snippets actually are variations of property and event implementations, to handle things like properties with change events, or properties in classes that implement INotifyPropertyChanged and other similar scenarios. I have now retired my venerable basic property-with-event and standalone-event snippets with new versions that do explicit event implementing. As I haven't prepared a demonstration program for this article, I instead present this code snippet for generating properties with backing events - I hope someone finds them as useful as I do.

<?xmlversion="1.0"encoding="utf-8"?><CodeSnippetsxmlns="http://schemas.microsoft.com/VisualStudio/2005/CodeSnippet"><CodeSnippetFormat="1.0.0"><Header><Title>Property with Backing Event</Title><Shortcut>prope</Shortcut><Description>Code snippet for property with backing field and a change event</Description><Author>Richard Moss</Author><SnippetTypes><SnippetType>Expansion</SnippetType></SnippetTypes></Header><Snippet><Declarations><Literal><ID>type</ID><ToolTip>Property type</ToolTip><Default>int</Default></Literal><Literal><ID>name</ID><ToolTip>Property name</ToolTip><Default>MyProperty</Default></Literal><Literal><ID>field</ID><ToolTip>The variable backing this property</ToolTip><Default>myVar</Default></Literal></Declarations><CodeLanguage="csharp"><![CDATA[private $type$ $field$;

    [Category("")]
    [DefaultValue("")]
    public $type$ $name$
    {
      get { return $field$; }
      set
      {
        if ($field$ != value)
        {
          $field$ = value;

          this.On$name$Changed(EventArgs.Empty);
        }
      }
    }

    private static readonly object Event$name$Changed = new object();

    /// <summary>
    /// Occurs when the $name$ property value changes
    /// </summary>
    [Category("Property Changed")]
    public event EventHandler $name$Changed
    {
      add
      {
        this.Events.AddHandler(Event$name$Changed, value);
      }
      remove
      {
        this.Events.RemoveHandler(Event$name$Changed, value);
      }
    }

    /// <summary>
    /// Raises the <see cref="$name$Changed" /> event.
    /// </summary>
    /// <param name="e">The <see cref="EventArgs" /> instance containing the event data.</param>
    protected virtual void On$name$Changed(EventArgs e)
    {
      EventHandler handler;
      handler = (EventHandler)this.Events[Event$name$Changed];
      handler?.Invoke(this, e);
    }

  $end$]]></Code></Snippet></CodeSnippet></CodeSnippets>

All content Copyright © by Cyotek Ltd or its respective writers. Permission to reproduce news and web log entries and other RSS feed content in unmodified form without notice is granted provided they are not used to endorse or promote any products or opinions (other than what was expressed by the author) and without taking them out of context. Written permission from the copyright owner must be obtained for everything else.
Original URL of this content is http://www.cyotek.com/blog/implementing-events-more-efficiently-in-net-applications?source=rss

Adding keyboard accelerators and visual cues to a WinForms control

$
0
0

Some weeks ago I was trying to make parts of WebCopy's UI a little bit simpler via the expedient of hiding some of the more advanced (and consequently less used) options. And to do this, I created a basic toggle panel control. This worked rather nicely, and while I was writing it I also thought I'd write a short article on adding keyboard support to WinForm controls - controls that are mouse only are a particular annoyance of mine.

A demonstration control

Below is an fairly simple (but functional) button control that works - as long as you're a mouse user. The rest of the article will discuss how to extend the control to more thoroughly support keyboard users, and you what I describe below in your own controls.

A button control that currently only supports the mouse

internalsealedclass Button : Control, IButtonControl
{#region Constantsprivateconst TextFormatFlags _defaultFlags = TextFormatFlags.NoPadding | TextFormatFlags.SingleLine | TextFormatFlags.HorizontalCenter | TextFormatFlags.VerticalCenter | TextFormatFlags.EndEllipsis;#endregion#region Fieldsprivatebool _isDefault;private ButtonState _state;#endregion#region Constructorspublic Button()
  {this.SetStyle(ControlStyles.AllPaintingInWmPaint | ControlStyles.OptimizedDoubleBuffer | ControlStyles.ResizeRedraw, true);this.SetStyle(ControlStyles.StandardDoubleClick, false);
    _state = ButtonState.Normal;
  }#endregion#region Events

  [Browsable(false)]
  [DesignerSerializationVisibility(DesignerSerializationVisibility.Hidden)]publicnewevent EventHandler DoubleClick
  {
    add { base.DoubleClick += value; }
    remove { base.DoubleClick -= value; }
  }

  [Browsable(false)]
  [DesignerSerializationVisibility(DesignerSerializationVisibility.Hidden)]publicnewevent MouseEventHandler MouseDoubleClick
  {
    add { base.MouseDoubleClick += value; }
    remove { base.MouseDoubleClick -= value; }
  }#endregion#region Methodsprotectedoverridevoid OnBackColorChanged(EventArgs e)
  {base.OnBackColorChanged(e);this.Invalidate();
  }protectedoverridevoid OnEnabledChanged(EventArgs e)
  {base.OnEnabledChanged(e);this.SetState(this.Enabled ? ButtonState.Normal : ButtonState.Inactive);
  }protectedoverridevoid OnFontChanged(EventArgs e)
  {base.OnFontChanged(e);this.Invalidate();
  }protectedoverridevoid OnForeColorChanged(EventArgs e)
  {base.OnForeColorChanged(e);this.Invalidate();
  }protectedoverridevoid OnMouseDown(MouseEventArgs e)
  {base.OnMouseDown(e);this.SetState(ButtonState.Pushed);
  }protectedoverridevoid OnMouseUp(MouseEventArgs e)
  {base.OnMouseUp(e);this.SetState(ButtonState.Normal);
  }protectedoverridevoid OnPaint(PaintEventArgs e)
  {
    Graphics g;base.OnPaint(e);

    g = e.Graphics;

    this.PaintButton(g);this.PaintText(g);
  }protectedoverridevoid OnTextChanged(EventArgs e)
  {base.OnTextChanged(e);this.Invalidate();
  }privatevoid PaintButton(Graphics g)
  {
    Rectangle bounds;

    bounds = this.ClientRectangle;if (_isDefault)
    {
      g.DrawRectangle(SystemPens.WindowFrame, bounds.X, bounds.Y, bounds.Width - 1, bounds.Height - 1);
      bounds.Inflate(-1, -1);
    }

    ControlPaint.DrawButton(g, bounds, _state);
  }

  privatevoid PaintText(Graphics g)
  {
    Color textColor;
    Rectangle textBounds;
    Size size;

    size = this.ClientSize;
    textColor = this.Enabled ? this.ForeColor : SystemColors.GrayText;
    textBounds = new Rectangle(3, 3, size.Width - 6, size.Height - 6);if (_state == ButtonState.Pushed)
    {
      textBounds.X++;
      textBounds.Y++;
    }

    TextRenderer.DrawText(g, this.Text, this.Font, textBounds, textColor, _defaultFlags);
  }privatevoid SetState(ButtonState state)
  {
    _state = state;this.Invalidate();
  }#endregion#region IButtonControl Interfacepublicvoid NotifyDefault(bool value)
  {
    _isDefault = value;this.Invalidate();
  }publicvoid PerformClick()
  {this.OnClick(EventArgs.Empty);
  }

  [Category("Behavior")]
  [DefaultValue(typeof(DialogResult), "None")]public DialogResult DialogResult { get; set; }#endregion
}

About mnemonic characters

I'm fairly sure most developers would know about mnemonic characters / keyboard accelerators, but I'll quickly outline regardless. When attached to a UI element, the mnemonic character tells users what key (usually combined with Alt) to press in order to activate it. Windows shows the mnemonic character with an underline, and this is known as a keyboard cue.

For example, File would mean press Alt+F.

Specifying the keyboard accelerator

In Windows programming, you generally use the & character to denote the mnemonic in a string. So for example, &Demo means the d character is the mnemonic. If you actually wanted to display the & character, then you'd just double them up, e.g. Hello && Goodbye.

While the underlying Win32 API uses the & character, and most other platforms such as classic Visual Basic or Windows Forms do the same, WPF uses the _ character instead. Which pretty much sums up all of my knowledge of WPF in that one little fact.

Painting keyboard cues

If you useTextRenderer.DrawText to render text in your controls (which produces better output than Graphics.DrawString) then by default it will render keyboard cues.

Older versions of Windows used to always render these cues. However, at some point (with Window 2000 if I remember correctly) Microsoft changed the rules so that applications would only render cues after the user had first pressed the Alt character. In practice, this means you need to check to see if cues should be rendered and act accordingly. There used to be an option to specify if they should always be shown or not, but that seems to have disappeared with the march towards dumbing the OS down to mobile-esque levels.

The first order of business then is to update our PaintText method to include or exclude keyboard cues as necessary.

privateconst TextFormatFlags _defaultFlags = TextFormatFlags.NoPadding | TextFormatFlags.SingleLine | TextFormatFlags.HorizontalCenter | TextFormatFlags.VerticalCenter | TextFormatFlags.EndEllipsis;privatevoid PaintText(Graphics g)
{// .. snip ..
  TextRenderer.DrawText(g, this.Text, this.Font, textBounds, textColor, _defaultFlags);
}

TextRenderer.DrawText is a managed wrapper around the DrawTextEx Win32 API, and most of the members of TextFormatFlags map to various DT_* constants. (Except for NoPadding... I really don't know why TextRenderer adds left and right padding by default but it's really annoying - I always set NoPadding (when I'm not directly calling GDI via p/invoke)

As I noted the default behaviour is to draw the cues, so we need to detect when cues should not be displayed and instruct our paint code to skip them. To determine whether or not to display keyboard cues, we can check the ShowKeyboardCues property of the Control class. To stop DrawText from painting the underline, we use the TextFormatFlags.HidePrefix flag (DT_HIDEPREFIX).

So we can update our PaintText method accordingly

privatevoid PaintText(Graphics g)
{
  TextFormatFlags flags;// .. snip ..

  flags = _defaultFlags;
  
  if (!this.ShowKeyboardCues)
  {
    flags |= TextFormatFlags.HidePrefix;
  }
  TextRenderer.DrawText(g, this.Text, this.Font, textBounds, textColor, flags);
}

Now our button will now hide and show accelerators based on how the end user is working.

If for some reason you want to use Graphics.DrawString, then you can use something similar to the below - just set the HotkeyPrefix property of a StringFormat object to be HotkeyPrefix.Show or HotkeyPrefix.Hide. Note that the default StringFormat object doesn't show prefixes, in a nice contradiction to TextRenderer.

using (StringFormat format = new StringFormat(StringFormat.GenericDefault)
{
  HotkeyPrefix = HotkeyPrefix.Show,
  Alignment = StringAlignment.Center,
  LineAlignment =StringAlignment.Center,
  Trimming = StringTrimming.EllipsisCharacter
})
{
  g.DrawString(this.Text, this.Font, SystemBrushes.ControlText, this.ClientRectangle, format);
}

The button control now reacts to keyboard cues

As the above animation is just a GIF file, there's no audio - but when I ran that demo, pressing Alt+D triggered a beep sound as there was nothing on the form that could handle the accelerator.

Painting focus cues

Focus cues are highlights that show which element has the keyboard focus. Traditionally Windows would draw a dotted outline around the text of an element that performs a single action (such as a button or checkbox), or draws an item using both a different background and foreground colours for an element that has multiple items (such as a listbox or a menu). Normally (for single action controls at least) focus cues only appear after the Tab key has been pressed, memory fails me as to whether this has always been the case or if Windows use to always show a focus cue.

You can use the Focused property of a Control to determine if it currently has keyboard focus and the ShowFocusCues property to see if the focus state should be rendered.

After that, the simplest way of drawing a focus rectangle would be to use the ControlPaint.DrawFocusRectangle. However, this draws using fixed colours. Old-school focus rectangles inverted the pixels by drawing with a dotted XOR pen, meaning you could erase the focus rectangle by simply drawing it again - this was great for rubber banding (or dancing ants if you prefer). If you want that type of effect then you can use the DrawFocusRect Win32 API.

privatevoid PaintButton(Graphics g)
{// .. snip ..if (this.ShowFocusCues && this.Focused)
  {
    bounds.Inflate(-3, -3);

    ControlPaint.DrawFocusRectangle(g, bounds);
  }
}

The button control showing focus cues as focus is cycled with the tab key

Notice in the demo above how focus cues and keyboard cues are independent from each other.

So, about those accelerators

Now that we've covered painting our control to show focus / keyboard cues as appropriate, it's time to actually handle accelerators. Once again, the Control class has everything we need built right into it.

To start with, we override the ProcessMnemonic method. This method is automatically called by .NET when a user presses an Alt key combination and it is up to your component to determine if it should process it or not. If the component can't handle the accelerator, then it should return false. If it can, then it should perform the action and return true. The method includes a char argument that contains the accelerator key (e.g. just the character code, not the alt modifier).

So how do you know if your component can handle it? Luckily the Control class offers a static IsMnemonic method that takes a char and a string as arguments. It will return true if the source string contains a mnemonic matching the passed character. Note that it expects the & character is used to identify the mnemonic. I assume WPF has a matching version of this method, but I don't know where.

We can now implement the accelerator handling quite simply using the following snippet

protectedoverridebool ProcessMnemonic(char charCode)
{bool processed;

  processed = this.CanFocus && IsMnemonic(charCode, this.Text);if (processed)
  {this.Focus();this.PerformClick();
  }return processed;
}

We check to make sure the control can be focused in addition to checking if our control has a match for the incoming mnemonic, and if both are true then we set focus to the control and raise the Click event. If you don't need (or want) to set focus to the control, then you can skip the CanFocus check and Focus call.

In this final demonstration, we see pressing Alt+D triggering the Click event of the button. Mission accomplished!

Bonus Points: Other Keys

Some controls accept other keyboard conventions. For example, a button accepts the Enter or Space keys to click the button (the former acting as an accelerator, the latter acting as though the mouse were being pressed and released), combo boxes accept F4 to display drop downs and so on. If your control mimics any standard controls, it's always worthwhile adding support for these conventions too. And don't forget about focus!

For example, in the sample button, I modify OnMouseDown to set focus to the control if it isn't already set

protectedoverridevoid OnMouseDown(MouseEventArgs e)
{base.OnMouseDown(e);if (this.CanFocus)
  {this.Focus();
  }this.SetState(ButtonState.Pushed);
}

I also add overrides for OnKeyDown and OnKeyUp to mimic the button being pushed and then released when the user presses and releases the space bar

protectedoverridevoid OnKeyDown(KeyEventArgs e)
{base.OnKeyDown(e);if(e.KeyCode == Keys.Space && e.Modifiers == Keys.None)
  {this.SetState(ButtonState.Pushed);
  }
}protectedoverridevoid OnKeyUp(KeyEventArgs e)
{base.OnKeyUp(e);if((e.KeyCode & Keys.Space) == Keys.Space)
  {this.SetState(ButtonState.Normal);this.PerformClick();
  }
}

However, I'm not adding anything to handle the enter key. This is because I don't need to - in this example, the Button control implements the IButtonControl interface and so it's handled for me without any special actions. For non-button controls, I would need to explicitly handle enter key presses if appropriate.

Downloads

All content Copyright © by Cyotek Ltd or its respective writers. Permission to reproduce news and web log entries and other RSS feed content in unmodified form without notice is granted provided they are not used to endorse or promote any products or opinions (other than what was expressed by the author) and without taking them out of context. Written permission from the copyright owner must be obtained for everything else.
Original URL of this content is http://www.cyotek.com/blog/adding-keyboard-accelerators-and-visual-cues-to-a-winforms-control?source=rss

Creating and restoring bacpac files without using a GUI

$
0
0

Almost all databases I use are SQL Server databases. They are created with hand written SQL scripts and upgraded with hand written SQL scripts - it is very rare I'll use SQL Server Management Studio's (SSMS) designers to work with database objects. When backing up or restoring databases, I have various SQL scripts to do this, which works fine when SQL Server has access to your file system, or you theirs.

This isn't always the case. Last year I replaced our woefully inadequate error logging system with something slightly more robust and modern, and this system is hosted on Microsoft's Azure platform using SaaS. No direct file access there!

Rather than using traditional database backups, for Azure hosted databases you need to use Data-tier Applications. While these do serve more advanced purposes than traditional backups, in my scenario I am simply treating them as a means of getting a database from A to B.

SSMS allows you to work with these files, but only via GUI commands - there's no SQL statements equivalent to BACKUP DATABASE or RESTORE DATABASE, which is a royal pain. Although I have my Azure database backed up to blog storage once a week, I want to make my own backups more frequently, and be able to restore these locally for development work and performance profiling. Doing this using SQL Server's GUI tools is not conductive to an easy workflow.

A CLI for working with BACPAC files

Fortunately, as I work with Visual Studio I have the SQL Server Data Tools (SSDT) installed, which includes SqlPackage.exe, a magical tool that will let me import and export BACPAC files locally and remotely.

Less fortunately, it isn't part of the path and so we can't just merrily type sqlpackage into a command window the same way you can type sqlcmd and expect it to work; it won't. And it doesn't seem to have a convenient version-independent way of grabbing it from the registry either. On my machine it is located at C:\Program Files (x86)\Microsoft SQL Server\120\DAC\bin, but this may change based on what version of the tools you have installed.

Creating a BACPAC file from an existing database

To export a database into a BACPAC file, you can run the following command. Note that this works for databases on a local/remote SQL Server instance or Azure SQL Database.

sqlpackage.exe /a:Export/ssn:<ServerName>/sdn:<DatabaseName>/su:<UserName>/sp:<Password>/tf:<ExportFileName>

Listed below are the arguments we're using. In my example above, I'm using the short form, you can use either long or short forms to suit your needs.

  • /Action (a) - the action to perform, in this case Export
  • /SourceServerName (ssn) - the source server name. Can be either the URI of an Azure database server, or the more traditional ServerName\InstanceName
  • /SourceDatabaseName (sdn) - the name of the database to export
  • /SourceUser (su) - the login user name
  • /SourcePassword (sp) - the login password

For trusted connections, you can skip the su and sp arguments.

Exporting an Azure SQL Database to a data-tier application file via the command line

The screenshot above shows typical output.

Restoring a database from a BACPAC file

Restoring a database is just as easy, just use an action of Import instead of export, and invert source and target in arguments.

sqlpackage.exe /a:Import/tsn:<ServerName>/tdn:<DatabaseName>/tu:<UserName>/tp:<Password>/sf:<ExportFileName>

There are a couple of caveats however - if the target database already exists and contains objects such as tables or views, then the import will fail. The database must either not exist, or be completely empty.

Sadly, despite the fact that you have separate source and target arguments, it doesn't appear to be possible to do a direct copy from the source server to the target server.

Importing a data-tier application into a local SQL Server instance from a BACPAC file via the command line

An automated batch script for restoring a database

The following batch file is a simple script I use to restore the newest available bacpac file in a given directory. The script also deletes any existing local database using sqlcmd prior to importing the database via sqlpackage, resolving a problem where non-empty SQL databases can't be restored using the package tool.

It's a very simple script, and not overly robust but it does the job I need it to do. I still tend to use batch files over PowerShell for simple tasks, no complications about loaded modules, slow startup, just swift execution without fuss.

@ECHO OFFSETLOCALREM This is the directory where the SQL data tools are installedSET SQLPCKDIR=C:\Program Files (x86)\Microsoft SQL Server\120\DAC\bin\SET SQLPCK="%SQLPCKDIR%SqlPackage.exe"REM The directory where the bacpac files are storedSET DBDIR=D:\Backups\azuredbbackups\REM The name of the database to importSET DBNAME=MyDatabaseREM The SQL Server name / instanceSET SERVERNAME=.REM SQL statement to delete the import database as SQLPACKAGE won't import to an existing databaseSET DROPDATABASESQL=IF EXISTS (SELECT * FROM [sys].[databases] WHERE [name] = '%DBNAME%') DROP DATABASE [%DBNAME%];REM Try and find the newest BACPAC file
FOR /F "tokens=*"%%a IN ('DIR %DBDIR%*.bacpac /B /OD /A-D') DO SET PACNAME=%%aIF"%PACNAME%"==""GOTO :bacpacnotfoundSET DBFILE=%DBDIR%%PACNAME%

SQLCMD -S %SERVERNAME% -E -Q "%DROPDATABASESQL%" -bIF%errorlevel% NEQ 0 GOTO :error%SQLPCK% /a:Import /sf:%DBFILE% /tdn:%DBNAME% /tsn:%SERVERNAME%IF%errorlevel% NEQ 0 GOTO :errorGOTO :done

:bacpacnotfound
ECHO No bacpac file found to import. EXIT /B 1

:error
ECHO Failed to import bacpac file.EXIT /B 1

:done
ENDLOCAL

All content Copyright © by Cyotek Ltd or its respective writers. Permission to reproduce news and web log entries and other RSS feed content in unmodified form without notice is granted provided they are not used to endorse or promote any products or opinions (other than what was expressed by the author) and without taking them out of context. Written permission from the copyright owner must be obtained for everything else.
Original URL of this content is http://www.cyotek.com/blog/creating-and-restoring-bacpac-files-without-using-a-gui?source=rss

Retrieving font and text metrics using C#

$
0
0

In several of my applications, I need to be able to line up text, be it blocks of text using different fonts, or text containers of differing heights. As far as I'm aware, there isn't a way of doing this natively in .NET, however with a little platform invoke we can get the information we need to do it ourselves.

Obtaining metrics using GetTextMetrics

The GetTextMetrics metrics function is used to obtain metrics based on a font and a device context by populating a TEXTMETRICW structure.

[DllImport("gdi32.dll", CharSet = CharSet.Auto)]publicstaticexternbool GetTextMetrics(IntPtr hdc, out TEXTMETRICW lptm);

[StructLayout(LayoutKind.Sequential, CharSet = CharSet.Unicode)]
publicstruct TEXTMETRICW
{publicint tmHeight;publicint tmAscent;publicint tmDescent;publicint tmInternalLeading;publicint tmExternalLeading;publicint tmAveCharWidth;publicint tmMaxCharWidth;publicint tmWeight;publicint tmOverhang;publicint tmDigitizedAspectX;publicint tmDigitizedAspectY;publicushort tmFirstChar;publicushort tmLastChar;publicushort tmDefaultChar;publicushort tmBreakChar;publicbyte tmItalic;publicbyte tmUnderlined;publicbyte tmStruckOut;publicbyte tmPitchAndFamily;publicbyte tmCharSet;
}

Although there's a lot of information available (as you can see in the demonstration program), for the most part I tend to use just the tmAscent value which returns the pixels above the base line of characters.

A quick note on leaks

I don't know how relevant clean up is in modern versions of Windows, but in older versions of Windows it used to be very important to clean up behind you. If you get a handle to something, release it when you're done. If you create a GDI object, delete it when you're done. If you select GDI objects into a DC, store and restore the original objects when you're done. Not doing these actions used to be a good source of leaks. I don't use GDI anywhere near as much as I used to years ago as a VB6 developer, but I assume the principles still apply even in the latest versions of Windows

Calling GetTextMetrics

As GetTextMetrics is a Win32 GDI API call, it requires a device context, which is basically a bunch of graphical objects such as pens, brushes - and fonts. Generally you would use the GetDC or CreateDC API calls, but fortunately the .NET Graphics object is essentially a wrapper around a device context, so we can use this.

A DC can only have one object of a specific type activate at a time. For example, in order to draw a line, you need to tell the DC the handle of the pen to draw with. When you do this, Windows will tell you the handle of the pen that was originally in the DC. After you have finished drawing your line, it is up to you to both restore the state of the DC, and to destroy your pen. The GDI calls SelectObject and DeleteObject can do this.

[DllImport("gdi32.dll", CharSet = CharSet.Auto, SetLastError = true)]publicstaticexternbool DeleteObject(IntPtr hObject);

[DllImport("gdi32.dll", CharSet = CharSet.Auto)]publicstaticextern IntPtr SelectObject(IntPtr hdc, IntPtr hgdiObj);

The following helper functions can be used to get the font ascent, either for the specified Control or for a IDeviceContext and Font combination.

I haven't tested the performance of using Control.CreateGraphics versus directly creating a DC. If you are calling this functionality a lot it may be worth caching the values or avoiding CreateGraphics and trying pure Win32 API calls.

privateint GetFontAscent(Control control)
{using (Graphics graphics = control.CreateGraphics())
  {returnthis.GetFontAscent(graphics, control.Font);
  }
}privateint GetFontAscent(IDeviceContext dc, Font font)
{int result;
  IntPtr hDC;
  IntPtr hFont;
  IntPtr hFontDefault;

  hDC = IntPtr.Zero;
  hFont = IntPtr.Zero;
  hFontDefault = IntPtr.Zero;

  try
  {
    NativeMethods.TEXTMETRICW textMetric;

    hDC = dc.GetHdc();

    hFont = font.ToHfont();
    hFontDefault = NativeMethods.SelectObject(hDC, hFont);

    NativeMethods.GetTextMetrics(hDC, out textMetric);

    result = textMetric.tmAscent;
  }
  finally
  {if (hFontDefault != IntPtr.Zero)
    {
      NativeMethods.SelectObject(hDC, hFontDefault);
    }if (hFont != IntPtr.Zero)
    {
      NativeMethods.DeleteObject(hFont);
    }

    dc.ReleaseHdc();
  }

  return result;
}

In the above code you can see how we first get the handle of the underlying device context by calling GetDC. This essentially locks the device context, as in the same way that only a single GDI object of each type can be associated with a GDI, only one thread can use the DC at a time. (It's little more complicated than that, but this will suffice for this post).

Next, we convert the managed .NET Font into an unmanaged HFONT.

You are responsible for deleting the handle returned by Font.ToHfont

Once we have our font handle, we set that to be the current font of the device context using SelectObject, which returns the existing font handle - we store this for later.

Now we can call GetTextMetrics passing in the handle of the DC, and a TEXTMETRIC instance to populate. Note that the GetTextMetrics call could fail, and if so the function call will return false. In this demonstration code, I'm not checking for success or failure and assuming the call will always succeed.

Once we've called GetTextMetrics, it's time to reverse some of the steps we did earlier.

Note the use of a finally block, so even if a crash occurs during processing, our clean up operations will still get called

First we restore the original font handle that we obtained from the first call to SelectObject.

Now it's safe to delete our HFONT - so we do that with DeleteObject.

It's important to do these steps in order - deleting the handle to a GDI object that is currently associated with a device context isn't a great idea!

Finally, we release the DC handle we created earlier via ReleaseDC.

And that's pretty much all there is to it - we've got our font ascent, cleaned up everything behind us and can now get on with the whatever purpose we needed that value for!

What about the other information?

The example code above focuses on the tmAscent value as this is mostly what I use. However, you could adapt the function to return the TEXTMETRICW structure directly, or to populate a more .NET friendly object using .NET naming conventions and converting things like tmPitchAndFamily to friendly enums etc.

Downloads

All content Copyright © by Cyotek Ltd or its respective writers. Permission to reproduce news and web log entries and other RSS feed content in unmodified form without notice is granted provided they are not used to endorse or promote any products or opinions (other than what was expressed by the author) and without taking them out of context. Written permission from the copyright owner must be obtained for everything else.
Original URL of this content is http://www.cyotek.com/blog/retrieving-font-and-text-metrics-using-csharp?source=rss

Viewing all 559 articles
Browse latest View live